How to Add Memorabilia to your Digital Vacation Albums
Darcy shares how to incorporate memorabilia to your digi albums
You’ve been saving everything from your trip from the cute little bottle caps of the funky cola you got at that hip little joint in the Quarter you were staying, or the map of Disney, or the $5.00 plastic animal you had created in the vending machine at the Zoo, or the piles of money you collected from your trip across Europe, or the piles of brochures that you used to prepare yourself for the ultimate honeymoon getaway. Now what do you do with all that stuff? You’re a digital scrapper. While your layouts look amazing and realistic, they are flat, and it’s hard to put a 3D object onto a flat page, much less store in a flat album.
Image courtesy of Sara Schiller
What options do you have to store or scrap your souveniers and collectibles from your vacation if you are a digital scrapbook artist?
Memorabilia (or ephemera) is the collection of stuff that represents our lives. It’s little ticket stubs from a movie we loved or the feather from a peacock, or the milk bottle cap or a typewriter key. It’s cool stuff that gives a great look to a layout to give it character beyond just the story of your page. Think of all those souveniers you brought home from vacation, all the piles of papers and seashells and how they can add character to the story of your vacation. Let’s see how we can take that ephemera and add it to your layout – digitally!
Ways to Incorporate Memorabilia into Your Digital Vacation Album
Take a photo.
Who says that all of your 3D objects need to be saved forever? Take a great photo of the object, record the story, and you have it for life! If you can, use as much natural lighting as possible.
Scan it
Things like brochures and maps can make awesome papers for your layouts. So scan them, and use them as your background or accent papers for your vacation layouts. Smaller objects can be scanned easily as well. It will keep the memory of the places you stayed without cluttering up your junk drawer. Be sure to use a neutral background for any paper object that you’re using (you can cover it with a cloth, or close your scanner). You’ll want to make sure the glass has been cleaned, too. If your item is a little bulkier than the scanner cover can accommodate, but you don’t want to go take a photo outside, use a shoebox top or smaller box to cover the item, instead. A great hint with those is to spray paint them black on the inside to give yourself that neutral background. You can then just extract any object from the background or crop the paper item to any shape that you need.
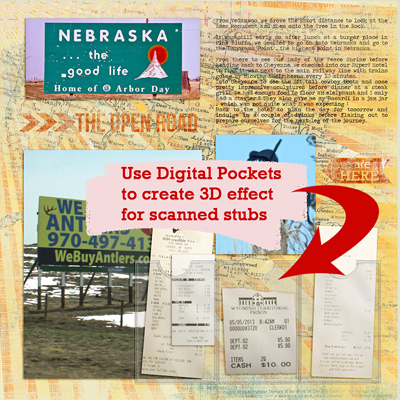
Here’s a look at how one of our members, Rachel, used a layout and Traci Reed’s Slip-Ins to create a pocket-effect for her layout.
You can get those Slip-ins for free on Traci’s site by joining her newsletter!
Decopauge
If you print of pages to insert into a physical album, there are great albums on the market where you can actually decopauge your ticket stubs, scraps of maps, brochures, photos and journaling bits onto the album covers or fly pages.
Create a Pocket
If you have digital ring-bound or post-bound albums, you can actually create a treasure pocket! Use an extra page protector, or even a decorated envelope at the back to tuck away flat or small 3D objects. If stored upright and not crammed into a bookshelf, these objects cause little imprintation on your pages.
Use a Panoramic Pocket
These fold out pocket inserts come in 12×12 or 6×6 size and insert into your album like a regular page. You can then put brochures in them that will fold up. You will have to cut your brochure or map to size, but it will fit into a space that is protected and opens easily for viewing. If you have a great way of including your memorabilia into your scrapbook pages, leave a comment with your idea!
Go Hybrid!
While we’ve been talking about creating 100% digital pages, there’s nothing that says you can’t create a digital page and then add a little 3D accenting to it after the fact!
Tuck It Away
One of the easiest options, especially if you store your pages in page protectors, is to tuck away your memorabilia between the pages in an insert. That way you have them for reference, forever, but not necessarily visible on your page.
If all else fails, just create a little box full of your 3D vacation memories. It can be as much fun to go through to figure out why you kept it as going through your favorite album!
