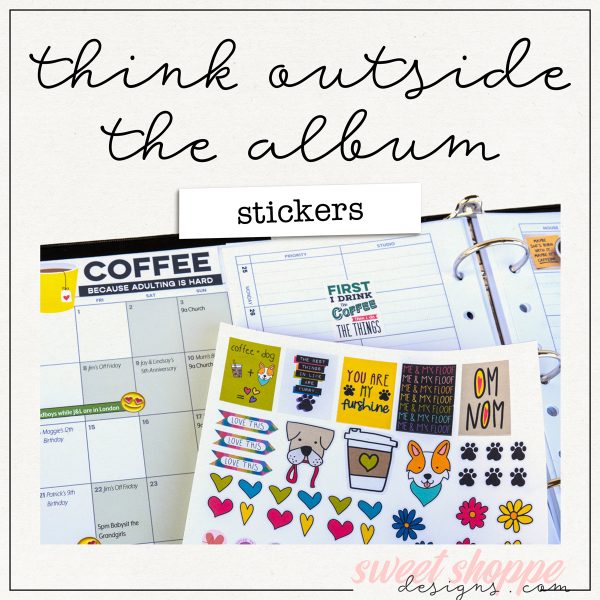
Sweet Shoppe Designs

Archive for the ‘Hybrid’ Category

Our Favorite Fonts for Silhouette Cutting

Heather shares some of the staff’s favorite fonts for Silhouette cutting machines

Hello scrappers… Heather here to share some of our favorite fonts for cutting with a our Silhouette cutting machines. One of my favorite features of a Silhouette over any other cutting machine is the fact that you can use any font you have installed to cut out titles and such. I’ve used some to make vinyl cuts for wall art around the house and my “no soliciting” sign on my front door. I LOVE how easy it is to just type up your words, and send to cut. So, I’ve asked Mari and Maria to share some of their favorite fonts and I’ve compiled a list of free fonts that we love to cut with our machine.

Print fonts:

1. AW Conqueror, 2. Bebas, 3. Blackout, 4. Boston Traffic, 5. Chunk Five, 6. DJB Play Misty For Me, 7. Droid Serif, 8. Oliver, 9. Stencil Std, 10. Ultra

Maria had some fun using AW Conqueror for her Project Life spread, I’m in LOVE with that ampersand card and how she used the swashes and welded them together to make word art…


One of my favorite things about script fonts is that you can “weld” the letters together to make a whole word instead of having the separate letters to tape down…There are tons of really great script fonts out there, so I tried to pick ones that didn’t have to do a lot of manipulating in order to weld them. Don’t worry, I’ve got a tutorial coming this week that will walk you through welding and cutting script fonts, if you have not idea what I’m talking about, be sure to check it out on Thursday. Here is a list of our favorite free script fonts…

Script fonts:

1. Cookie, 2. Cursive, 3. Deftone, 4. Grand Hotel, 5. Japan, 6. Lobster Two, 7. Pacifico, 8. Marketing Script, 9. Sofia, 10. Unicorn NF

This layout uses Marketing Script, for most of the words I didn’t need to do any adjusting to get them to weld perfectly… there were only a couple letters I needed to squeeze in a bit so they touched and I could weld them together.

There are a couple fun dingbat fonts that are fun for cutting too…

I haven’t personally used any dingbat fonts but in my search for fonts, I found some that I thought might be fun to use and I hope to use in the near future…

There are also some great fonts by Darcy that are perfect for cutting too… I might be a tad bit biased but I think all her fonts would be awesome for cutting, but these are the ones I thought really stood out as good titling cutting fonts…

Fonts in the Shoppe:

Belly Button Innie
Emphatic
Starry Starry
This Font Is Bold
Fizza Wizza Wowza
Fancy Nancy
Dear Mrs Claus
Downstairs at the Abbey
Holly Jolly B’Golly
Uncertain Tense 

Here is a layout using Darcy’s This Font is Bold…

Here is an awesome layout by Mari using both Bebas and Pacifico fonts for her title work, I love how she cut it out of her background paper and then put paper behind it like a stencil:

Turning Junk into Treasures!

Rebecca highlights great ideas for turning common household items into exciting hybrid projects

Hello, my sweet friends!

This whole month we have been talking about organizing, and it has maybe even spilled into your daily lives in the form of spring cleaning! So, as you are going through those cupboards and closets and running across things that you are thinking of throwing away . . . you should stop and think, can I breath new life into this item? How can I upcycle this item into something fabulous with my digi supplies and a bit of creativity?

I really love taking an item that I may throw out and thinking about what else I could make out of it. I have boxes of containers and paper cores in my basement just waiting for inspiration to hit! One of my favorite items I’ve made was the upcycle coffee sleeve album. I even wrote a little tutorial on it: UpCycle Coffee Sleeve Album.

Searching through our very own Sweet Shoppe Hybrid Galleries, I’ve been spotting some exciting projects that our members have done using common household items or those containers that would have found themselves recycled. They’ve made some pretty darn cool things!

Kitchen Items

NatalieKW created this cool Advent calender out of a muffin tin!

And HeyJude, took a spare frame and clothespins and created another cool take on an Advent Calendar!

Sigmakap95 took a cookie pan and created a calendar. That is pretty smart!

Boxes and Containers

Scrappycath took a plain tin box and turned made it fabulous!

AmberK took an empty Crystal Light container to store ideas for stopping the cries of the bored.

Sigmakap95 dressed up a lidded jar so her family could collect ideas for what they would like for dinner.

knlchevys created this cool game by dressing up some basic cardboard tubes.

knlchevys also took some more cardboard tubes and made them in play binoculars.

livelys made a cute mini first aid kit out of a mint tin. Personally, this is one of my favorite items to make to turn trash into treasure!

Office Supplies

HeyJude came up with a cool use for those common everyday binder clips that are just sliding around the office junk drawer.

Joana1n turned a tray into a nifty magnetic board.

I (mamabee) took some old CD-ROMs that my hubby had and was going to throw away and used them as backing for a mini album!

Other Items

Nicolesnead made this cool lab coat for her toddler from a t-shirt.

Wildblueeyez took a plain candle and turned it into a beautiful gift!

I (mamabee) took a gift card holder and turned it into a little magnetic paper doll set for my friend’s daughter.

These are just scraping the surface of the ideas of what you can do to common items around the house. Before you throw out that tin can, berry container, or toilet paper roll, pause and think about what you could make that into!

I would love to see your favorite trash to treasure items you have made with your digi supplies. Link them up so I can share the love!

{{Hugs}}

Rebecca aka mamabee

Love . . . Hybrid Edition!

Look no further than this post by Rebecca for some amazing hybrid inspiration–perfect for everyone you love

Awww . . . In just a few short weeks it will be THAT day . . . the day that my hubby calls a Hallmark Holiday. It’s a day of love . . . it’s Valentine’s Day! It is one of my favorite holidays for which to create hybrid items. There are so many aspects of this holiday for which we can craft . . . from valentines for our kiddo’s classes, to home decor for the holiday, to little books and cards for our family and friends. I have searched our own galleries here at Sweet Shoppe Designs to bring you a TON of ideas!! Let’s get started!

Kiddo’s Valentines

Many of us with school children are thinking about what to do this year for their valentines. Do we go to the store and get pre-made valentines, or do we do something original and out of the box? And, what special valentine are we going to give our kiddo?

  1. Valentine Holder by MamaBee
  2. Isaac’s Valentine Coupons by HeatherGW
  3. I Chews You by Sigmakap95
  4. Love Monkey Valentine Goodies by livelys
  5. Tweetheart Mailbox by Inskidahv
  6. Sweets for the Sweets by Joana1
Packaged Gifts for Teachers and Others
Then there are those packages of chocolates, cookies, and other little tokens that we give to teachers and others. How are you going to package them?
  1. Made with Love Treat Pocket by LadyB
  2. Pretty Gift Bag by Livelys
  3. Making Cupcake Gift by MamaBee
  4. Smitten Mini Milk Carton by JuliFish
  5. Desk for Daddy by MamaBee
  6. Takeout Box by Joana1
Fun Gifts and Games
Then there are those that we want to have a bit more fun with. Do we just get them flowers or something more from the heart?
  1. Valentine Bingo by kscwgirl
  2. Test Tube Candies by Joana1
  3. Spin the Bottle by MamaBee
  4. Love Letters by Jacinda
  5. Candy Box by MamaBee
  6. Be Mine Heart Basket by JuliFish
Cards
And, for those to whom you just want to say “I love you” via mail . . . should you spend up to $6 on a card or make something yourself?
  1. Be Mine by JenTapler
  2. Frog Card by Ladyb
  3. PS I love You by Andrea Gourley
  4. Valentine Card by Joana1
  5. I love you Card by HeatherGW
  6. I love you more than Chocolate by livelys
Home Decor
 The house looks empty with all the holiday decor down. What can I do to give it a bit of festive flair?
  1. Marriage Gift, part 2 by Adrianka
  2. Candle Holder Mosaic by Woofpurrpurr
  3. Shadowbox Flowers by Tettletop20
  4. Mini Banner by MamaBee
  5. Love wall art by MummytoThree
  6. Countdown to Valentine’s Day  by MamaBee
Store Items

However, I hear a few of you telling me that you just don’t have the time to create something, or you are all thumbs when it comes to scissors and glue. Well, Sweet Shoppe Designs has a number of fabulous printables and craft projects that are so easy to print and put together!

  1. 10 Things I Love About You Mini PhotoBook by Nettio Designs
  2. DIY Printable Template: Heart Bag by Heather Roselli
  3. DIY Printable Template: Heart Box by Heather Roselli
  4. DIY Printable Template: Heart Pouch by Heather Roselli
  5. DIY Printable Template: Mailbox Cover by Heather Roselli
  6. DIY Printable: Folded Heart by Heather Roselli
  7. DIY Printable: LOVE Album by Heather Roselli
  8. DIY Printable: Mailbox by Heather Roselli
  9. Eww! Valentines by Shawna Clingerman
  10. Heartbreaker Valentines by Shawna Clingerman
  11. I Like the Way You Rock Valentines by Shawna Clingerman
  12. J’adore Goodies by Kristin Cronin-Barrow
  13. Love Coupon Book by Studio Basic and Rebecca Kuchenbecker
  14. Love Monkey Valentines by Heather Roselli and Sara Lively
  15. Love, Love, Kiss, Kiss Album by Studio Basic and Pink Reptile Designs
  16. Masked Marvels Lollipops by Julie Billingsley
  17. Sticky Learnings: Heart Match by Heather Roselli and Rebecca Kuchenbecker
  18. Sticky Learnings: Love Letter Stick Puzzle by Heather Roselli and Rebecca Kuchenbecker
  19. Sticky Learnings: You Have Mail by Heather Roselli and Rebecca Kuchenbecker
  20. The Look Book by Traci Reed

Phew!!! Did you find something that inspires you to create for Valentine’s Day? I sure hope so! And, I would love to see it, so please load it up in the Sweet Shoppe Hybrid Gallery!

Happy Crafting!

{{Hugs}}
Rebecca aka MamaBee


Journals . . . Hybrid Style!

Do you use a journal to record your journey? Rebecca shows us creative ideas for hybrid journals

I hope I am not alone in that I’m probably a few months – okay, years – behind on scrapping everything that I would love to have recorded about my family history.  I have come to terms with the fact that I will not remember every story. However, they do need to be jotted down somewhere. And, this is where I turn to a good ol trusty side kick . . . pen and paper.  Of course, it must be pretty if I’m going to keep the journal going!

Journals come in all shapes, sizes, and forms, but don’t limit yourself to the traditional book! There are so many different boxes, containers, and envelop albums that you can use to store your deepest thoughts. Even a calendar is a great option for a journal that is never far away. My mom has used a calendar for years to keep track of key events and memories.

Here are some other examples from the Sweet Shoppe Community of different types of books and objects that are great ideas for journals to capture and store your memories and every day notes, or to just act as a creative home for your thoughts and ideas.

Altered Journals

When I think of journals, I think of the standard book with cover and lined papers inside. However, you can dress up an inexpensive composition book, journal, or a binder to create a custom look.

Handmade Journals

Can’t find the right journal in the store? Try your hand at making one. All you need to do is print out your pages and hold them together with string, binder rings, or have it spiral bound at an office supply store.

Outside the Box Journals

You don’t have to settle for the basic book shape for a journal. I created the rolodex album as a journal hoping that since it is “3-D” it won’t get lost in the shuffle of other papers and books that land on my desk.  Another neat alternative to a book are jars, boxes, or bags. Preprint journal cards or have strips of paper handy to jot down your thoughts and then drop them into the container!

I would love know what you use to journal. Have you dressed yours up? Please drop a link in the comments. I would love to see it!!! :)

{{Hugs}}

Rebecca aka MamaBee

Rolodex Scrap Style


Hello Sweet Shoppers! It’s Keely here today. I’m sure like a lot of you the holidaze has begun. There’s a lot going on and I’m already feeling like I’m going in circles. I wasn’t sure what to blog about, I’m feeling inadequate with all the December daily albums and Elf On the Shelf hijinks  going on so I thought I’d make myself feel better and share one of my ongoing projects.

Way back when, I kept all my contacts and household information on a spinning Rolodex. Over the years that fell  by the wayside but I didn’t want to throw it out. I’ve turned it into a sort of scrapping project, there’s no real rhyme or reason to it, I just visit it every so often and add to it.

(please excuse the poor  photos, the weather has not been cooperating. Oh and the tabs too, I always forget to change those LOL)

For my latest round of additions I used Traci and Jenn’s Get Artsy bundle. I made  four or five full cards and prepped some stuff to use later. I used a scanned card to make a template for Photoshop but you can also trace a card, mine’s not perfect and depending on how my X-acto skills are when I’m doing my thing the cut outs can be imperfect but they work.  I usually set up an 8.5 x 11 inch canvas and stick as much on there as I can get in and then print them on matte presentation paper. Some cards I do completely digitally, most often though I do them hybrid. These are great for using up scraps, bits of floss, ribbons, buttons etc. You can ink them, paint them, add ephemera, stitch them, make them flat or chunky, the sky’s the limit. You can see a couple of my sheets here, some parts I cut out and adhered directly, some pieces I turned into flowers or tags and I made a lot of little bits into transfers with packing tape.

 And that’s a peek into my latest foray into hybrid, I love this project because I can do it whenever the mood strikes, I can make it as simple or complicated as I like, there’s no big commitment and I love the way it perks up my desk, I flip to whatever matches my mood.


Birthday invites

I have two daughters whose birthdays are in October and November, so for the last little while I’ve been sorting out invitations. (They have several friends with birthdays around the same time of year, so I have to get in quick).

I thought today I’d show you my latest invites, and also share some others that I found in the gallery. After all, who doesn’t need inspiration for parties?! I have linked the images so you can find the necessary credits.

First up is Brooke’s 9th birthday invite. She turns 9 today (happy birthday my sweet girl), and will have a purple party with her friends tomorrow. She was happy to have this simple card with her monogram on it:

My little Elisa turns 6 at the end of November, and she’s having a pool party at the local Aquatic Centre. I browsed pintrest for inspiration, modified it to suit, and came up with this:


I love how they turned out. A few years ago I made some Strawberry Shortcake invites for Brooke’s 5th birthday. Each invite had a magnet on the back, and lollies inside:


I do hybrid invitations most years, so I’m constantly on the look out for more ideas. Here are some favourites I found in the gallery:

By Christy:

By Joana:

By Juli:

By Andrea:

And Rebecca:

This one is actually a birthday card I made for my daughter one year, but wouldn’t it make a cute invitation!


And last but not least, I made these invitations for a sleepover party.

There’s so much you can do with hybrid, and it’s honestly not as hard as you think. Get inspiration from pintrest, the hybrid inspiration gallery, the hybrid babe gallery and the printable projects section of the shoppe. If there’s something you want to make, but are unsure how to do it, just start a thread in the forum – there are plenty of hybrid gurus who are more than happy to help out and give advice/ideas.

Mini Travel Album

Hey everyone, it’s Juli here with a fun little hybrid mini album I created for our upcoming family vacation.  The last few summers, DH and I have taken trips just the two of us (a little slice of heaven) while our daughters spend time with my in-laws in Miami.  This year we are taking our first really Summer Vacation as a family  (we usually do the whole family thing at Spring Break or in the fall).  I’m excited about our upcoming trip…I don’t want to miss anything.  If you see my blog post from last month, I’m a real planner when it comes to vacations.  This year I decided to make sure it was easy to keep track of our memories, fun inside jokes, and little bits of memorabilia.  So…I created this fun little mini album to take along with us.  It’s not to stick pictures in after we get back, but rather a place to journal and keep our memories while we are enjoying our time together.

This isn’t going to be a tutorial, but rather just a little show and tell.

For the outside covers (front and back) I used two pieces of a 4 piece chipboard mini album I picked up in the dollar area at Michael’s (probably a year or so ago knowing me).  To bind all the pages together I used book clips that I got from Wal-Mart.  The inside pages are printed on white card stock using a color laser printer.  To decorate the book clips (rings) I just tied pieces of ribbon on in colors that coordinated with the kit.  Most important – the kit.   I used Meghan Mullen’s new kit – Summer Vacation.

The front – I wrapped the cover around the painted chipboard front.

Front

Inside pages – each section of our trip has a divider card, behind it are journaling pages and a vellum envelope to put memorabilia in.


Do you Need a Silhouette?

Hey Sweet Shoppers…this is my first blog post here and I just want to share my love for Hybrid. As you all know I design some Cutting files that are perfect to use with your Silhouette and other digital die-cutting machines.

Hybrid appeals to me on so many ways…I love the tangible aspect and being able to personalize my creations just the way I envisioned it. But I will be honest I *HATE* cutting out anything by hand. lol.

Enter the first digital die-cutting machine I own. The Slice which is a handheld cordless cutter with many cute cartridges which is so much fun to use in all kinds of different ways.

I created this cute paper flower bouquet for Mothers day one year. I even made these cute hair clips.

I made this cute t-shirt iron on appliqué and it was even featured on the Slice website.

Even though I loved my little machine I was still limited on size…it only does a maximum of 4 inches, and the cartridges were expensive.

Enter the Cricut…when I took that machine out of the box I was so overwhelmed, so much to learn and I did not  know if maybe I have waded to far out of my comfort zone.

But I loved the fact that now with the help of a 3rd Party Software I could cut almost anything. What appealed to me about the Cricut was the fact that it could cut a multiple of materials like thin chipboard and fabric.

I used my Cricut to decorate these baby wipe holders for my daughters art supplies.

I made these Cupcakes using a Template and some of my paper flower templates.

a Project like this just made me shudder thinking of cutting it by hand.

But unbeknownst to me Provocraft (creator of the Cricut) was in a legal battle with the unauthorized 3rd party software creators. Which meant that because the software was not perfect and also not endorsed by Cricut my projects would not always be flawless or like I envisioned them. Straight lines and corners will be wonky and rounded which is not what you want when cutting precise 3d crafting templates. Also Print and Cut was not available on the Cricut…there were ways of getting round it but it was more hit and miss than precise.

I finally succumbed and got myself the Silhouette…I originally did not get the Silhouette because it does not cut 12×12. But after careful consideration and realizing that even though the Cricut said it cut 12×12 it does not…I also hardly ever used the larger size. Most projects were Hybrid and were sized at 8.5×11 which the Silhouette cuts.

The Cricut does not do well on smaller intricate cuts but the Silhouette is such a nifty little machine and cuts like butter through these projects, and at almost half the price of a Cricut I was not disappointed at all. I love the Print and Cut feature and can not for the life of me think how I survived without it for so long.

Now I can so easily use the trace feature built into their software and use elements from my digital stash to make my projects shine. I cut out the flower, leaf, branch and labels using my Silhouette.

I made this fun ‘set the scene’ activity for my Daughter using my digital stash and using the print and cut feature. I laminated the dolls and other elements making it more durable and ensuring hours of fun and imaginative play.

For those of you that have no idea what Print and Cut is…it is the term that is used when you print a digital item and your digital die cutting machine cuts it out. For your machine to recognize where to cut they print out additional ‘Registration Marks’ that the laser can read and ‘know’ where to cut. It sounds very intricate (and trust me it is! lol) but luckily for us Silhouette has done most of the legwork already and they have almost automated the whole thing for you.

So I am wondering…is there a project you have been dying to make but the thought of cutting it out by hand is making you shudder? Or do you want to take your hybrid project to the next level? I would highly recommend the Silhouette. It has so many great features and in the end is the most affordable and with the new Cameo that has been released recently it has so many new and improved features.

Teacher Appreciation Ideas

Hi everyone, it’s Juli here with a few get ahead of the game ideas on end of the year Teacher Appreciation gifts you can create using hybrid techniques.  Our elementary school hosts a Teacher Appreciation Week the week before Mother’s Day every year.  While the PTA does a few things like breakfasts, lunches, and a little gift for each teacher, it’s really up to the homeroom moms to plan activities for the class to show their appreciation for the teacher throughout the week.  Now this year I gave the homeroom reigns over to a stay at home mom who totally rocks at being a homeroom mom (because she happens to have the time in her life to do this).  Just because I’m a working mom doesn’t mean that I can’t participate though.  I’ve got some cute ideas for you today so that your little one has something fun and unique to give her teacher come teacher appreciation time.  Oh, and for you Homeschooling moms.  There is nothing that says you can’t make one of these items for yourself.  (I know that kind of defeats the purpose, but if you have older kids…some of these projects are easy enough for you to have them make on their own.)

Let’s get started!

Post It Note Holder created by Juli Fish
This is a project that is easy to adapt to any teacher’s classroom or even to fit the teacher’s personality.  The frame pictured is 5 x 7″ but I’ve done them in the 4 x 6 size and regular 3″ x 3″ post-it notes still fit (plus you can print your design at Walgreens as a 4×6″ picture if you don’t have a color printer).

click HERE for directions on how to make this cute project

Covered Mini-Legal Pads – by Juli Fish
All you have to do is measure the dimensions of the mini-legal pad and then create a cover from cardstock.  You adhere the back of the cover to the back of the pad, fold over the side of the pad and then you have a nice cover to decorate.

Supplies – mini-legal pad (Staples), Shore Thing by Misty Cato, colored card stock (SU!), double stick tape

Supply Basket – by Juli Fish
I used a Dollar Store bin and created a simple label to stick on to decorate the basket.  Then I used a paper bag and a coordinating label to match the basket.  This was created for the class to bring in supplies for the teacher on one of the appreciation days (last year I had a theme for each day).  You could easily use this same technique and fill the basket with tissue paper and then stuff with snacks, gift cards, school supplies or even lotions to give as a gift.  Who doesn’t love a re-useable bin along with a gift?

Supplies – White lunch bags and bins (Dollar Tree), ribbon (Michael’s), kit by Dani

Rainbow Paper Basket – by Juli Fish
Not necessarily a gift for my child’s main teacher(s) but a cute little basket decorated with a saying that says how special teachers are and then stuffed with a little candy and the $1 Bath and Body Works lotion – perfect for specials teachers, bus drivers and after school daycare teachers!  Or just a little something for one day during the whole week.

Supplies -  cardstock (JoAnn’s), Better Together by Eva Kipler and Jay Day Studio, Basket Template

Gift Card Holder by Juli Fish
Giving a gift card is always a good teacher gift.  For this gift card I collected money from the class and we were able to give the teacher a nice gift card to the Cheesecake Factory as an end of the week gift.  To make this gift card holder I created my design in Elements and then printed and added it to a sturdy piece of card stock.  I added a raised flower for dimension and then adhered a Starbucks coffee cup wrap to the card (make sure to tape the bottom shut so the gift card wouldn’t fall out).  I then added a little decorative panel to hide the Starbucks logo and then tucked in the card and put it in an envelope. Easy as pie personalized gift!

Supplies – Card stock (JoAnn’s), Coffee cup holder (Starbucks),  When You Are Smiling by Traci Reed (Retired)

Now if creating your own hybrid project from scratch isn’t your thing, or you just don’t have the time then don’t forget Heather Roselli’s awesome DIY templates with printables.  Here are a few that are perfect to use for a teacher appreciation gift!

Have you seen this little berry basket filled with Bath and Body works lotions, hand sanitizer and body wash on Pinterest?

Well Heather Roselli has this adorable berry basket template with a printable that would be perfect if you wanted to make your own version of this project!

Heather also has this adorable back pack template that would so cute filled with a gift card and some desk supplies – something any teacher would be sure to love!

I hope this gave you lots of ideas on what you can do with your digital supplies for Teacher Appreciation week.  If you decide to tackle one of these projects or come up with your own, please link me up in the comments so I can come leave you some love in the gallery!  I always like to see what creative hybrid projects you are making.  Have fun getting messy!


Anytime Treat Bags

Hi, It’s my turn (Andrea) to post on the blog and I wanted to share some treat bags for any occasion. They are really quick and easy to make and by choosing different ‘themed’ kits could be made to suit any kind of celebration

The best thing about these treat bags is that they can be made out of scraps for the decoration and use any type of paper bag for the main body of the treat bag

Gather together your supplies – paper scraps, ribbons, small paper bags, a few tags and small embellishments

Trim the tops off the paper bags with fancy scissors or pinking shears (just to pretty them up, not necessarily essential!)

Add sweeties, candy or small treats

Cut circles of different sizes from paper scraps – pinking shears, fancy scissors or dies make the circles look pretty but draw around your cups and glasses in the kitchen for different sized plain circles

Add folded paper circles, ribbon scraps, a tag and embellishments to the bag of treats and they’re almost finished

Add a handwritten name or holiday sentiment to the tags

Easy-peasy and so quick – you could easily make a whole batch of these in an hour or two.

You’ll have to check out the new releases in the shoppe this Saturday to find out which papers I used for my treat bags, but consider this a sneak peek of something new from Allie ;)

Have fun making your treat bags, Andrea xx