Recording Your Own Actions & Batch Processing in Photoshop
Hey everyone!
Zoe here with a neat little tutorial that I thought might come in handy for anyone, like me, who has a gazillion photos to edit from one session and not a lot of time. We’ve heard a lot about using actions to improve our photos, but how about actually recording your own actions to speed up your editing? And what about editing a whole folder full of photos at once, all with a few simple clicks of your mouse? Read on to find out more!
These days, we are spoilt with the luxury of having digital cameras which allow us to take hundreds of photos in one sitting. (Anyone remember the days of having your roll of 36 exposures and “budgeting” your shots so you didn’t run out of film? LOL!) It’s great, right? But, the ability to take so many photos also has it’s downfall… and anyone who has taken 100+ photos of their child running around in the yard, or at the soccer match, in the same lighting conditions knows exactly what it is. Editing. The tedious task of editing 100 snaps of pretty much exactly the same thing, one by one! Even just running the actions you usually use each time on the few photos that you choose from the bunch is enough to turn off even the most dedicated family historian from getting those photos fixed, printed and scrapped!
Recording your own actions is easy peasy, and you can even incorporate your favourite actions into your own actions to save time when editing a bunch of photos… For example, when I download photos from my camera, I always seem to find that they are a little on the dull side and need a bit of a brightness/contrast boost, and I also have an action that I run on pretty much every photo. In this tutorial I will show you how to record your own actions, a few different options, and finally how to batch process a folder of photos using the action to save a whole heap of time! For a little bit of time setting up, it is totally worth it!
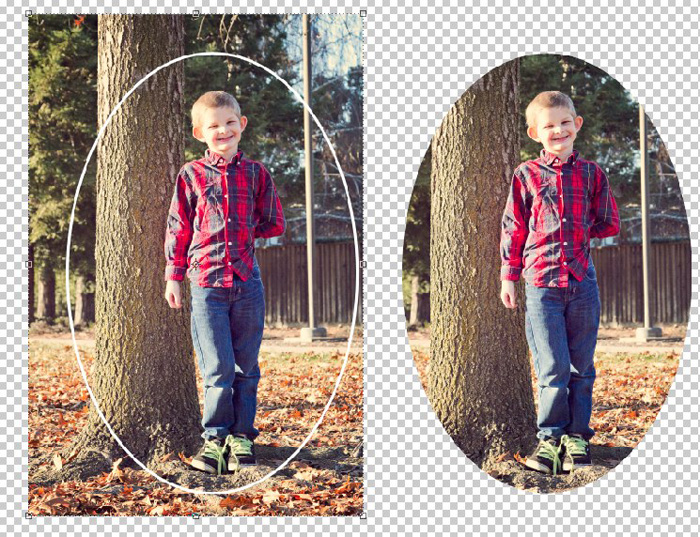
For this tutorial I am using Photoshop CS3 Extended (steps should be similar for other versions of Photoshop). Please keep in mind that not all actions will be suitable for all photos. For example, you might need to record a new action for each set of photos that you want to edit. The example I am using includes photos from one session, all with similar lighting conditions (see example below).

Before you record your action, you might want to choose a photo to edit from scratch to make sure that the treatments/adjustments you plan to use will work how you want them to. Make a note of the steps you took, and once you are happy with how it looks revert it to the original image (or close and don’t save). If you use layer masks to protect your original image when editing, another option is to save the layered file as a PSD or TIFF so you can easily refer to it to see what you did (see example below).
You can skip this step and just start recording your action while you play around, but this is how I work – the less steps in an action, the quicker it will run!

Recording Your Own Action
1. Open the original, unedited version of the photo that you just edited. You should have a file open when you start creating your action, so that opening the file doesn’t become part of the action!
2. Make sure the “Actions” Tool Palette is open in Photoshop. (The icon looks like a little “play” arrow button). You can also open it by selecting Window > Actions from the menu bar.

3. Create a New Set for your actions by hitting the icon that looks like a folder at the bottom. Choose a name for your set and type it in the dialogue box that pops up after hitting the New Set icon – you can call it whatever you like.

4. With the set you just created highlighted, create a New Action by hitting the “New” button, next to the folder icon. Give your action a name, and hit the “Record” button. Your action will start recording!

NB: If you wish to stop recording your action at any point throughout the process, just hit the “Stop” button (square on the left). To start recording again, hit the “Record” button (circle next to the square).
5. Go through the adjustments that you want to make, and you’ll notice each time you do a step a new line will show up in the Actions palette. If you want to run a pre-made action within your action, just hit play like you usually would and your action will record it.

6. If you want to be able to check and make adjustments to the images that you run the action on (ie keep the layers), stop recording the action after you have finished your steps. (You might not want to save each photo as a PSD file, so I would suggest stopping the recording BEFORE you save).
If you are confident that the action will do what you want to each photo in the set, you can flatten all layers then save and close your file and then stop recording your action. This is especially handy if you want to batch process a whole heap of files (instructions to follow).
Remember that the action records everything you do while in Photoshop. This means that if you go to another file and do anything, or open another file while you are recording, it will record this too! This can make actions not run properly, so it’s best just to stay in the one file unless you have to go to another file as part of your action.
To stop recording your action, hit the Stop button (it looks like a square on the left).

7. If you wish to save your Actions, make sure the folder that you created in the first step is highlighted (mine is called Zoe’s Actions for this example). Hit the drop down menu in the top right corner of the actions palette, and select Save Actions.

In the dialogue box that pops up, you can either choose a new name for your actions, or it should automatically name it as what you called your folder. Photoshop should automatically put them in the right folder, but just in case your actions are found in Photoshop > Presets > Actions.

All done! Now you can test your action to see if it works on other photos in your set. Now, if you’re confident it will work and want to edit a whole heap of photos in a folder at once, you can do something nifty called Batch Processing. It’s a neat little trick that will save you a heap of time if you don’t want to edit or run your action on photos individually!
Batch Processing in Photoshop
To run your action on all files in a folder, just follow these steps:
1. In the top menu bar in Photoshop, select File > Automate > Batch

2. There are lots of options here, but this is the most basic.
In the menu that comes up, make sure the action set you created (or whichever action you want to run) is selected in the top section. If it is the last action you ran, it should automatically be selected.
Choose Folder as the Source. Then hit the Choose button to select the folder containing the photos you want to edit.
Keep the rest of the options the same. You can play with them later!

Press OK and your action will run on all of the files in that folder in super quick time! Hey presto! 😀

I’ve just edited over a hundred photos with just a few clicks of my mouse, and in a fraction of the time!
Thanks for reading, and I hope you’ve found this tutorial helpful! Happy editing!