Extracting from an Image
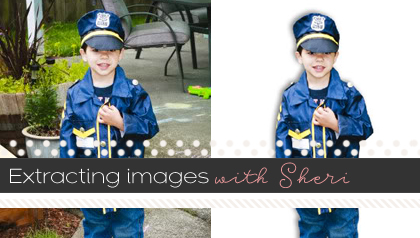
Today I’m going to show you how to create an extraction from an image.
1. Start with your favorite image. Choosing an image is one of the most important parts of this tutorial. Ideally, the entire subject you wish to extract has an outline that doesn’t run off the side and is contrasted to the background.

2. Next, select your magnetic lasso tool. You can do this from your tool bar or by selecting the “L” key. I have mine set to 10 px width and 10% contrast, but you can adjust those to your liking.

3. Move your cursor to the edge of the object you wish to extract, left click and carefully move your cursor around the edge of the subject. You can left click at any time to create anchors. If you do not like how the magnetic lasso sets an anchor, hit the delete key to move back.

4. Once you have gone around your image, double click to enable the “marching ants”.

5. The magnetic lasso has given us a great start. Now let’s clean up a bit. Enable your Quick Mask Mode by selecting it from your tool bar or hitting the Q key. This will preserve the image, but give you the flexibility to make changes.

6. Zoom in and use your eraser tool with a white foreground to add to your selection.

7. And, use the black foreground to subtract from your selection.

8. This step is optional but will give you an even better result. Modify your selection by going to Select -> Modify -> Contract. Contract by 1-2 pixels to remove stray pixels.

9. Additionally, you can refine the edge of your extraction by hitting the “Refine Edge” radial button (see above) and adjusting the settings to your liking.

10. Add a layer mask from your Layer palette or by going to Layer -> Layer Mask -> Reveal Selection. This will enable you to make changes if you’re not 100% happy with the result, while preserving the integrity of your original image.

11. Your layers palette will now show the original layer and the applied mask.

12. Shadow your extraction accordingly!


Tutorials by Sweet Shoppe Designs » Scrap Like a Sugarbabe: Sheri Malcom said...
on September 15th, 2012 at 4:01 pm
[…] can see on my layer palette, I duplicated the photo and used a layer mask to hide all but the gun. HERE is a tutorial on extraction. I applied a drop shadow to that layer, making sure I adjusted the […]
Tutorials by Sweet Shoppe Designs » Creating a Template for those Mini Albums! said...
on February 26th, 2013 at 8:19 pm
[…] 2. In your photo editing software… I am using Photoshop Elements 11… select the Magnetic Lasso Tool from the Tools Panel and start going around the outside of the shape. Note – to go remove the previous anchor, click the delete key as you are tracing the shape. Would you like to know about the Magnetic Lasso Tool? Sheri has a great tutorial here. […]