Photography Techniques – Controlling Depth of Field
Hello everyone, this is Susan posting today. In addition to being a scrapbooking designer, I am also a photographer, and I would like to talk about how controlling depth of field can improve your photography. For those that are not familiar with the term Depth of Field (DOF), it is defined by Wikipedia as the “distance between the nearest and farthest objects in a scene that appear acceptably sharp in an image. Although a lens can precisely focus at only one distance at a time, the decrease in sharpness is gradual on each side of the focused distance, so that within the DOF, the unsharpness is imperceptible under normal viewing conditions.”
Why is DOF important to creating interesting photographs? Shallow DOF can focus the viewer’s attention on the important subjects of a photograph. Have you ever taken a photograph and it seemed uninteresting and cluttered? Everything is in focus, including objects in the photograph that are boring or even unappealing.
How do we control DOF? Well there are a couple ways to control DOF, the most obvious being the lens’ aperture diameter, also known as the f-stop. The lower the F-stop number, the more shallow depth of field you will have in your photos.
Here is an example of very shallow DOF:
This photograph was shot at F1.8, which is one of the lowest apertures possible. Notice how the subject is in focus, but everything in front of and behind him is blurred. This draws the viewer’s attention to the subject. Because of the blur, you cannot see the details of the ground or anything else in the background.
Now, take a look at this photo. This was shot in the very same location. But the aperture was shot at F5. Everything is in focus. You can see the details of the wall, the broken glass and rocks on the ground, and even the electrical outlets and wires on the side of the building. This is very distracting to the viewer, and frankly, visually unappealing. Another problem with this photo is that the subjects are positioned very close to the brick wall. Had they been further away from the wall, it is possible that the wall may have been blurred more. And that brings me to my next point about controlling DOF. The distance from the plane of focus also affects the amount of blur that will occur in a photograph. The closers objects (such as the brick wall) are to the plane of focus, the more they will be in focus. Had I positioned these subjects further away from the wall, I could have had it blurred out more.
So why did I shoot this photo at F5? Why not F1.8? I shot the photo at F5 because I was worried that I had several subjects in the photograph and they were not all on the same plane. The adults were positioned behind the children and I was concerned that with a shallow depth of field of say F1.8, if I focused on the children, the parents would be out of focus. I could have chosen to put them in a straight line, all on the same plane, and shot the photograph at F1.8, but that would have just looked weird and unappealing. So I had to have a high enough aperture to ensure that they would all be in focus. My mistake was placing them so close to a brick wall. I should have put them in the shade in an open field where there was a great distance between them and the background.
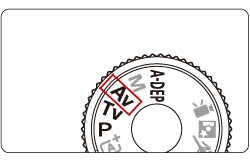
Now, how are you able to control your aperture on your camera? For those of you with DSLRs, it is actually quite simple. I would recommend that you start by shooting in aperture priority (AV mode on Canons & A mode on Nikons). Put your camera dial on AV mode and then select the aperture you wish to shoot at and then your camera will automatically change the shutter speed and ISO to make sure your shot has enough light.
A caveat: Shooting at F1.8 can be difficult with children as they tend to move around a lot. At F1.8, there is a very small margin for error, as your plane of focus is very small. I would recommend you start by shooting at 3.2 and then 2.8 or 2.5 and see how different your photos look. Also, when practicing, try to shoot outside, in the shade, so that your camera has ample light and your shutter speed will be high, reducing the possibility of blur from camera shake or fast little feet. (Shutter speed is a topic for another post.)
There are many more issues to consider when playing with DOF. But that would make for an epic blog post. I just wanted to get you all thinking about how you could quickly improve your shots and thereby make your layouts really shine! I know it may sound complicated, but once you have it down, you will really see a difference in your photos. If you have any questions about DOF or Shutter Speed, or shooting in general, please leave them in the comments and I will try to answers your questions. Good luck and have fun!


Jamie said...
on January 1st, 2012 at 6:55 pm
I have seen similar tutorials, but none of them tell how to change your f-stop. Can you please explain how to do this? I have a Canon Rebel T1i. Thanks in advance!
Nubiancrafter NC said...
on January 4th, 2012 at 1:00 pm
Thank you so much for this tutorial, I have pinned this for future reference!!
ashley williams said...
on January 7th, 2012 at 2:07 am
Thanks so much for this tutorial. I always have trouble remembering the difference of aperture and shutter speed and what they both control. This definitely helped clear it up!