Knights & Dragons Birthday Party
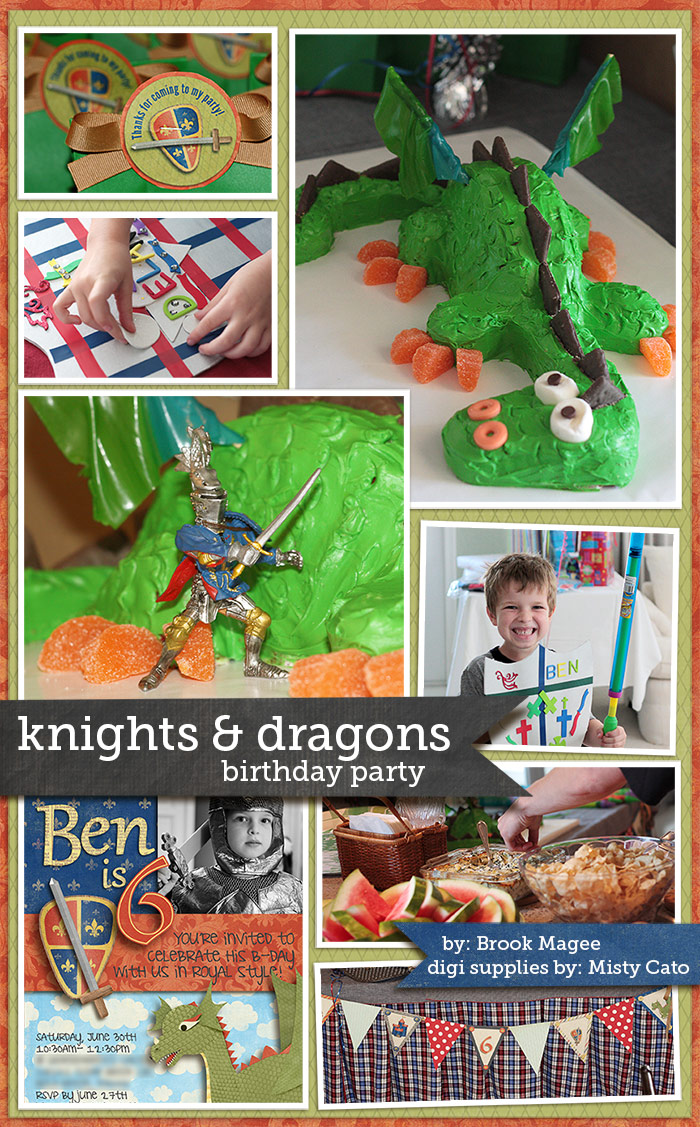
My son is a huge fan of knights. He has been completely enthralled with them ever since we took him to the Renaissance Festival that came to town a few years ago. I was beyond thrilled when Misty Cato released a new prince and princess kit back in June. Especially since I was in the thick of planning my son’s 6th birthday party which he requested to be knight themed. Misty’s kit was the perfect inspiration! Thanks to the help of my friends and family, Ben’s birthday party turned out to be one of the best I’ve done so I wanted to share it with you.
Now, just as a disclaimer… I don’t claim to be a super awesome big party planner, nooo way. I have a hard time with the whole process of prepping for parties. I’m a huge procrastinator and it’s stressful for me to think ahead about what we will do, where the party will be, what to give as party favors, and what we will eat (and how much to make). SIGH. See, I’m stressing right now just thinking about it! LOL! That is why I rely heavily on Pinterest for party ideas… and why I don’t do big birthday parties for my kids every year. Here’s some pics from the party:
So, here’s the quick run-down of the party for those who are interested in the details.
Decorations & Invitations: I made a 5×7 digital invitation for the party using Misty Cato’s princely kit, Prince ss. I chose to email it out (again, the whole procrastination thing), but it could have easily been printed at Costco or Shutterfly and mailed. For my banner, I used a self-made digital template and designed 5 quick banner flags (each one fit on a sheet of 8.5×11 paper) with Misty’s kit. I used some scrap paper from my old paper scrapbooking stash to do plain flags in between my printed digi ones. Then, I stapled the banner flags to a few yards of grosgrain ribbon and pinned it to the front of my cake table. Sooo easy and inexpensive, and I just tossed it when it was time for clean up. The Sweet Shoppe has some great banner templates if you want to make them sometime! Here’s a couple I found: one by Mari Koegelenberg and one by Heather Roselli. Lastly, I made some circles to say “thanks for coming” and decorate the party favor bags. I just filled the bags with goodies, folded the tops of the paper bags, looped ribbon into a bow shape over the fold and stapled the circles on top to hold it all together.
Games & Activities: The dining room table was set up with a fun activity for the kids as they arrived at the party. I prepared 14 shields, cut from dollar-store foam core board (I got 2 shields from each sheet) and lightly spray painted silver. On the back of the shield I doubled up duct tape as a handle.The kids were given foam stickers, alphabet stickers, stick-on gems, electrical tape, and other random decorations. I have to thank my friend Gevay for this idea! She came up with it and it was such a hit with the kids! Outside in the hot FL sun, the kids had access to a zip line, slip & slide, and a wading pool. I also found sword-like water sprayers from the dollar store which kept them busy (and the adults wet)!
Food & Cake: Thankfully, my Aunt and Grandma were in town and helped tremendously with the food & cake! My Aunt pulled off this amazing dragon cake that I discovered on Pinterest (from FamilyFun). We used red velvet cake on the inside, so the kids were oohing & aahing in amazement when my son sliced the the first piece of cake in his knight costume! It was shockingly red inside… like a “real” slayed dragon. Poor dragon. But, oh so fun for the boys. For appetizers I found a couple great recipes that were completely gone by the end of the party: Spinach & Artichoke Dip, Queso Blanco Dip, and my Aunt’s fabulous apple dip which I’ll share with you at the end of this post. We also had chips, watermelon, lemonade & tea mixed together, and for the main dish my hubby grilled up some yummy hot dogs (with a few burnt especially for me) which no one was even hungry for after eating all the delicious dips! LOL!
Well, this wraps up my post. It turned out to be such a fun party and I’m glad I could share it with you all. Thanks so much for reading along!!! Please feel free to also share how you’ve used SSD kits for your party planning here in the comments or on our sweet forum. And here’s that recipe…
Creamy Caramel Apple Dip:
4-6 apples, cored & sliced
8 oz. container of whipped cream cheese
16 oz. Old Fashioned Caramel Dip (i.e. Marzetti’s)
1-2 bars of heath candy
Slice apples and arrange around the outside of a platter. Empty the container of cream cheese in the center. Slightly warm the caramel dip and pour over top of the cream cheese. Chop the heath bar into pieces and sprinkle over the caramel. Sooo yummy!


Nikki Epperson said...
on July 22nd, 2012 at 8:57 am
Awesome party and first ever Babe post, Brook!
Jenn Barrette said...
on July 22nd, 2012 at 9:53 pm
WOW!! You rocked that party Brook!