Black & White Matte Photos
It is not often that I see pages created with black-and-white photos, but when I do something makes me stop to look twice. Now, I certainly do not think every photo is meant to be converted to black-and-white. I look for a few criteria to be met first.
When deciding whether I want to convert a photo to black-and-white, I ask myself these questions:
- Do the colors distract from the focus of the photo?
- Is the subject showing emotion?
- Can the subject(s) alone convey the message?
- Does the background matter? Is it too cluttered?
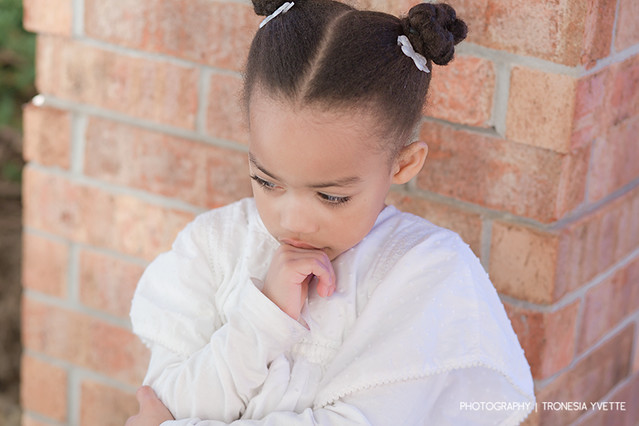
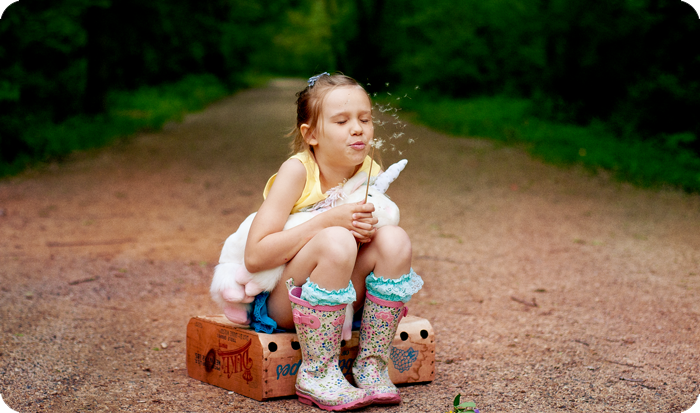
If my answers are “yes – yes – no, yes”, then I go ahead and start with the edit. Before I start, I clean up the color in the photo to make sure it looks as close to the color I saw when I took the photo. These adjustments I usually do in camera raw. Today I am using this photo from the other day as a starting point in Photoshop.
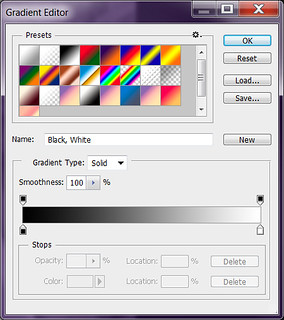
The first thing I do is to add a gradient map adjustment layer. By working with layers, we will be able to correct the edit easier as we are working on it. I always save as a PSD file until I am done with the photo.
Layer > New Adjustment Layer > Gradient Map: Black, White. Once I have the gradient map applied as I would like, I duplicate the layer and change the Opacity to 50%. The amount you change your opacity to will depend on how much contrast you would like in your photo.
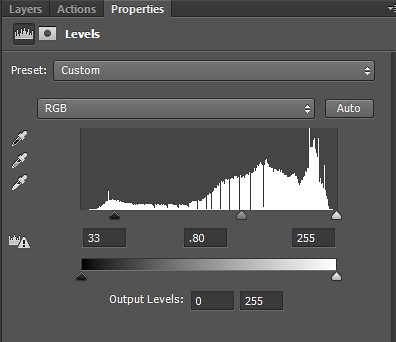
Next thing is add a bit of moodiness to the black-and-white by adding another layer on top of the two gradient layers I already have. Layer > New Adjustment Layer > Levels. Once the levels layer is set as shown (image, right), I will change its opacity to 40%.
Then, I will create a new blank layer to add a subtle vignette to darken the background. Select the paintbrush tool and foreground color #2b2b2b. At 0% hardness, with a round brush, I paint around the subject of my photo. To that painted layer, I apply Filter> Blur > Gaussian Blur at a radius of 15-20 pixels. Reduce the layer’s opacity to 40% and change the blend mode to overlay.
To add a matte finish, I add an exposure adjustment layer. Layer > New Adjustment Layer > Exposure: Exposure [-0.65] … Offset [0.05] … Gamma Correction [1.0]. I reduce the exposure layer opacity to 30% and then I flatten my image. Duplicate my flattened image once and to create a soft light layer at 30% opacity. Flatten again. Then I resize and save for the web. If I am saving this to go onto a digital page, I do not sharpen the photo more than once during the entire processing, and that is usually in the beginning during the color edit.
Here is my finished result:

I definitely suggest playing around with the blend modes and opacity to get just the right look for your photo. Here are a few of my pages where I used black-and-white photos:
“Smile” – “I See You” – “Beautiful Life”
Thanks for looking!
Tronesia


Biju said...
on November 10th, 2015 at 4:02 am
Every day I’ve to learn something on PS. today here I found something new… Thanks a lot.. Tronesia!