Hot 4 Hybrid: A Hybrid Card from Kit to Completion
Hey there Sweet Hybrid Lovers! Jen Tapler here with your Hot 4 Hybrid post for this week! The Hybrid Babes have had several specific questions recently from community members about hybrid card-making. Each of us has a very distinct style and as you experiment with hybrid I encourage you to find a technique and style that works best for YOU! Some Hybrid hotties do all of their design and layout work digitally, then print out their finished digi card, score the cardstock and add a few physical embellishments. I tend to have a hybrid style that is a bit more like a traditional paper crafter / card-maker. At the request of a few community members, today I thought I’d give you a detailed look at my card-making process from start to finish. (I apologize ahead of time for the long length of the post – LOL).
I almost always start with a fantastic kit I see in the shoppe and want to play with. I am most often initially inspired by digi papers – I look for patterns and colors (and sometimes textures) that I think will print up well and that I can combine with cardstock and items from my physical stash of goodies (like ribbon, buttons, etc). Today I was drawn specifically to the papers and alpha in this fun kit by Melissa Bennett:
I started by opening up the papers and embellishments I wanted to use (in this case I wanted to use the alpha to form the word “HI”) in Photoshop Elements (I use PSE6 and will be showing some cropped screen shots of my process. Disclaimer: I am so NOT a digi girl, so forgive me if I mess up the lingo or whatever). I also open up 2 new documents – an 8.5 x 11 inch document and a new document that is the size of the card front I’ll be making – today it is 4.25 x 5.5 inches. I then start dragging the papers one by one onto the card document (4.25 x 5.5 inch) and then using the little corner square things to “shrink” the paper to a size that seems right so that the size of the pattern on the paper looks right for the size of the card:
Once the pattern looks good, I merge my layers and then drag the card document onto the “print” document (8.5 x 11 inches):
I typically have a basic idea of what I want the finished card to look like at this point. To save paper and ink, I don’t print ALL of the digi papers in that full card front size, so this is when I roughly “crop” them down, keeping in mind I do my final cropping physically after everything is printed. But in this case, I know that I want my striped paper to be about 2 inches tall, so I go ahead and use the marquee tool and delete button to crop it down to roughly that size. I’ll shape everything up with my paper trimmer later after I’ve printed everything:
I then repeat this process with the other papers I want to use, resizing them onto the card front document, then dragging onto the “print” (8.5 x 11) document, then cropping with the marquee tool. Once all the papers are roughly the size I want them to be, I drag my embellishments onto the “print” document and size them appropriately:
Once I have all of the digital papers and elements in place, I’m ready to print. I ALWAYS print on double-sided matte brochure / presentation paper. I usually just buy the OfficeMax or store brand or whatever happens to be on sale (I honestly can’t tell a difference). But I’ve found that this matte paper seems to give me the best true-to-color results and I like the weight of the paper. The MOST IMPORTANT tip I can give you, something that makes a HUGE difference in overall print quality, especially in the vibrancy of the colors, is to be sure you change your printer settings to reflect the paper type you’re using each and every time you print!! For me, because I use an HP printer, I do this in my print window by clicking on “Preferences” , then making my selection under “Paper Type”. This may look slightly different for you depending on the printer you use, but there should be somewhere to change this setting before hitting that final “print” button!! (and even though I don’t use HP brochure paper, this is the closest to what I do use, so that’s what I go with):
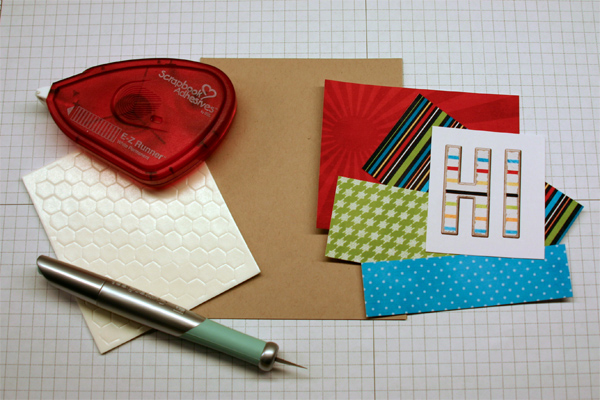
Once I’ve printed my document, I cut all of my digi papers out and gather my supplies. For this particular card I wanted to use a Kraft cardstock base and I needed a hobby knife to cut out those letters. I also wanted to pop the letters up on 3D adhesive to give the card some dimension:
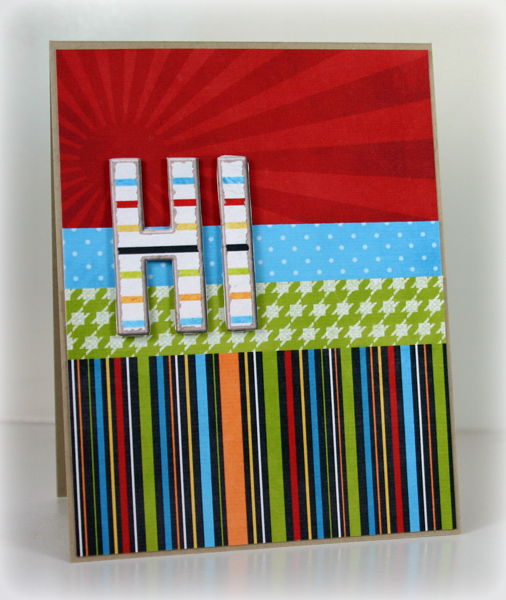
And finally, here’s a look at my finished card:
I know it seems like A LOT of steps, but really this card took less than 20 minutes to complete, start to finish. I could have added some ribbon and brads to give it a little more oomph, but I think it’ll be just fine the way it is.
I hope you’ve found this helpful and can see that hybrid really is SO easy. You don’t need a lot of fancy supplies and you really don’t need to be a digi expert either (obviously!! LOL).
I’d love to hear what you think! Are these types of tutorials and glimpses into the Hybrid Babes’ processes helpful, or would you rather just see completed eye candy?


Tamara said...
on March 10th, 2010 at 7:58 am
I love seeing the process- it’s so great to really see how everyone does these great hybrid things! Keep it coming! Thanks for sharing!
Dawn said...
on March 10th, 2010 at 8:27 am
Oh WITH instructions please – I can make paper cards till the cows come home but the mysteries of PSE are new to me lOL
Majda (pomi) said...
on March 10th, 2010 at 1:01 pm
Thank you for the tutorial, Jen! As for me, these step-by-step tutorials are great and I really appreciate them.
Sarah said...
on March 10th, 2010 at 1:45 pm
thank you! i think i will use this idea for some thank you cards i need to make for my son’s birthday!
Christy said...
on March 10th, 2010 at 2:29 pm
Very helpful! I am still considering the PSE purchase. You may have just convinced me! Thank you. 🙂
Lizzy257 said...
on March 10th, 2010 at 3:35 pm
Great post Jen, thanks for taking the time to write this out as a tutorial, it really helps 🙂
Paula said...
on March 10th, 2010 at 10:09 pm
Thanks for the tutorial. I am a beginner here, so these types of tutorials are a big help!
Kim Howard said...
on March 10th, 2010 at 10:18 pm
I really love this tutorial and can’t wait to try it. I love how you resize the paper to put a bunch on one sheet vs. printing a sheet of a bunch of different ones.
Sarah said...
on March 10th, 2010 at 11:44 pm
Just thought I would let you know I used the tutorial to make a thank you card for my son’s birthday. Here is the link http://sarahsearly.wordpress.com/2010/03/11/hybrid-cardthank-you/ Thanks again!
Milmomma said...
on March 11th, 2010 at 6:51 am
I love the tutorials 🙂
Anthonette said...
on March 12th, 2010 at 8:00 pm
Hi Jen, great job in explaining your process!
Gina said...
on March 13th, 2010 at 9:11 am
This is really helful for those of us that are just gtting in to doing Hybrid. Thanks a lot.
star said...
on April 5th, 2010 at 4:40 pm
Thank you for this step by step tutorial, i learn best this way. Also thanks for including the info on what type of paper you print on that really helped me.
Paperia said...
on July 8th, 2010 at 1:34 pm
That’s super cute, it’s so interesting what people can do with a simple program (if you know how to use it…I am not one of those people!)