Speed up your Scrapbooking with Photoshop Smart Objects
Got Photoshop woes? Specifically, are you having trouble with Photoshop bogging down and running r-e-a-l-l … y slow when the number of layers in your layout starts to climb?
I’ve found the more complex my layout, the more elements I add, the more layers I have, the slower Photoshop responds. And nothing is more frustrating than when Photoshop won’t keep up with you!
But I’ve discovered a little trick that helps with those multi-layered PSD files. It’s the Smart Object feature, and it’s saved my sanity!
NOTE: We know not all Sweet Shoppe digi-scrappers use Adobe tools to create their layouts, but this blog post specifically addresses a feature available in Adobe Photoshop and Photoshop Elements.
A Smart Object is a layer that’s more than just a layer. They contain image data from raster or vector images. Smart Objects can either be embedded inside your PSD file or linked to an external file. There’s several different ways to create them and a number of benefits to using them, all of which you can read about here.
But today, I’m focusing on what happens when you create a Smart Object from some of the layers in your document. Now, I’ve tried to keep this from getting overly technical. It’s easiest to explain if I show you an example of an actual layout I recently created.
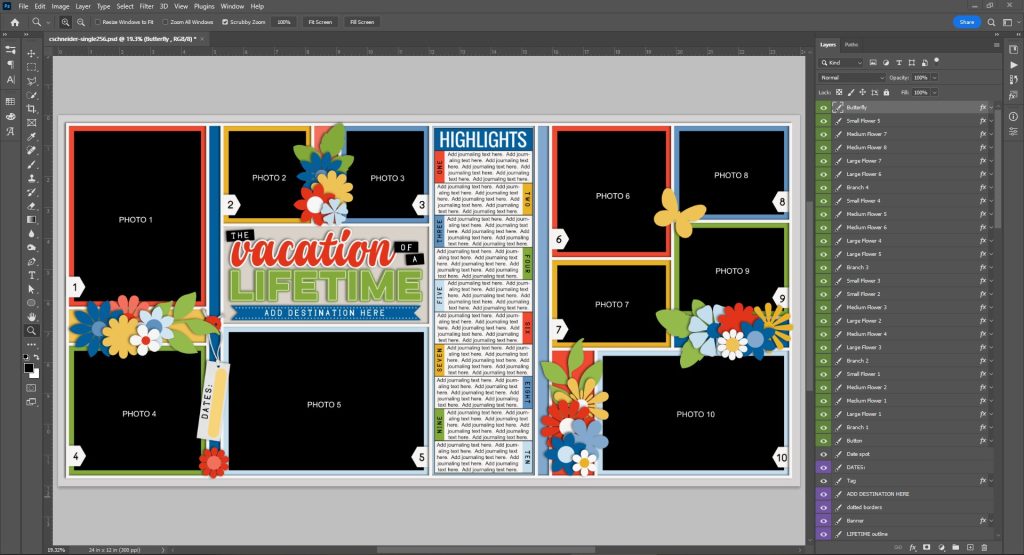
I started this layout using a 2-page template by Cindy Schneider; I wanted to work on the full spread all at once, so I opened the 24″x12″ file. This template comes with over 100 layers … and that’s before you start dragging papers, photos, and elements into the layers palette and clipping them layer-by-layer. Depending on how much processing power and memory your computer has, as the number of layers continues to climb, Photoshop can begin to struggle and respond sluggishly – especially as you drag and resize objects on your canvas. I also experience problems with lag when I’m editing text in layouts with lots and lots of layers.
Here’s why this happens: as you make changes on your canvas, Photoshop runs microsecond calculations on how the layer you’re working with is going to interact with all the other layers that are above and below it. Those calculations are running and updating over and over again to update what you see as you drag an object across the page, or resize it, or add text. The more layers you have, the more layer styles you’ve added to them, the more complex those calculations become. And as your computer starts to max out on available processor and memory, the slower your screen will update.
While one solution is to add more memory and upgrade your computer’s CPU, that’s not always possible or desirable. Personally, I’m working on an expensive mobile workstation that can’t be upgraded – it has to be replaced – and I’m trying to eek out another 6-12 months of use while I save up for its replacement. So when you can’t upgrade your hardware, instead, change the way you’re working with the software.
The solution is to decrease the number of layers Photoshop has to work with. It’s true that you can take multiple layers and merge them into one, but once you do that, it discards all the data for the separate layers. Now you’re locked in and can’t edit them separately.
But what if you could temporarily flatten those layers in a way that would still let you edit them individually later? That’s what happens when you create a Smart Object from those layers! Photoshop takes those layers exactly as they are at the moment you turn them into a Smart Object, and creates an image that looks and acts like a single layer.
I think of it like this: Photoshop takes my stack of layers and squishes them down, creating a picture of what they look like all together. Then it locks away the individual layers so if I need to make changes, I can expand it and get back to all those original layers, but in the meanwhile they stay flattened and out of the way. And instead of having to make calculations on those 20 layers, now Photoshop only makes them on 1.
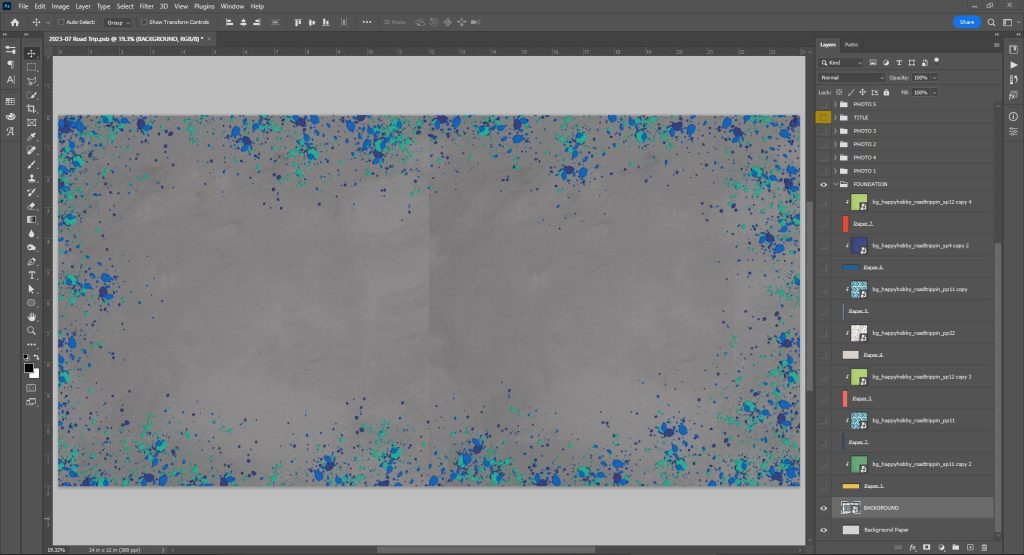
Let me show you how this works in my layout. To jazz up the background of my page, I decided I wanted to put paint splatters on top of the grey background paper so they’d show all around the edges of my layout. I ended up duplicating, rotating, and flipping this one paint splatter some 42 times to surround the edges of my canvas.
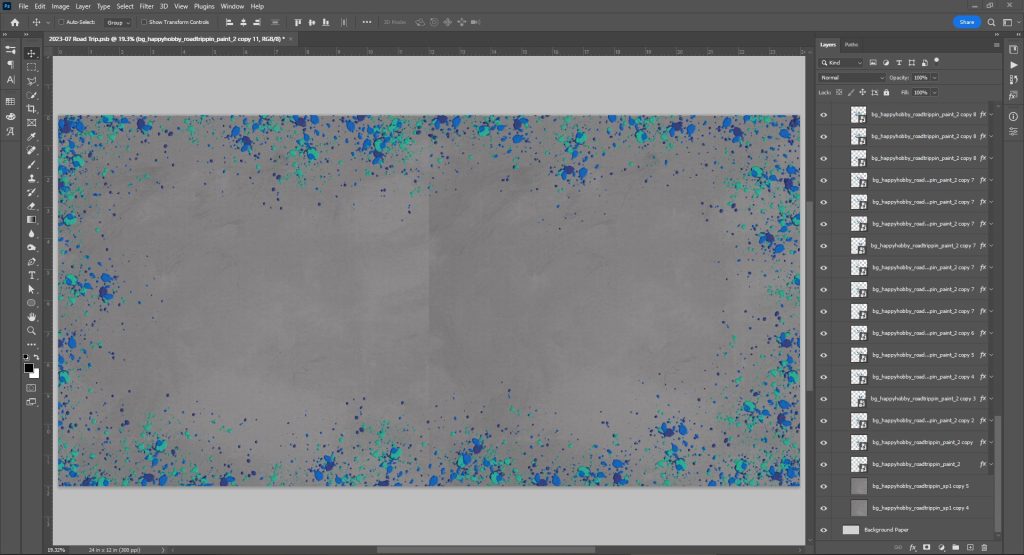
Combined with the paper layers, that’s 44 layers for my background, 42 of which also have layer styles to add a slight bevel and drop shadow to each layer of paint. That’s a LOT of layers and effects for Photoshop to process. To speed up and improve performance, I had two options:
Option 1: Merge Layers.
If I selected the 44 layers in my layers palette and went to Layer … Merge Layers Photoshop smooshed them all down into one layer. And that’s fine if you’re 100% certain you’re done making changes to those layers. But now I’m stuck with it as-is, and if I want to shift around the splatters at all, I can’t.
Option 2: Turn them into a Smart Object.
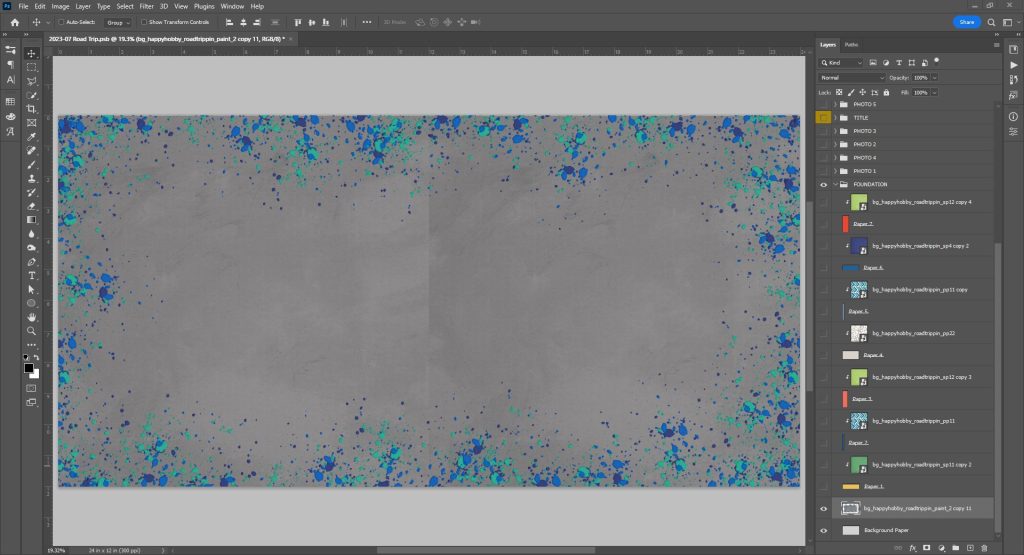
Since I like having the ability to tweak any part of my layout right up until I send it to print, I selected the 44 layers in my layers palette and went to Layer … Smart Objects … Convert to Smart Object. Photoshop will clock for a handful of seconds while it does its thing, and then I now have one layer where there were 44 before.
I know those two screenshots look pretty similar, but there’s one important difference in the layer panel. The single layer for my background has a little icon on it that indicates it’s a layer that’s more than a layer … it’s a smart object.

If I decide I want to make changes to it, I have two options.
Editing Option 1: Double-click the layer.
Double-clicking the Smart Object layer launches a new tab in Photoshop and isolates just the layers of the Smart Object.
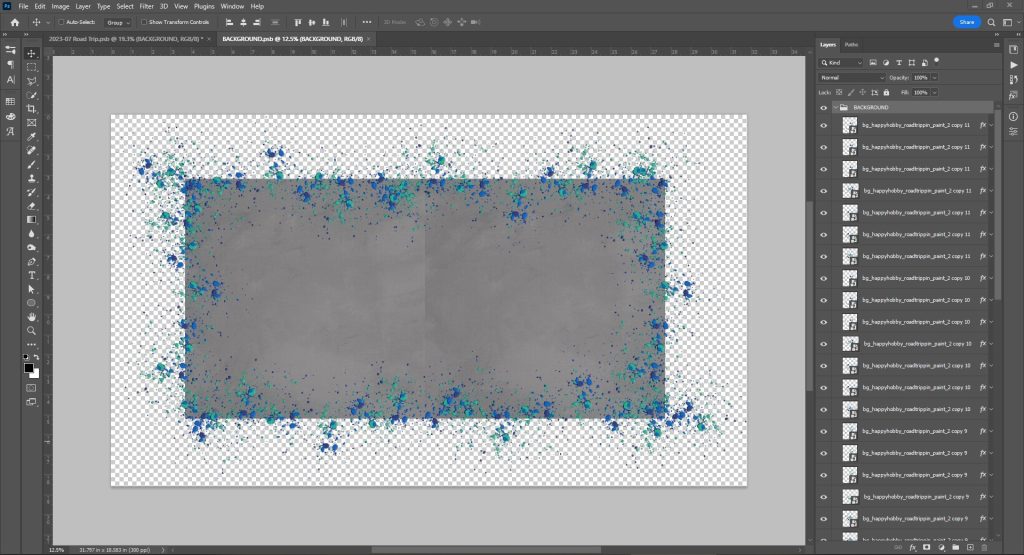
I can shift things around as much as I want. When done, click the X to close the tab, choose to Save changes, and it returns to the layout with the updates in place.
Sometimes, it’s helpful to be able to edit a Smart Object outside of your layout like this. But other times, you really need to be able to work with it inside the layout so you can adjust it in relation to all the other stuff on your page.
Editing Option 2: Un-make the Smart Object and break it back into its layers.
Select the Smart Object layer in the layers palette and go to Layer … Smart Objects … Convert to Layers. Photoshop replaces the one Smart Object layer with the 44 layers inside it. If you want to turn them back into a Smart Object when you’re done, just select the layers and choose Layer … Smart Objects … Convert to Smart Object.
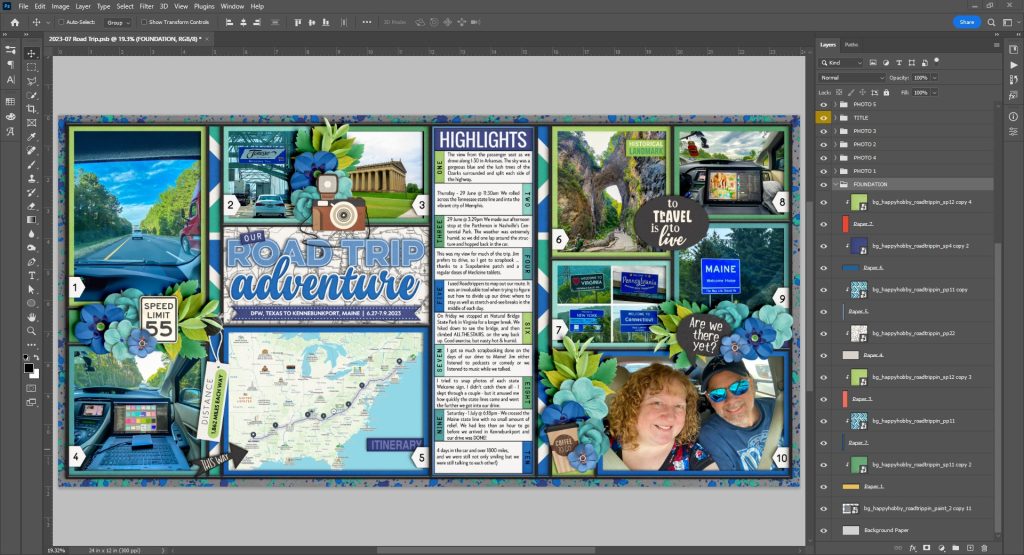
That’s all there is to it! You’ll find the more you can simplify your layers palette as you work, the better Photoshop will respond. I do this often with element clusters, taking the ten or twelve layers of the cluster – once I’ve added all my drop shadows – and converting them to a Smart Object. Here’s what my finished layout looked like in Photoshop:
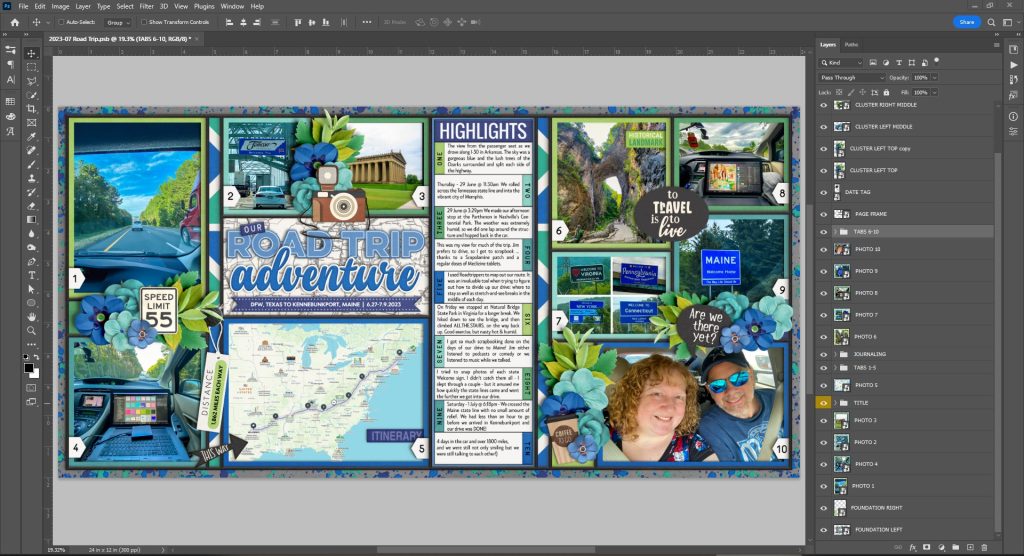
Most of those layers aren’t really layers … they’re Smart Objects. And as I used them to simplify my layers palette, Photoshop responded faster and worked more smoothly.
I hope this little trick helps you – whether you’re trying to eek out another year on your computer before replacing it or just finding yourself frustrated with one extremely complex layout, convert your stacks of multiple layers into Smart Objects, and save your sanity!
Do you have other tricks to help improve Photoshop performance? Share them in the comments below!


sandy said...
on July 15th, 2023 at 11:25 pm
Thank you, this is a game changer
Heather Hines said...
on July 16th, 2023 at 8:49 am
This is such a helpful post! Can’t wait to try it!
Amy Cazier said...
on July 16th, 2023 at 11:33 am
THIS is amazing! My life is forever changed! Lol. Thank you!
I don’t store anything on my C drive but photoshop still fills it up and slows everything down. Photoshop uses C as its main system by default BUT you can tell it to use a different drive when it needs more space!!!! Go to: Scratch Disk under Edit > Preferences > Scratch Disk and click on a second drive to speed things along! Now when C is sluggish and full Photoshop will dip into the second drive!
Charlene said...
on July 16th, 2023 at 11:54 am
Thanks, Angie! I’m looking forward to trying this out.
Leablahblah said...
on July 19th, 2023 at 6:34 am
Wow! I had no idea we could do that!! Unbelievable what there is still to learn with that program we use everyday. Thank you so much for showing this trick Angie.
Tracey Monette said...
on July 21st, 2023 at 11:13 pm
Brilliant use of smart objects. I have done this on occasion but not for your great reasons. It may certainly change the way I create previews for large kits!!!
Rachel (Rach3975) said...
on July 22nd, 2023 at 9:31 pm
Great tip–I’m definitely going to be using this one. Thanks, Angie!
leablahblah said...
on July 28th, 2023 at 3:59 pm
Arggghh my file was too big to save as I was scrapping so I made a lot of different smart objects because I hadn’t done my journalings spots yet but it didn’t let me unlayer the smart object when I had accidentally put one of the journaling spot in there! I had to start over! 🙁 Do you know what went wrong?
Amber Reimer said...
on August 4th, 2023 at 1:08 pm
What a great tip! I’m definitely going to have to try this out.
Angie Key said...
on August 6th, 2023 at 5:56 pm
Oh, no, Lea! I’m sorry to hear this. It’s possible that instead of making it a Smart Object, you accidentally merged the layers, or that once you made it a Smart Object, you rasterized it by accident. Did the layer still have that little Smart Object icon on it? By the way, if your Photoshop file gets too big and you get an error about saving it, you should be able to change the file type to PSB rather than PSD, and it’ll save properly. PSB is “PhotoShop Big” and is used for any file over 2GB in size.