Think Outside the Album: Gift & Goodie Wrap from Paper Lunch Sacks
We’re well into the final three months of the calendar year, when it seems like every time you turn around there’s another thing you need to give, make, or do. I thought we’d devote this month’s hybrid project to something quick and easy, where you probably already have everything you need to make it in your home right now. It’s a versatile project you can use for wrapping up gifts, snacks, and homemade treats, and you can even re-purpose it as a festive holiday place card. And all it takes is a simple paper lunch sack.
Welcome to the October 2024 edition of Think Outside the Album, where we where we look at different ways to take our digital supplies off the scrapbook page and instead, use them to make the rest of our world just a little bit sweeter.
This month, we’re using simple paper lunch sacks to make custom gift- and goodie-wrap. It’s quick, it’s easy, and it’s a super inexpensive way to dress up any gift. Best of all, they’re easy to make in bulk (like, for instance, a set of 30 for all the students in a classroom). Are you ready? Let’s get started!
What You’ll Need:
Paper Lunch Bags
I pulled a partial package of these out of my pantry for this project, and I encourage you to make use of what you have on hand. But if you want to buy a package of them specifically for this project, you’ll find them in the wraps & bags section of your grocery store.
Walmart offers a package of 100 self-standing lunch bags in a standard size (5 1/8″ x 3 1/8″ x 10 5/8″) for $2.28, or the “giant” size (6 1/8″ x 4″ x 12 3/8″) in a package of 50 for $2.28.
NOTE: If you prefer to use a white paper lunch sack, you can easily order them from Amazon. Just be careful to get a standard kraft paper bag and do NOT get glossy (which is what you’ll find in the gift-wrap section of the store). You won’t be able to print easily on the glossy bag.
A color printer
For this project, either inkjet or laser is fine, though you may have an easier time getting your lunch bags to run through an inkjet printer. I used my HP OfficeJet Pro 9010 All-In-One.
Stapler with standard-size staples
We’ll be closing our bags with two staples each.
Troubleshoot printing before you begin
Before you spend time creating a complex design for your bag, it’s a good idea to run some tests and figure out how to use your printer to print on a lunch sack. Each printer has its own quirks, so rather than trying to troubleshoot this process for you, I’m going to suggest you use your favorite search engine to look up “how to print on a paper lunch bag”. There are some fantastic videos available on YouTube that will walk you through the process.
Some videos suggest using painter’s tape to either (a) adhere down the folded part of the bag, or (b) adhere the entire bag to a letter-sized sheet of paper. For my printer, I found that when I loaded and fed the bag in feet first – so it went through the rollers with the fold, rather than against it – I didn’t need to do either one. All I had to do was rotate my finished image 180-degrees before printing so that it printed feet-first just like I loaded the bag.
So plan on using several bags on test runs through your printer, and get that part out of the way first. Once you know how to make it work with your printer, it’s time for the fun part – designing!
Step 1: Set up your template
Open your preferred digital scrapbooking software – I’ll be using Photoshop – and create a new canvas that’s the same size as your lunch bag. (In my case, that’s 5.25″ wide by 11″ high and 300dpi.)
Create a temporary line, mask, mark, or ruler to block off the top square of your canvas. In other words, if your bag is 5.25″ wide, create a line at 5.25″ down your canvas.
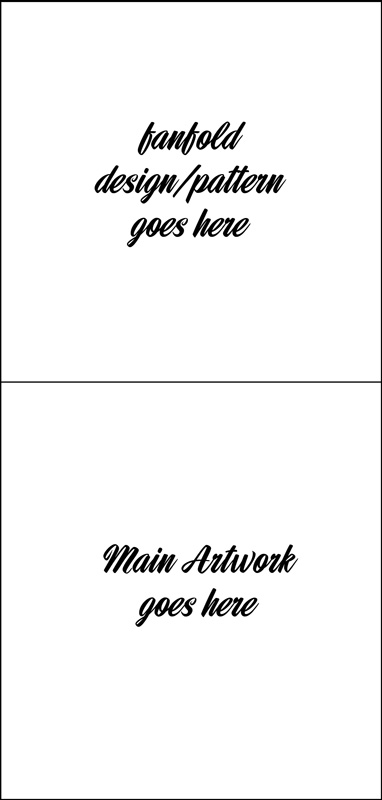
You’ll want to keep the main artwork for your bag BELOW this line. And if you want to print a design on the fanfold portion of the bag, you’ll put it ABOVE the line.
Step 2: Create your artwork
Now break out your favorite digital scrapbooking kits from the Sweet Shoppe and start designing! I’m creating a Halloween goodie bag and want something that’s a little spooky-scary. I’m using a brand new kit by Em of The Nifty Pixel called Bag o’ Bones that will launch with this week’s new releases on the 19th of October. It’s a super fun kit with lots of elements, but my favorite part are the various painted overlays she’s included.
Here’s what my design looks like, all ready to print.
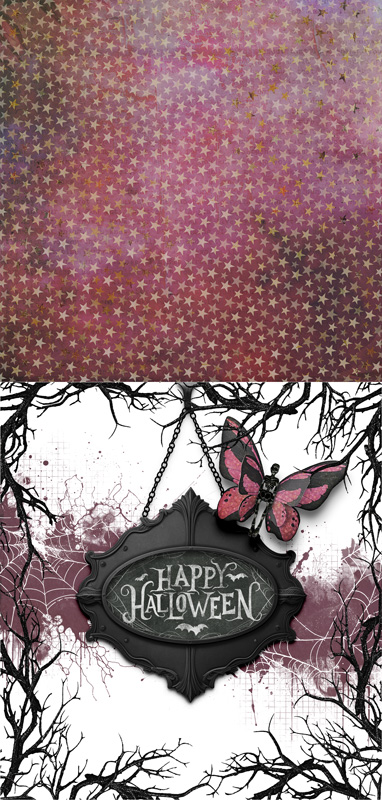
Created using Bag O’ Bones by The Nifty Pixel – coming to the Sweet Shoppe October 19th
Step 3: Print your lunch bag
Now load up your printer with your lunch bag and print off your design. You’ll want to set it aside and give it a really good opportunity to dry before moving on to the next step.
Step 4: Fill & fold your lunch bag
Once your lunch sack is completely dry, it’s time to fill it up. Place whatever treats or goodies you want inside the bag, making sure you don’t fill it any higher than the bottom portion of your printed design. (Remember that line we marked in Step 1? Don’t fill it higher than that. In fact, about 1″ below that line is ideal.)
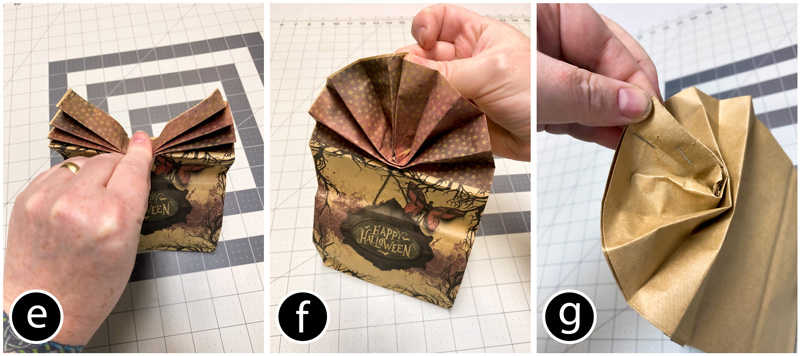
Now, bring the top of your bag together (a) and once it’s aligned, start a zig-zag or accordion fold. Begin at the top by folding it toward the back of the bag (b), then to the front (c), then the back, etc. (c) until you’ve completely folded that top square portion of the bag (d). The exact size of your fold will depend on the size of your bag; the bigger the bag, the thicker your fold, and the smaller your bag, the smaller your fold. For my standard-sized lunch bag, I went with approximately a 1″ fold.
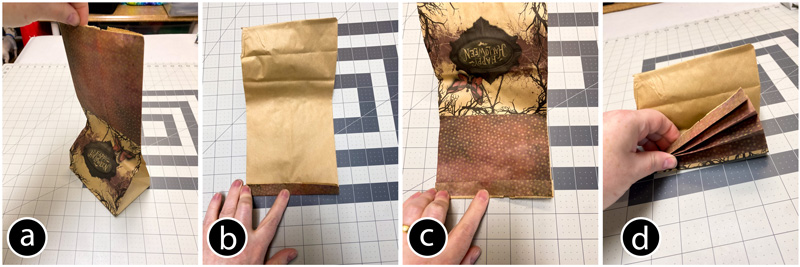
Give the edges of your folds a nice, crisp score with a bone folder or your fingernail. The crisper your folds, the prettier your fan-fold will be.
Then pinch the top layer of your fan-folds together from the center (e) and bring the outside edges together (f). Give that center fold a good pinch to create a crisp fold.
Now it’s time to grab your stapler. Staple together the top fold – which is now the center of your fanfold – as close to the fold as you can get (g). I generally use two staples – one at the very end, and one about halfway in.
And that’s all it takes – how cute is our finished bag?!?
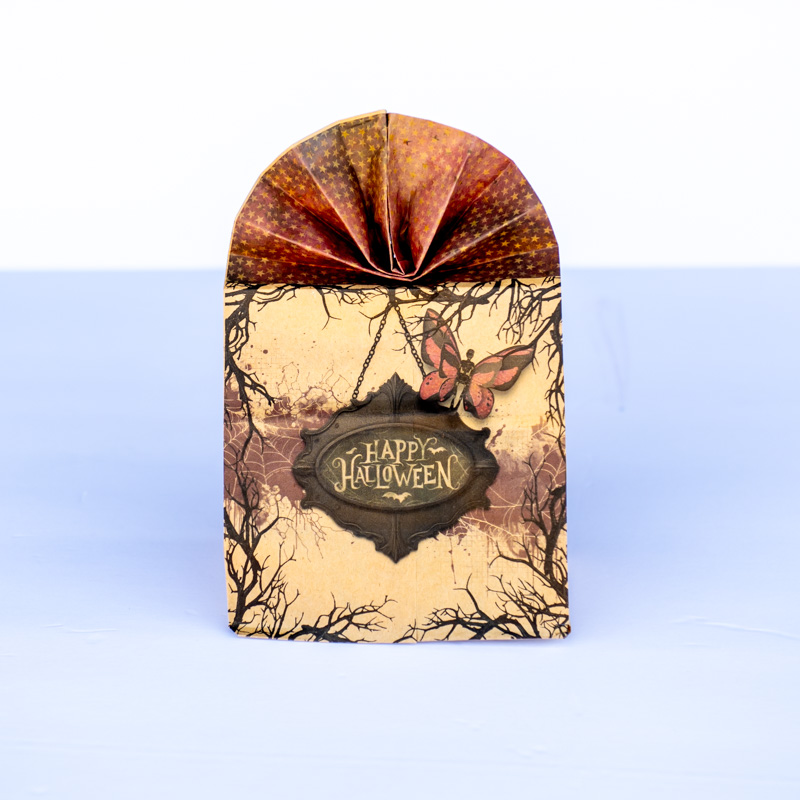
Created using Bag O’ Bones by The Nifty Pixel – coming to the Sweet Shoppe October 19th
More ideas for this project
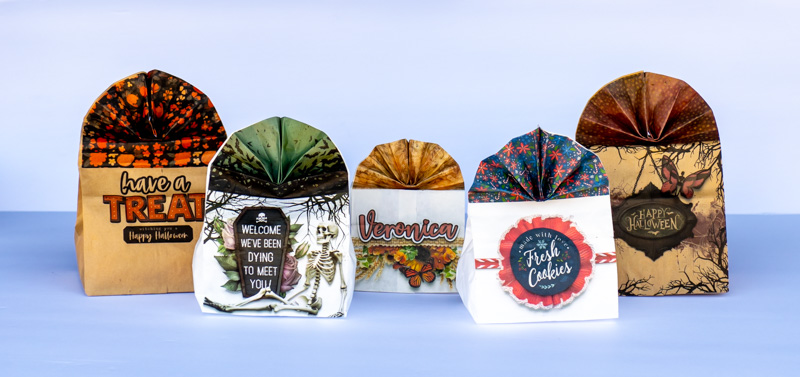
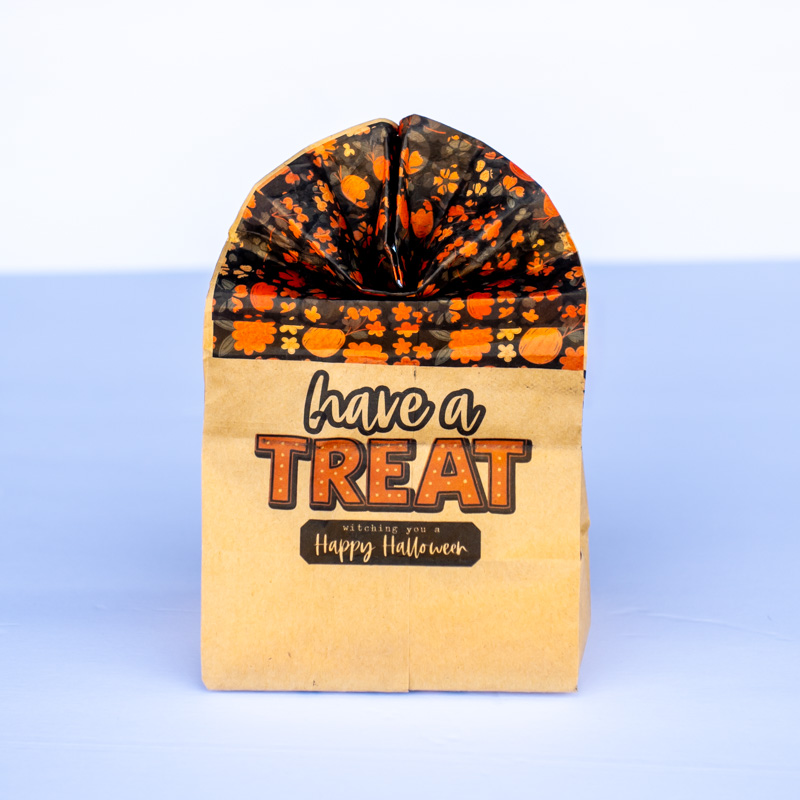
Now that you know how easy it is to make this project, it’s time to start thinking about all the different things you can do with it. For example, you can print your design on a white bag rather than a brown one:
Created using Bag O’ Bones by The Nifty Pixel – coming to the Sweet Shoppe October 19th
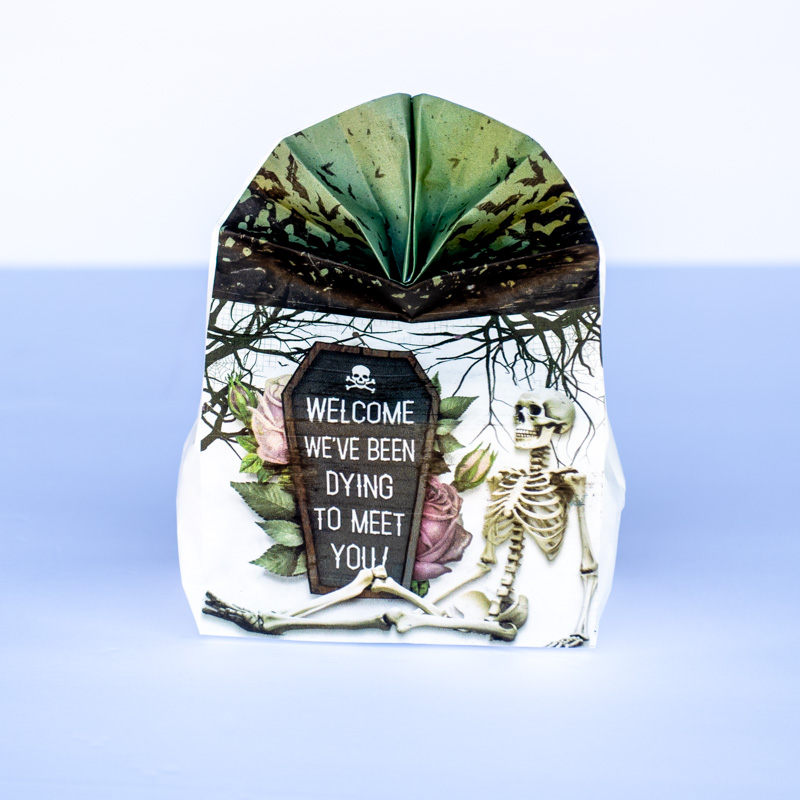
If you’re making goodie bags for small children, you can use a cute Halloween kit rather than a scary one – for this, I used Traci Reed’s latest collection, Jack & Skelly:
Created with Jack & Skelly by Traci Reed
What about using a smaller bag and creating functional placecards for your next holiday table? Simply fill the bag with nuts, butter mints, a cookie, or a truffle or two for an after-dinner treat:
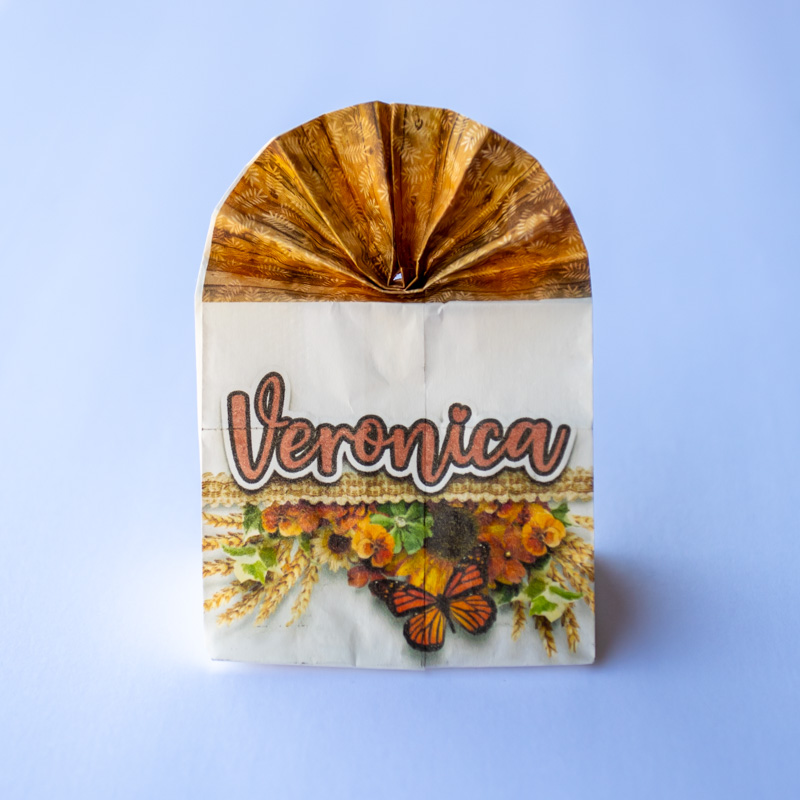
Created using Farmhouse Fall by Digital Scrapbook Ingredients
And speaking of cookies, when it comes time to start baking for Christmas, keep these bags in mind as an easy (and cute!) way to package and distribute them:
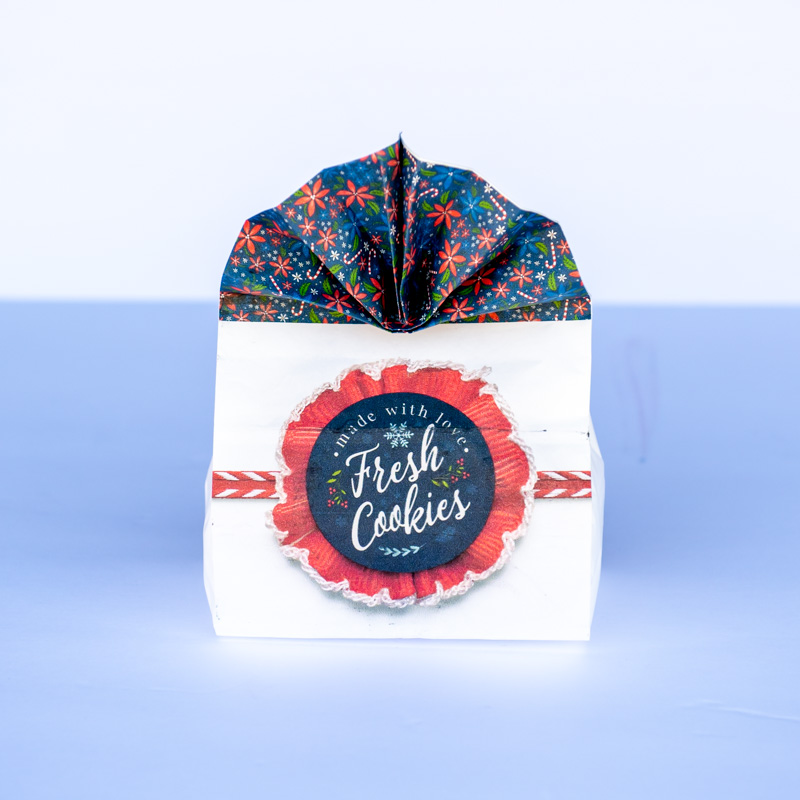
Created using Cookies & Hot Cocoa by Kristin Cronin-Barrow
The possibilities for this project are only limited by your imagination! So pull out those unused paper lunch sacks – or pick up a package the next time you’re at the store – and get ready for quick-and-easy but 100% customizable goodie bags, place cards, and gift wrap this holiday season!


