Noted-Make Your Own Notepads
Hello Sweet Shoppers, Keely here and I’m bringing you one super easy crafty project. Notepads. They’re practical, I started making them because I like to have a customized shopping list on my fridge so the family can jot down needs and wants. They also make great stocking stuffers, teacher and classroom gifts, game pads for car trips, lots of possibilities. I’ll show you how I put together a couple for my girls’ Easter baskets.
What you need:
– Digitally designed and printed sheets to make your notepad
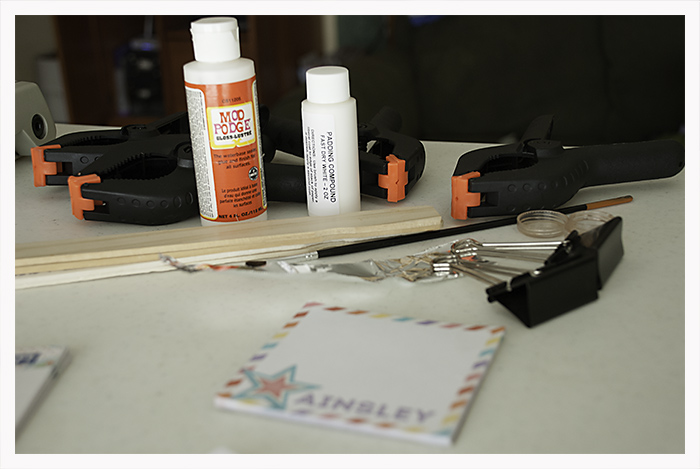
– Scissors, paper trimmer or craft knife
– Thin cardboard for notepad backing ( I always scavenge the recycling bin, packaging inserts, cereal boxes etc. are perfect)
– Binder clips, vice grips, clamps anything that will do a good job of keeping your notepad tightly pressed together.
* I also use paint stirrers, rulers, or clip boards to keep it even and stable.
– Padding compound
* You can use Modge Podge too. It works but honestly it’s just not as nice as padding compound. Padding compound is exactly like what is used for the notepads you buy in stores, it dries really quickly and it’s flexible. You can buy it at craft or art supply stores or online. I’ve been using the same bottle for years, it lasts for ages.
Let’s Do This:

I created my pages in Photoshop, I did a set that will be 4×4 using the triple dip Somewhere Over the Rainbow, a 3×3 set, and a 3.1.4 x 6 using Jenn’s Home On The Range. Print out as many copies as you want for your pad. I like to mix up my notepads so not every page is the same but you can do whatever you like.
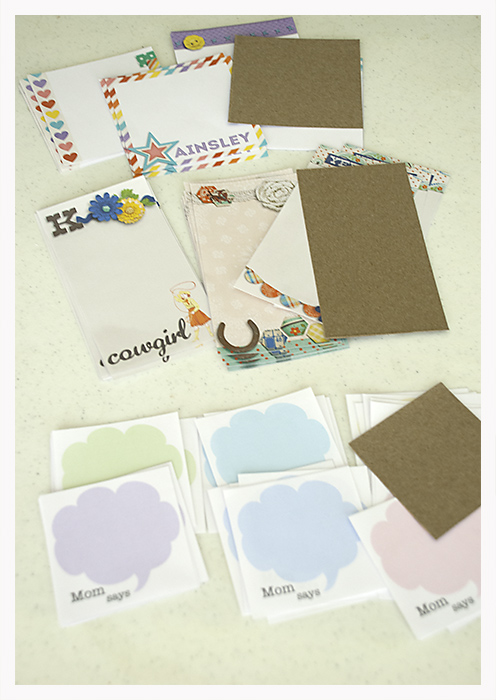
Trim away and cut your cardboard for backing. Now your notepads are ready to assemble. Stack up everything like you want and you’re ready for the finishing.
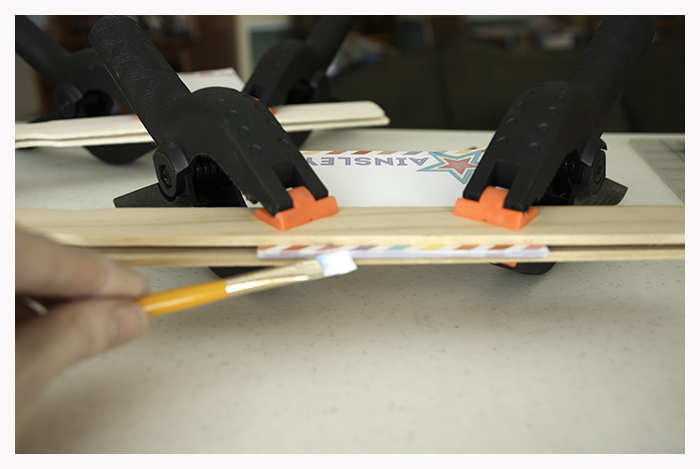
Take your stacked pad and place in-between your stabilizer ( I’ve always used what I have on hand, paint stirrers and clipboards work really well. If you use clipboards just have one on top and one on the bottom and use your clamping device. I’ve also used only binder clips on small pads, they’ve been fine but it’s nice to have a little extra, even pressure ) Once everything’s stacked and clamped run a brush with padding compound along the edge and a tiny bit over the side and back edge of the cardboard backing. Wait. It only takes twenty or thirty minutes for this stuff to dry, I usually do about three coats.
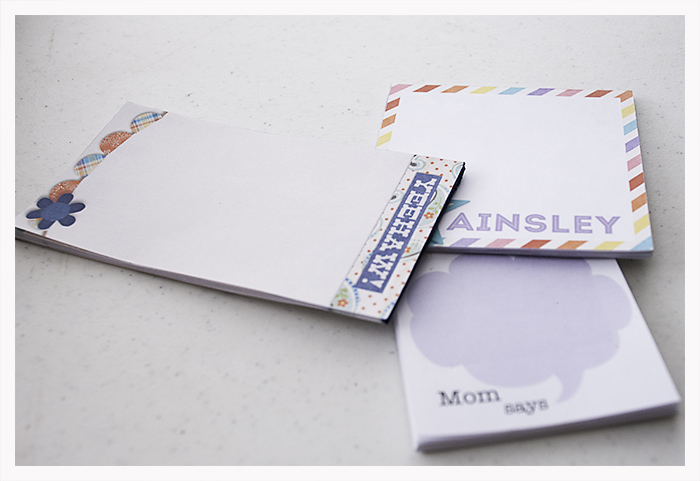
Voila, custom made notepads. You can see the edge on the long set is blue, I added a little food coloring to the padding compound.

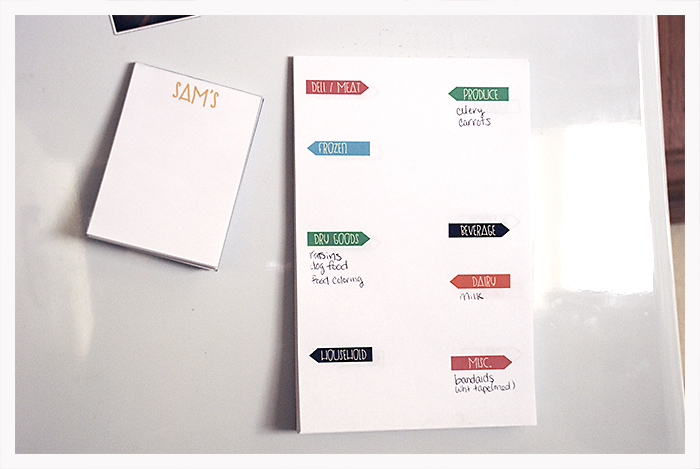
You can also glue a magnetic strip on the back, that’s what I do with my shopping lists. You can get a big roll for $2.99 at Hobby Lobby.
(I’ve also found you can reuse the backing )
And that’s it, easy peasy.
alli hughart said...
on March 21st, 2013 at 4:10 pm
thank you for making my world a little bit easier today! lol. could also be a great idea for making easy to tear journal cards for the Project Life albums.
Heather Greenwood said...
on March 21st, 2013 at 4:20 pm
that’s so awesome Keely!!!
Sandy/tx-nana-scraps said...
on March 21st, 2013 at 4:56 pm
Love this, great idea. Thanks!
Marie said...
on March 21st, 2013 at 6:54 pm
Very cool!
Nicole said...
on March 21st, 2013 at 7:26 pm
AMAZING!!!
Jeanne said...
on March 22nd, 2013 at 6:17 am
Where do you buy padding compound?
Donna E. said...
on March 22nd, 2013 at 8:20 am
Totally awesome, love this! Thanks!
Keely Bostick said...
on March 22nd, 2013 at 1:09 pm
Jeanne you can buy padding compound at art supply or craft stores or buy it online. I recommend not buying a huge bottle, a little goes a long way.
Jeanne said...
on March 22nd, 2013 at 4:45 pm
Thanks Keely. I’ve never seen it in the stores, but I will check out Michaels and Hobby Lobby. Is there a certain brand that you buy? I’ve always wanted to try making my own pads of paper. This should be fun.
xo
jeanne
Keely said...
on March 22nd, 2013 at 10:07 pm
Jeanne I’ve only used one bottle so I can’t say if there’s a difference between brands. I can’t imagine there being a huge difference. Have fun!
Faith A said...
on March 23rd, 2013 at 10:52 am
What a brilliant idea, thanks for the tutorial.
Terri Paulson-Sasaki said...
on March 23rd, 2013 at 12:43 pm
Thank you, this is such a great idea. I love the shopping list. I was looking for something like that.
Terri
Soul Wishes
Yobeth said...
on March 23rd, 2013 at 1:35 pm
What a super idea! I’m going to do this one for sure. Thanks!
mshoneybee said...
on March 23rd, 2013 at 7:47 pm
Great idea! This would make perfect teacher gifts. Thanks! MM
Inger said...
on May 7th, 2013 at 5:41 am
Good idea, thanks for the tip. I live in Sweden and I need to know the brand name for a Padding compound. Or, can anyone give me a link to an online store? I don’t know if there’s a swedish product that works the same, so I don’t know what to look for.
Keely Bostick said...
on May 7th, 2013 at 9:30 pm
Inger I have no idea where to get it in Sweden. Here’s a link from Amazon that has several different brands, you can check it out and see if something similar is available.
http://www.amazon.com/s/ref=nb_sb_noss?url=search-alias%3Daps&field-keywords=padding+compound
Inger said...
on May 8th, 2013 at 7:04 am
Thanks for the tip, Keely!
Mary said...
on January 2nd, 2014 at 5:28 am
Brilliant!!! Thank you so much! I have been trying to purchase a Page-A-Day Calendar / Notepad combo in a format I like, because 2 years ago they discontinued what was the *PERFECT* calendar / daily notepad for me. So I’m now considering making my own -did not even know this was possible, as I am not at *all* crafty – so a huge thank you for posting this great tutorial!
Debbie said...
on August 12th, 2021 at 3:12 pm
I love it! I’m going to take a trip with my grandsons to Disneyworld, and I’m going to make them countdown calendars so they don’t drive their parents crazy asking, “How many days until we go?”.