Hot 4 Hybrid Wednesday
Hello, I can’t tell you how excited I am to be doing the first Hot 4 Hybrid blog post of 2010. There are going to be fantastic challenges, inspirations, tutorials, ideas and ‘how to …’ posts every Wednesday from the Hybrid Babes so keep checking back 🙂
Today I have a card tutorial for you. If you’re anything like me then finding time to create anything has to fitted in amongst 20 other things that all take priority so hopefully this might make things easier for you.
The first thing you need to do though is grab a drink, find a chair, clear your desk of all that clutter and half finished projects – oh yeah I know it’s all there because I have a desk just exactly the same – and plan a half hour of ‘me’ time!
This is a mini tutorial to make a boy themed birthday card but really it could be adapted to suit any occasion by switching out the papers and the embellishments.

I used Lauren Grier’s Birthday Monsters kit and Countdown to 6 doodles available in the store to make my 14.5 cms square card.
Step 1
In photoshop create a new file at 14cm square, 300dpi. Place papers, elements and wordart directly onto your document resizing where necessary. Merge the wordart doodle with the blue paper to create one layer. My document looked like this (I create lots of my cards in this way and I use photoshop almost as a planning tool to move things around, add and remove elements etc. so that I am happy with how my card will look before I print and I don’t waste my ink, paper or my time)
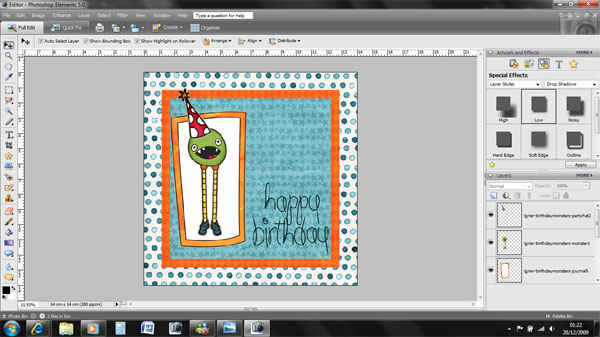
Create a new document the size of your printer paper and drag each layer on to it, print and cut all ready to create your card.
Step 2
Gather your supplies – blank card, printed papers and elements, ribbon, buttons, twine and embellishments

Step 3
Adhere the orange paper to white cardstock, trim leaving a narrow border. Adhere the blue paper to white cardstock leaving a narrow border then join the two pieces using foam pads

See how the wordart doodles have printed directly onto the blue paper giving the effect of a stamped sentiment
Step 4
Wrap a length of ribbon around the blue paper piece then tie twine through the button and around the ribbon. Carefully pull tight and knot, this will nip in the ribbon anchoring it to your crad


Step 5
Now it’s time to build your card. Adhere the spotty paper to the blank card and add the orange and blue piece with foam pads.

Step 6
Adhere the journalling block (I removed the lines in photoshop) and then the monster and his party hat

Stick the gemstone star to the clear acrylic star, knot twine through button and glue to the centre

Carefully position a glue dot, dab of glue or a foam pad behind the button so that it can’t be seen through the star and attach to the card

So now you’ll have a finished card 🙂

Materials used:
Birthday Monsters and Countdown to 6 doodles both by Lauren Grier available at Sweet Shoppe Designs
Buttons – Basic Grey
Twine – Papertrey
Gemstone star – Zva Creative
Acrylic star – craft store
Ribbon – May Arts
I’d love to see your cards, have fun
Andrea x
Sharon Dale (aka skyezak) said...
on January 6th, 2010 at 8:04 am
Wow Andrea, this is just a fabulous card! Love the bright colours, that cute monster and the wonderful layering you’ve done. Just love me some hybrid!
Jenn7 said...
on January 6th, 2010 at 8:09 am
I love your card! It makes me want to try making one!
Col said...
on January 6th, 2010 at 9:55 am
Andrea this is fantastic!! I just LOVE your tutorials, you do such a great job with them!! 🙂
Excellent start to H4H for the year!!!
erica said...
on January 6th, 2010 at 10:28 am
gorgeous card and step by step instructions thank you, love your card
Emmy said...
on January 6th, 2010 at 12:38 pm
This is so cute! I can’t believe how good your cut pieces look – you must have a super steady hand!
jan hunnicutt said...
on January 6th, 2010 at 3:11 pm
Very nice! I’m just starting out digi scrapping and am really interested in the card making part so your card today was just what I wanted to see. I’m waiting on PSE7 so I can dive in. Thanks for showing how to~
Beth M said...
on January 6th, 2010 at 5:12 pm
Oh my goodness is that cute! Can’t wait to try designing a card in photoshop!
heidi said...
on January 6th, 2010 at 7:48 pm
Love this card! So cute, and the monster is just to die for.
Heather S said...
on January 7th, 2010 at 11:37 am
This is FABULOUS – Thanks for sharing. I have been wanting to try a hybrid card.
Lilach Oren said...
on January 10th, 2010 at 4:21 pm
So cool!! I just LOVE it!!