Think Outside the Album: Sweet Treat Baskets
The very happiest of springtime greetings to you all, my sweet scrappy friends!
As the calendar turns to the month of March, I’ve started thinking about the holidays on the horizon; specifically, St. Patrick’s Day (March 17th) and Easter (March 31st). These are ideal opportunities to show some love to the people in our lives, be they family, friends, co-workers, or service providers. And I’ve got the perfect springtime project to help you do just that!
Welcome to this installment of Think Outside the Album, where we look at different ways to take our digital supplies off the scrapbook page and instead, use them to make the rest of our world just a little bit sweeter.
Did you know that you can turn a sheet of cardstock into an adorable little basket with just a paper trimmer, scoring tool, and stapler? No complex pattern or cutting files required! And when you combine that with your favorite digital scrapbooking kits from the Sweet Shoppe, you can create quick and easy custom gift baskets for anyone, for any reason!
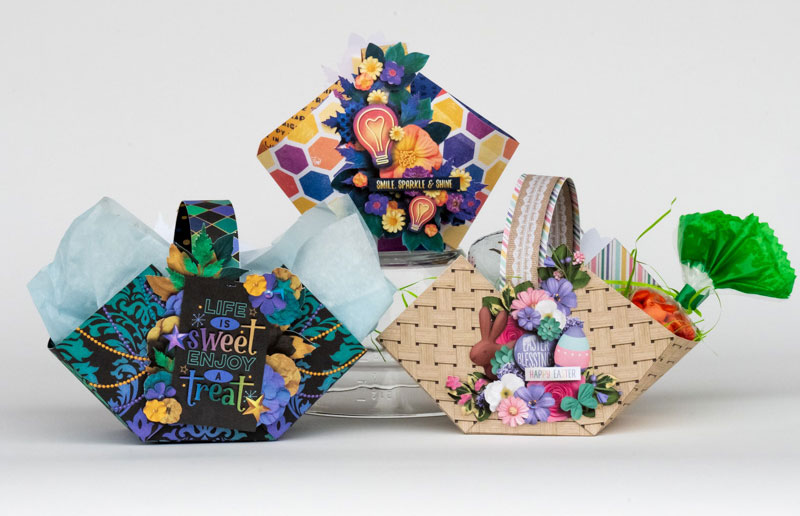
I’ve created three versions of this project: an Easter basket filled with candy, a thank-you or thinking-of-you basket that holds a decorative candle, and a St. Patrick’s Day basket that’s the perfect size to contain baked goods. Let’s take a closer look!
What you’ll need:
For each gift basket, you’ll need:
- two sheets of white 8.5″ x 11″ cardstock
- …and something to put in it! Candy, baked goods, home decor, fun office supplies, etc.
You’ll also need the following tools:
- color inkjet or laser printer
- paper trimmer
- scoring tool or scoring blade for your trimmer
- scissors
- standard-size stapler with staples
- rolling adhesive, adhesive dots, or foam mounting tape
How it comes together:
Before we open up Photoshop (or your preferred digital design software) let’s take a look at how the basket is cut and assembled.
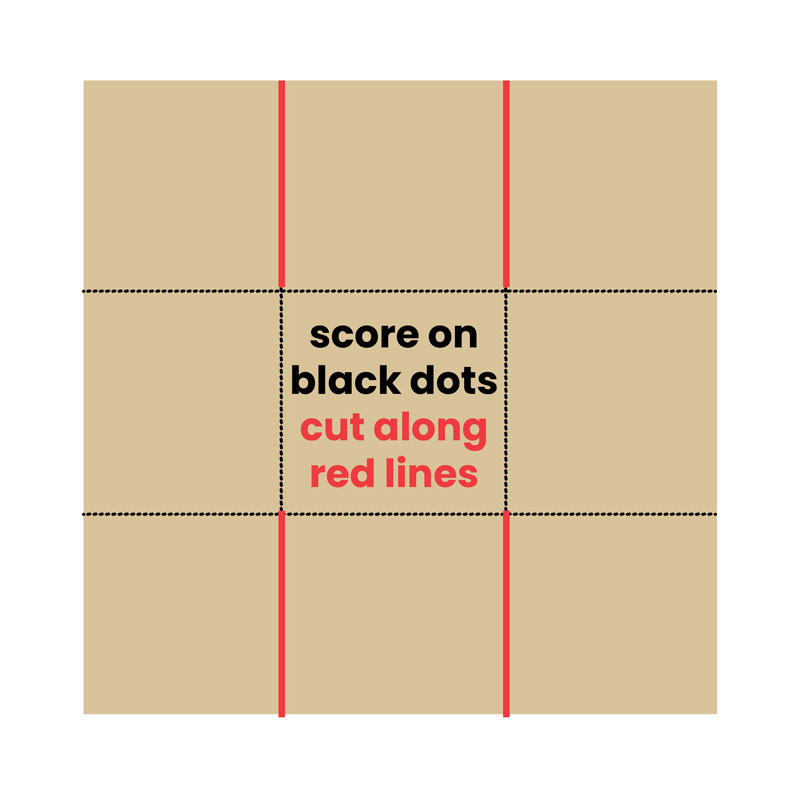
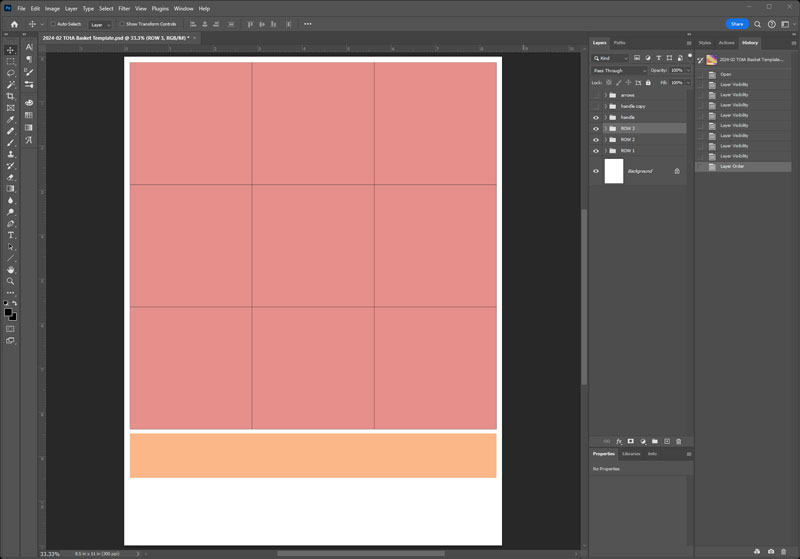
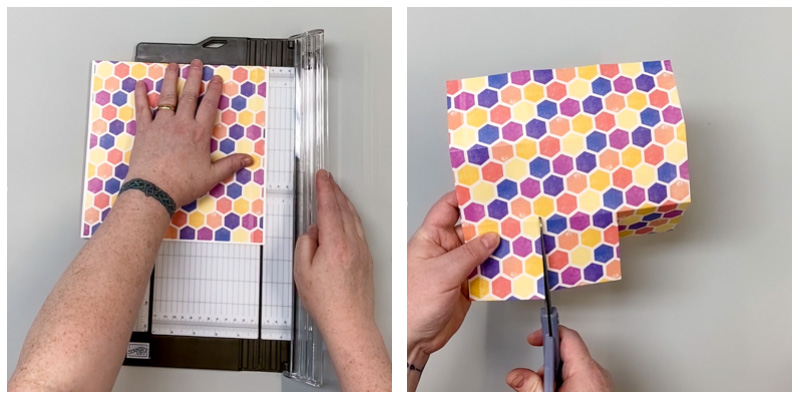
The basket is created from a square piece of cardstock. Obviously, you can scale this up or down as much as you’d like; for this project, I’m going to make the most of my letter-sized sheet of cardstock by cutting an 8.25″ x 8.25″ square:

Next, score fold lines that divide it into thirds both horizontally and vertically. 8.25″ divides into three equal segments of 2.75″:
Your cardstock should now look like a grid of 9 squares – 3 wide by 3 high. Next, take your scissors and carefully cut along these 4 folds:
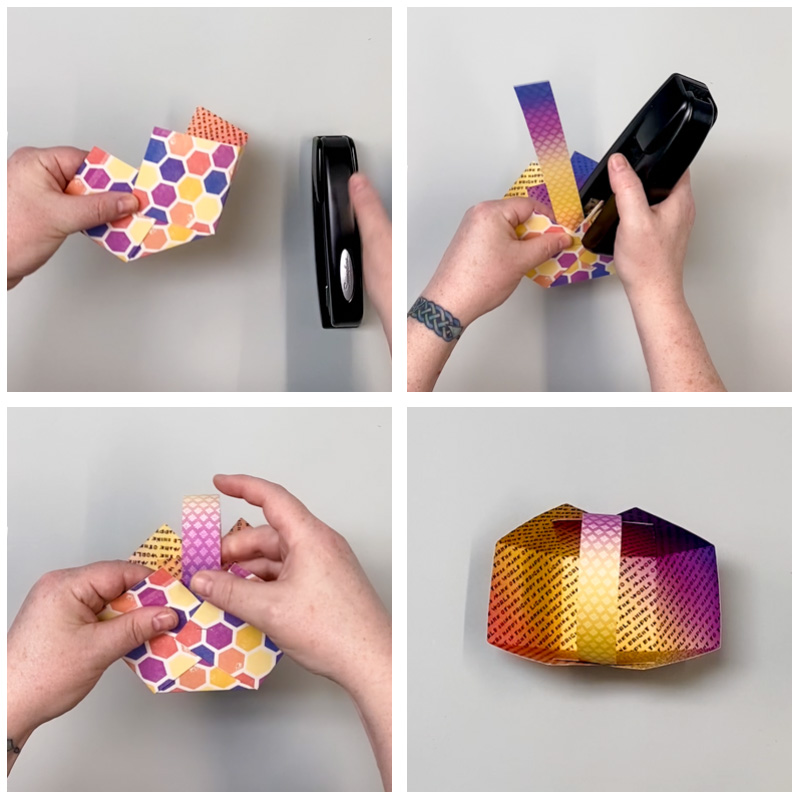
Fold up your basket along all the score lines.
Now, grab your stapler. Take your two outer squares and fold them up over the middle square so they are at a 45 degree angle – two diamonds, overlapping the square. Staple it in place. Then turn the cardstock and do the same thing to the other side.
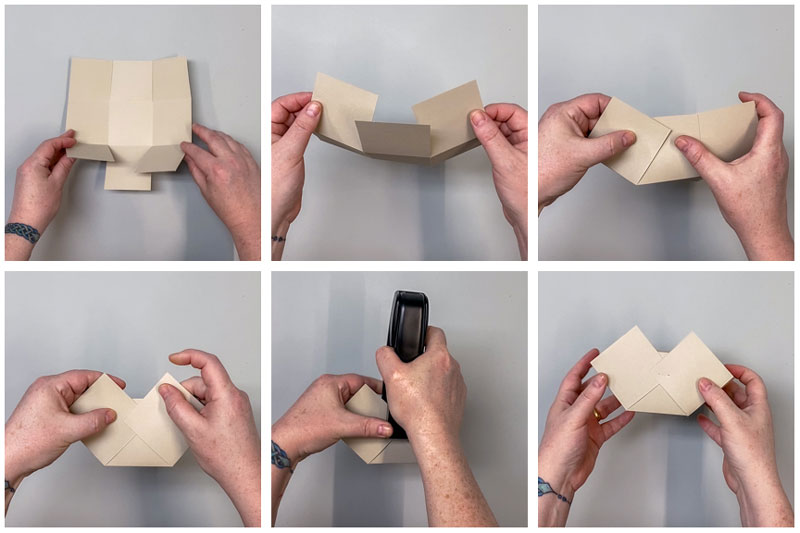
That’s it! You can add a handle to your basket by cutting a strip of cardstock – I went with 1″ wide and 8.25″ long, to use some of the paper I cut off when creating my square. Slide it between the square and overlapping diamonds, and staple it in place.
I strongly recommend using staples to assemble your basket because of how much stronger they are than adhesive. It will hold your basket and handle together with no worries of slipping or coming apart. If you don’t like the look of the staples, don’t worry – when you design your basket, you’ll create some sort of decoration – a cluster, a shape, a journaling card or word art – that will cover up those staples.
Now that you know how the project is assembled, we can get to the fun part – designing our artwork!
Project #1 – Let Your Light Shine Basket
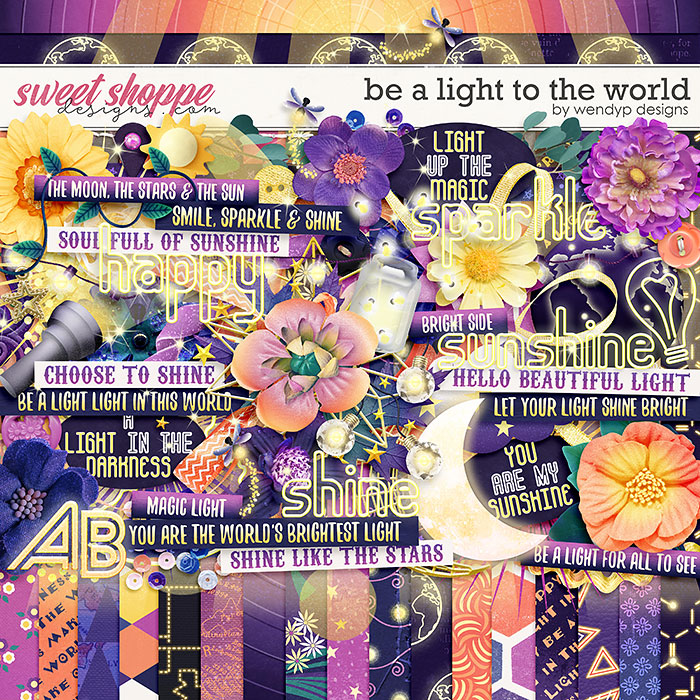
For this project, I wanted to create a basket to hold a decorative candle with an encouraging message for a friend or teammate. I fell in love with WendyP Designs’ Be A Light to the World – and its color palette matched my candle perfectly!
Step 1 – Design your basket
Launch your preferred digital design software and start with a blank canvas the same size as the cardstock you’ll be printing on (ex: 8.5″x11″). Set up your template for the basket using the layout above – either one big square, 8.25″ x 8.25″, or a three-by-three grid of 2.75″ squares. Also, be sure to include a 1″ x 8.25″ strip for your basket’s handle.
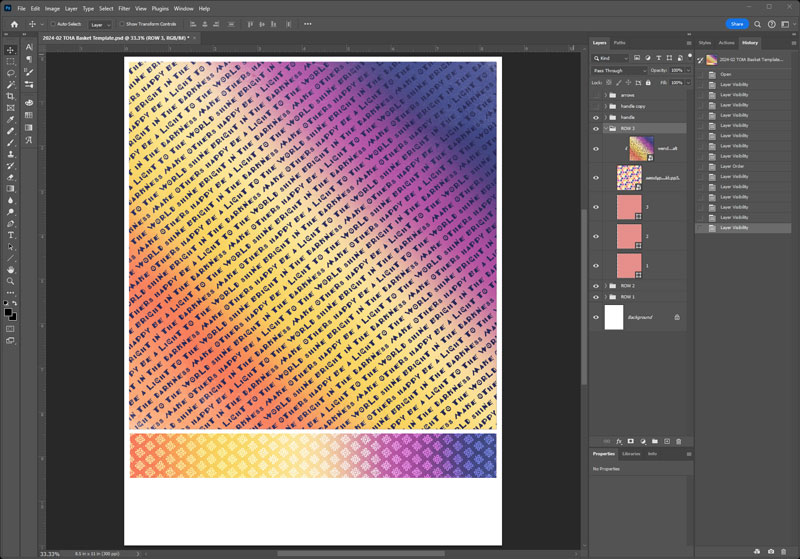
Now, drag-and-drop patterned paper from your digital kit onto the canvas and clip it to your template. We’ll call this your Basket Front.

Be sure to also set up the paper you want to print on the back side – it’s what will show on the inside of your basket. We’ll call this your Basket Back.
Step 2 – Design your side decorations
In another blank canvas the same size as the cardstock you’ll be printing on (ex: 8.5″x11″), create the decoration that will go on the sides of your basket to cover the staples. This can be as big or small as you’d like; I decided I wanted mine to be no wider than 4″ and no taller than 5″. Using the gorgeous elements in WendyP Designs’ Be A Light to the World here is what I created:

Step 3 – Print and cut
Now that your design work is done, it’s time to print and cut it out. But before you hit “print”, you have a decision to make … how will you cut out your decorative clusters?
You can use a pair of scissors and “fussy-cut” around your design. Alternatively, if you have a Cricut, Silhouette, or other digital cutting machine, you can use its “print and cut” function to have it do all the cutting for you.
Option A – I’m cutting out my decorations by hand
Print your 3 designs on 2 sheets of cardstock as follows:
- Sheet #1: your Basket Front & your Basket Back (printed front-and-back on one piece of cardstock)
- Sheet #2: your decorative clusters
You’ll know best how to do this with your specific printer.
Option B – I’m using my Cricut/Silhouette to cut out my decorations
- Print only your Basket Front & your Basket Back (printed front-and-back on one piece of cardstock). You’ll know best how to do this with your specific printer.
- Export your decorative clusters as PNGs with a transparent background.
- Launch your Cricut/Silhouette design software. Following its instructions, import/upload your decorative clusters to a new canvas.
- In my Cricut software, the options I chose when importing my clusters were Complex image type and Print then Cut Image.
- Resize the clusters on your canvas so they’re the dimensions you want. (In my case, I made sure they were no wider than 4″ and no taller than 5″.)
- Follow the instructions in your Cricut/Silhouette design software to Print then Cut.
- My Cricut software first printed the image to my inkjet printer on cardstock;
- Then I placed the sheet of cardstock on a cutting mat;
- I loaded the cutting mat into my machine;
- And it cut around the design.
To cut out sheet #1, simply trim it with a paper cutter so you wind up with one 8.25″x8.25″ square and one 8.25″ x 1″ strip.
Step 4 – Assemble
Following the instructions at the beginning of this post, score and fold your basket into a 3×3 grid (2.75″ squares). Then cut along those two fold lines:
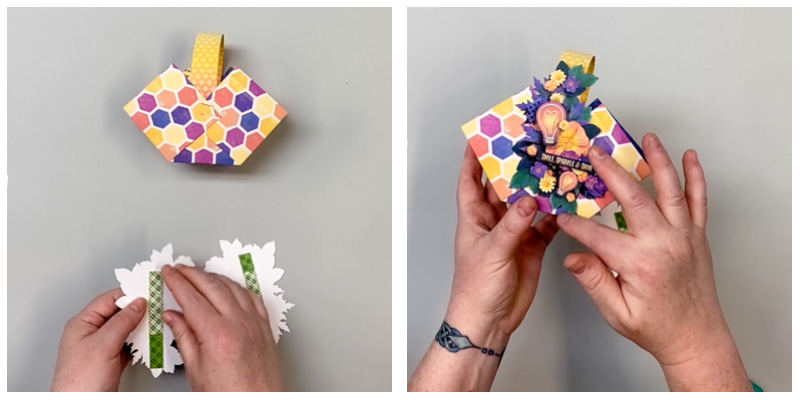
Grab your stapler. Take your two outer squares and fold them up over the middle square so they are at a 45 degree angle – two diamonds, overlapping the square. Staple it in place. Then turn the cardstock and do the same thing to the other side.
Insert your handles and staple them in place as well.
Finally, using the double-side adhesive of your choice, attach your decorative clusters to each side of the basket, covering up the staples.
Fill your basket with a decorative candle, and marvel at the gorgeous gift you’ve just created!
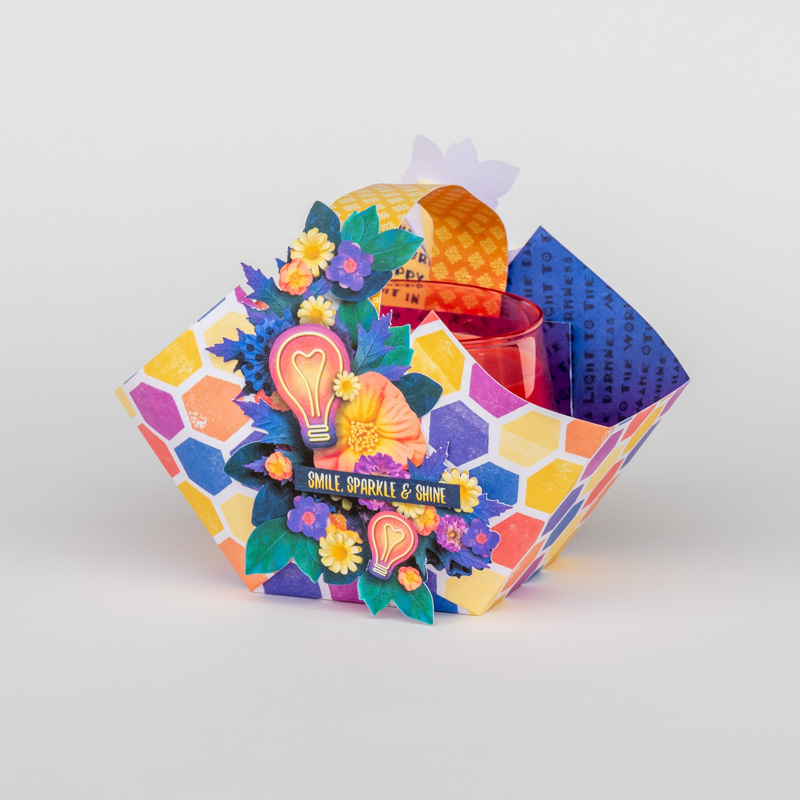
Created using digital scrapbooking kit Be A Light to the World by WendyP Designs
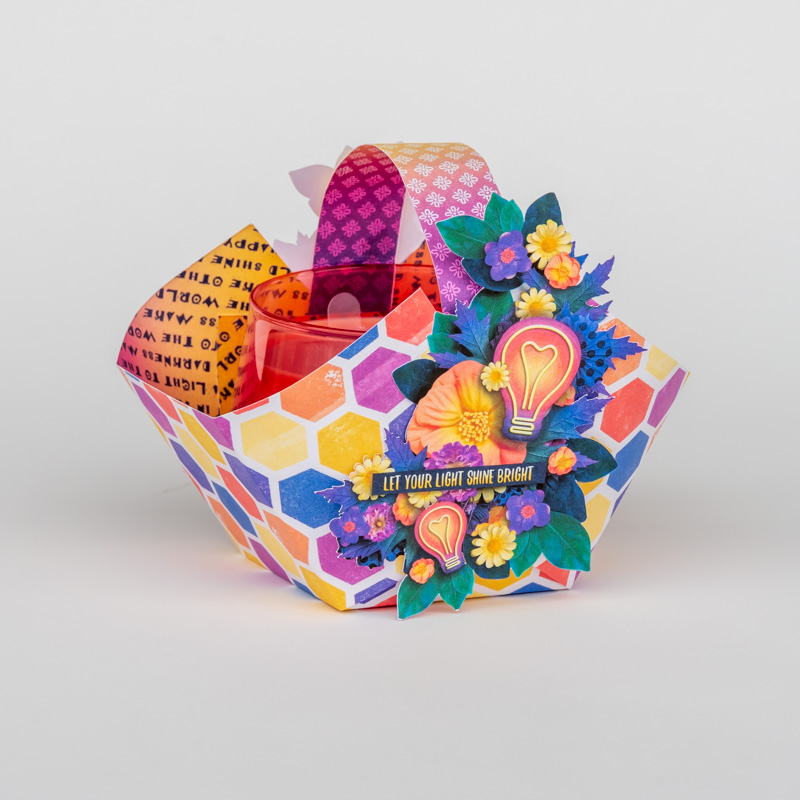
Created using digital scrapbooking kit Be A Light to the World by WendyP Designs
Project #2 – Easter Treats Basket
I was surprised when I checked the calendar and realized Easter falls at the end of March this year, rather than sometime in April. Thank goodness it’s easy to whip up a basket perfect for filling with Easter goodies!
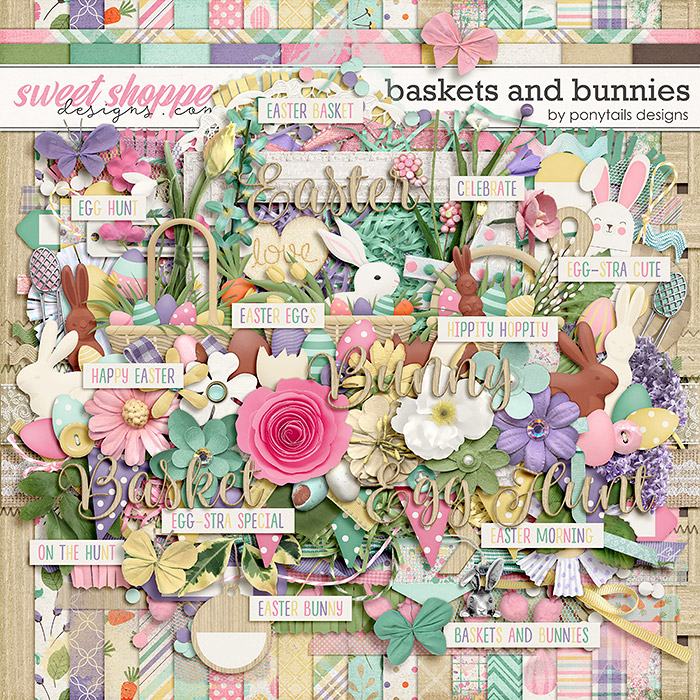
For this project, I selected the oh-so-adorable Baskets and Bunnies by Ponytails Designs.
Step 1 – Design your basket
I decided to get a little tricksy with the basket design on this project. Since I was using the woven basket paper, I wanted the pattern to line up after the basket was assembled. So I rotated the paper in the four corners of my template by 45 degrees:
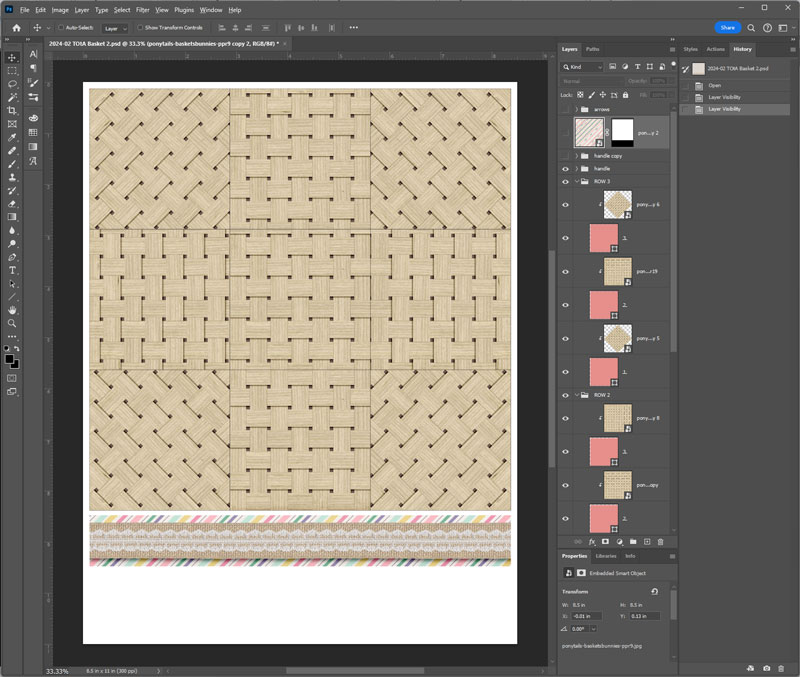
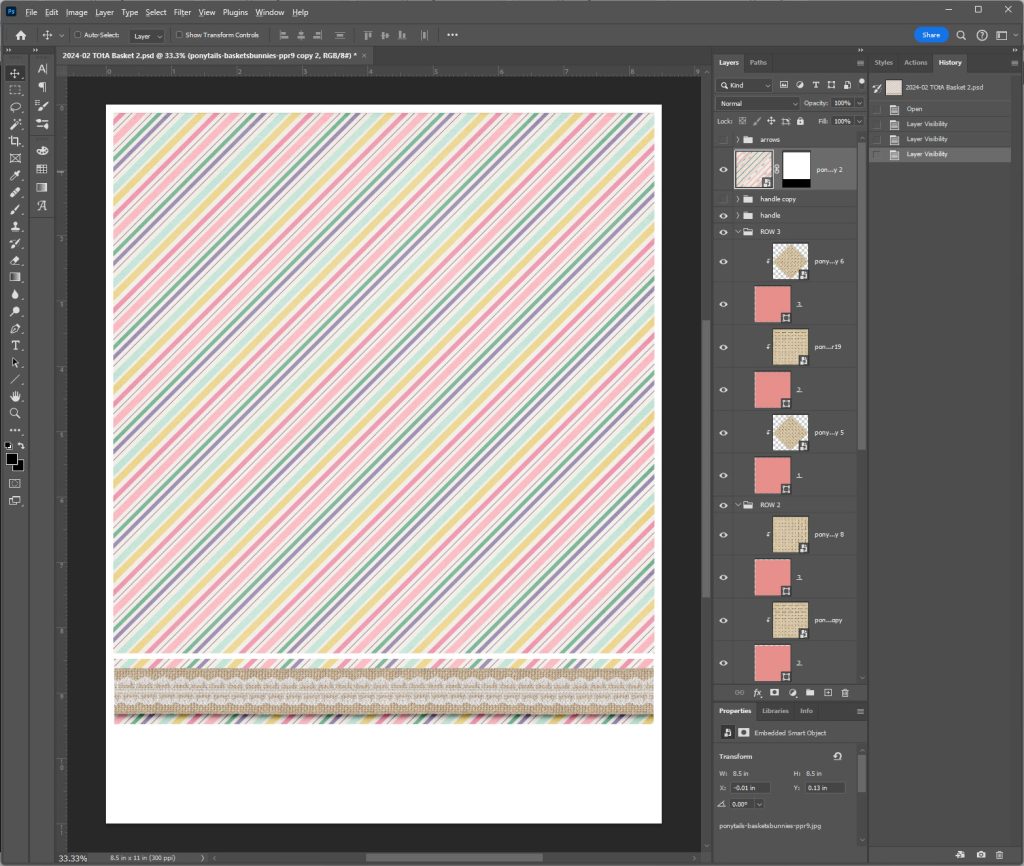
I opted for a striped paper on the inside of my basket:
Step 2 – Design your side decorations
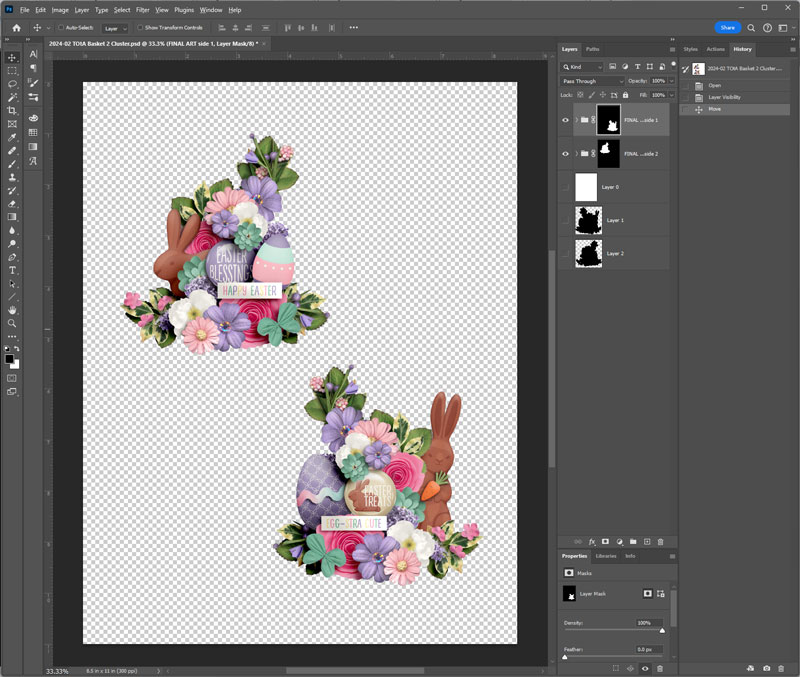
Oh, the adorable flowers and bunnies and eggs in this kit were such fun to play with when creating my side decorations!
Step 3 – Print and cut
Just as before, I printed my Basket Front and Basket Back front-and-back on one sheet of cardstock, and my decorations on a second sheet of cardstock.
Step 4 – Assemble
After following the same steps for assembly, I added some sweets and treats, and here’s my finished Easter basket:
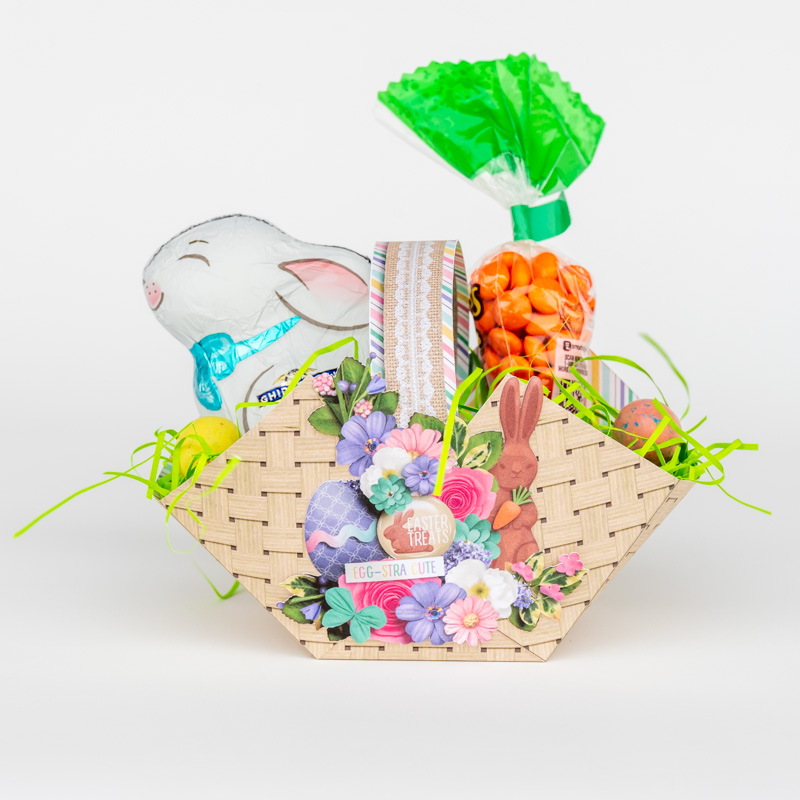
Created using digital scrapbooking kit Baskets and Bunnies by Ponytails Designs.
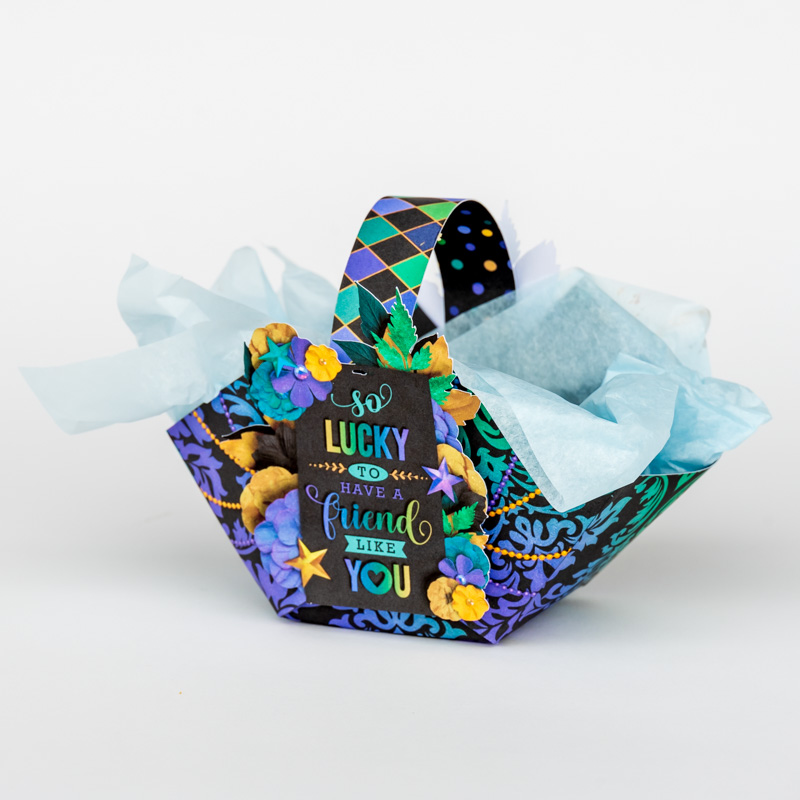
Project #3 – St. Patrick’s Day Friendship Basket
Step 1 – Design your basket
For my Basket Front, I went with patterned paper and bead garlands from the kit, rotated 45-degrees in each corner so they’d be right side up when assembled.
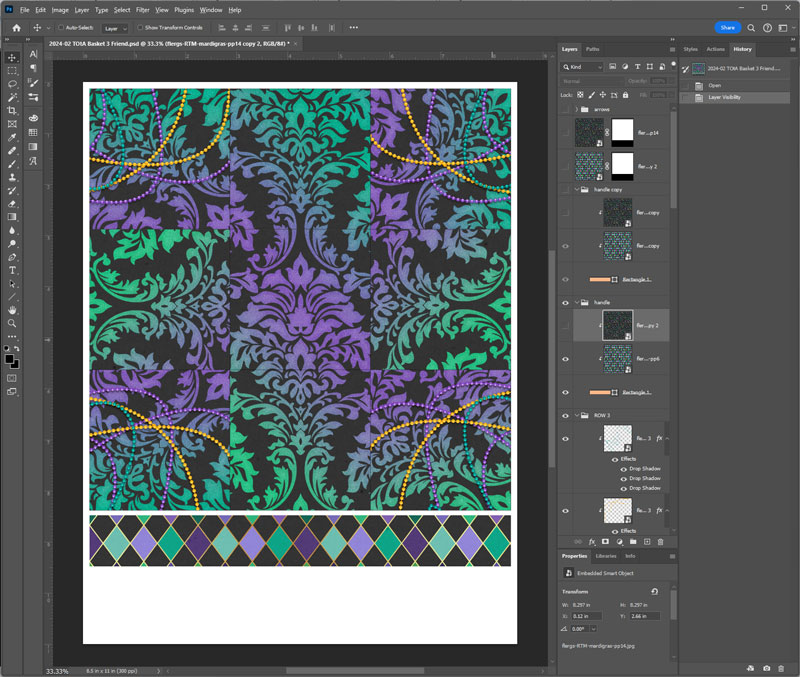
To accent the papers I chose for my basket and handle, I went with a third paper from the kit for the inside of my basket. The designers at the Sweet Shoppe make it so easy to ensure everything coordinates!

Step 2 – Design your side decorations
This project has the most intricate side decorations of the three. I started with word art, clipped papers from the kit so it all worked together, and then built clusters behind them.
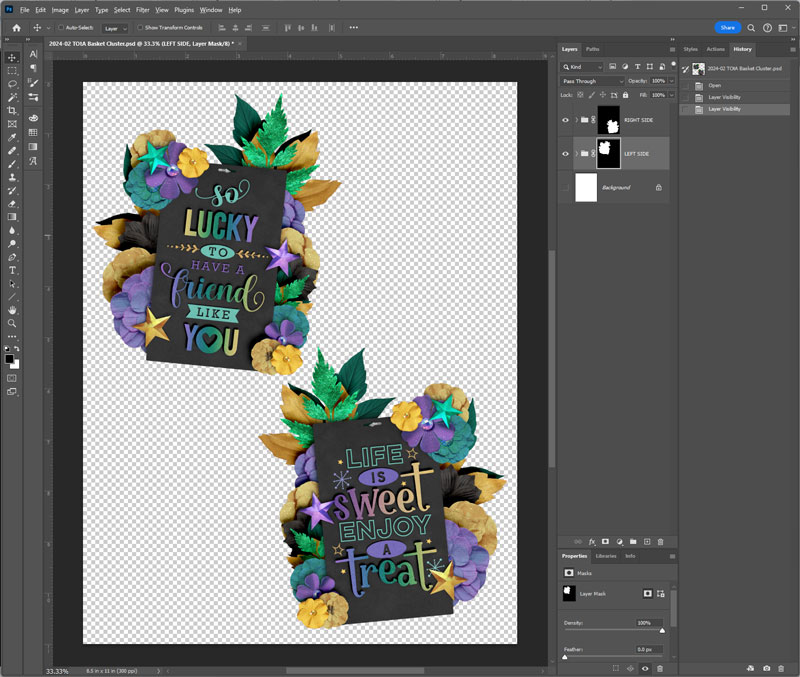
Step 3 – Print and cut
Just as before, I printed my Basket Front and Basket Back front-and-back on one sheet of cardstock, and my decorations on a second sheet of cardstock.
Step 4 – Assemble
I followed the same steps for assembly, added tissue paper and a big, fat blueberry muffin, and here’s the end result:
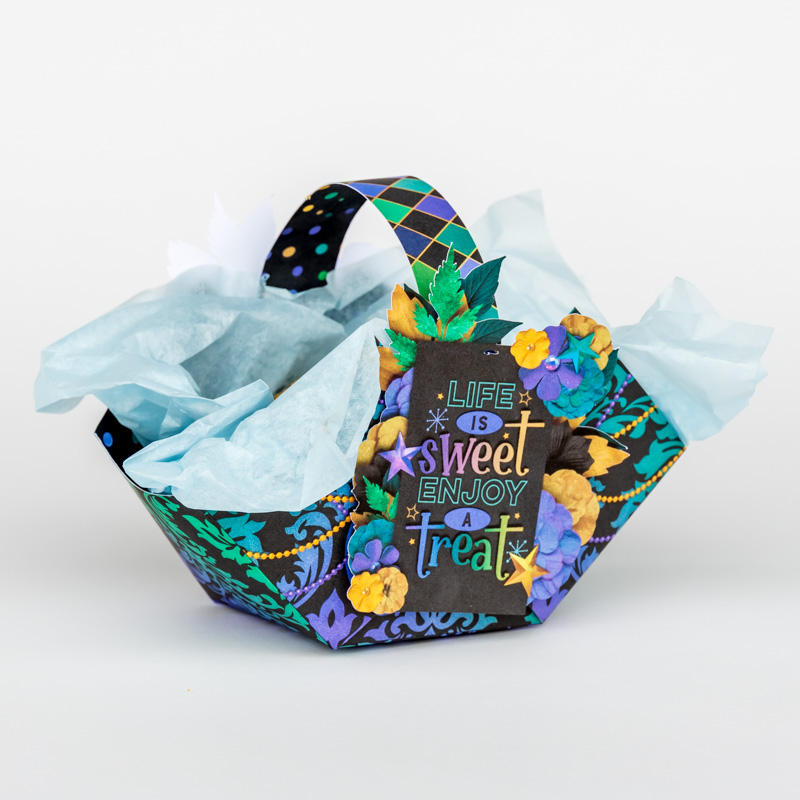
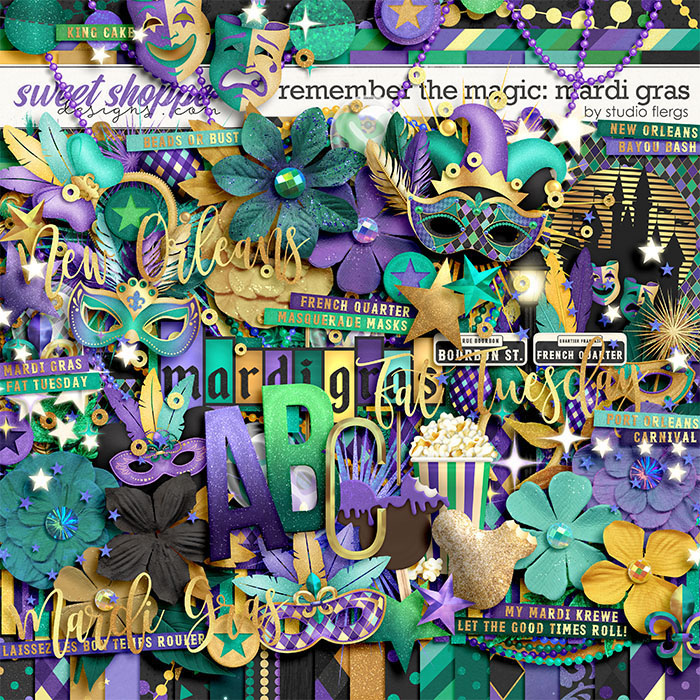
Created using digital scrapbooking kit Remember the Magic: Mardi Gras Collection by Studio Flergs along with word art from Stickers & Stamps: Good Eats 1 and Stickers & Stamps: Friendship, both by Cindy Schneider.
Created using digital scrapbooking kit Remember the Magic: Mardi Gras Collection by Studio Flergs along with word art from Stickers & Stamps: Good Eats 1 and Stickers & Stamps: Friendship, both by Cindy Schneider.
And that, my friends, wraps up yet another edition of Think Outside the Album. The next time you’ve got a small gift or treat to give, I hope you’ll keep this project in mind. It’s not only perfect for Easter and St. Patrick’s Day, but when you use different digital scrapbooking kits from the Sweet Shoppe, it’s an incredibly versatile project. Baby shower party favors, teacher appreciation baskets, a picnic-themed Father’s Day gift or a floral basket for Mother’s Day … the possibilities are endless!
I hope as you tackle your next hybrid project you’ll take a moment to snap a few photos and share it with us in the Gallery. I know I always say it, but it’s true – I can’t wait to see what you create when you Think Outside the Album!


Lidia G said...
on February 28th, 2024 at 1:06 pm
These are all so beautiful with a lot of thought and love put into them. Thank you so much for sharing your talents with us, Angie!