Think Outside the Album: Graphic Tee, NSD Edition
Happy interNational Scrapbooking Day weekend, and welcome to this month’s installment of Think Outside the Album, where we look at different ways to take our digital supplies off the scrapbook page and instead, use them to make the rest of our world just a little bit sweeter.
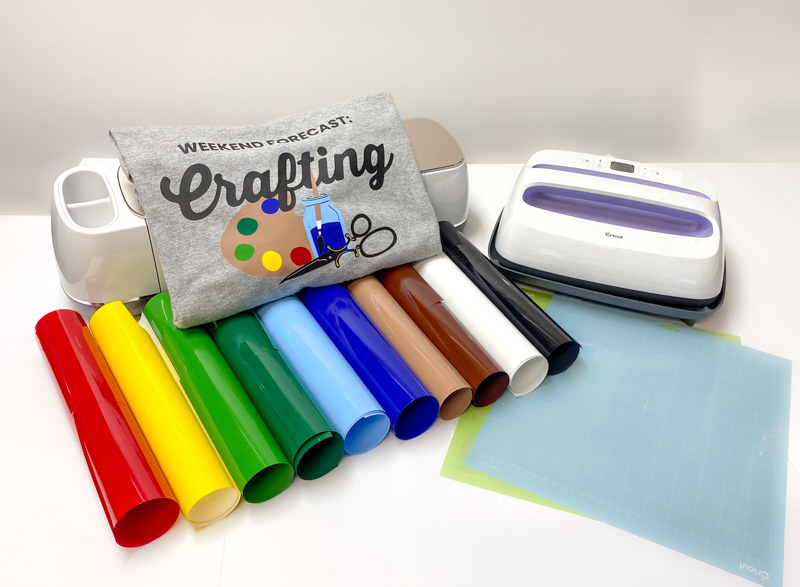
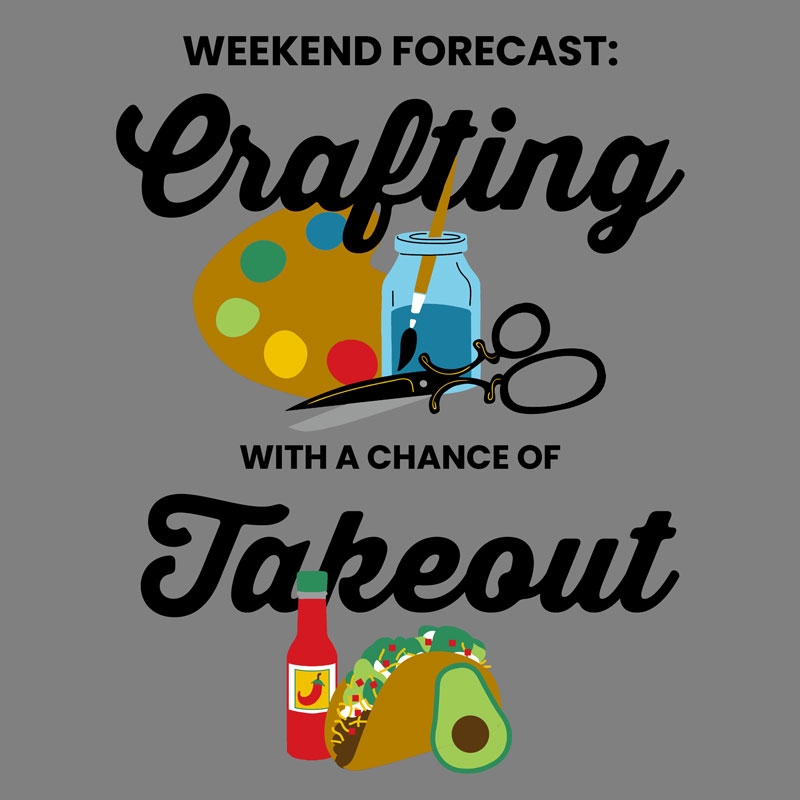
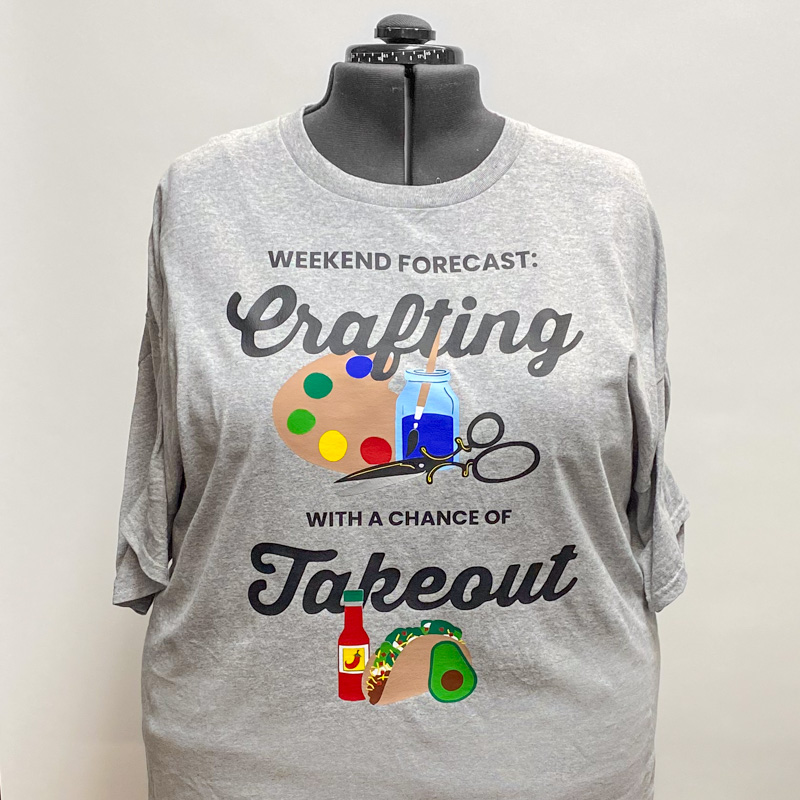
In honor of iNSD, I’ve used some of the brand new products coming to the Sweet Shoppe this weekend and whipped up a custom graphic t-shirt. Just like the Halloween graphic tee I created and shared with you last October, I combined my digi-scrapping tools with an electronic digital cutting machine (commonly known by the brand names Cricut or Silhouette) along with heat transfer vinyl (also known as iron-on vinyl) to create some wearable magic!
You can find step-by-step instructions in the October blog post Think Outside the Album – Custom Graphic Tee so I won’t go into quite as much detail here.
What You’ll Need
Your favorite digital scrapbooking software
I used Photoshop, but any graphics program that can save files as transparent PNGs will work.
An electronic digital cutting machine and accessories
I used my Cricut Maker, but any cutter capable of cutting heat transfer vinyl will do.
The software for your digital cutting machine
I used Cricut Design Space. You need the software for your machine that allows you to upload images to cut.
Heat transfer vinyl in the colors of your choice
I use a variety of brands of HTV. For this project, I needed one 12″ x 24″ sheet of black as well as one 12″ x 12″ sheet of white, silver, red, light brown, dark brown, yellow, light-to-medium green, dark green, light blue, and medium-to-dark blue.
A shirt or other fabric-based item for your design
For this project, I used a heathered grey Gildan t-shirt (90% cotton 10% polyester) – but you can use any pre-made t-shirt, sweatshirt, tote bag, or other item with a fabric content that works with your heat transfer vinyl. (Cotton, cotton/polyester, nylon, etc. Read the instructions that came with your HTV to be sure!)
An iron or heat press
I used my Cricut EasyPress for this project, but any heat press or iron that can get hot enough for your HTV will do the trick. (Again, read the instructions that came with your HTV to determine its temperature requirements.)
Step 1: Create your design
Before you launch your favorite digital scrapbooking software, grab the item you’re putting this design on and figure out how big you’ll want it to be. In my case, I decided I wanted a 12″ wide graphic and it could be as tall as 16″. Now, set up a new document in your preferred scrapbooking software at those dimensions and 300dpi (ex: 12″ x 16″ x 300dpi).
I set my background layer to grey – the color the t-shirt I’d be putting this on – and got ready to design!
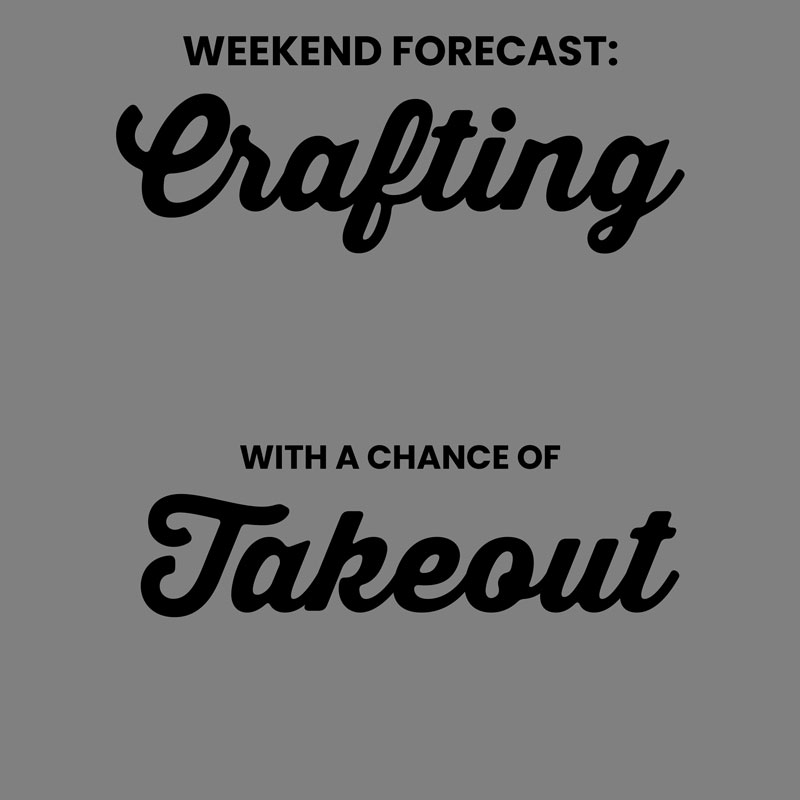
First, I created the text portion of my design using the fonts Poppin and Thirsty Soft.
Next, I looked through my digital scrapbooking supplies to find graphics to use in my design. Remember, since we’re cutting out chunks of solid-color vinyl and assembling them like puzzle pieces, it’s important to select illustrations rather than photo-realistic elements like dimensional flowers.
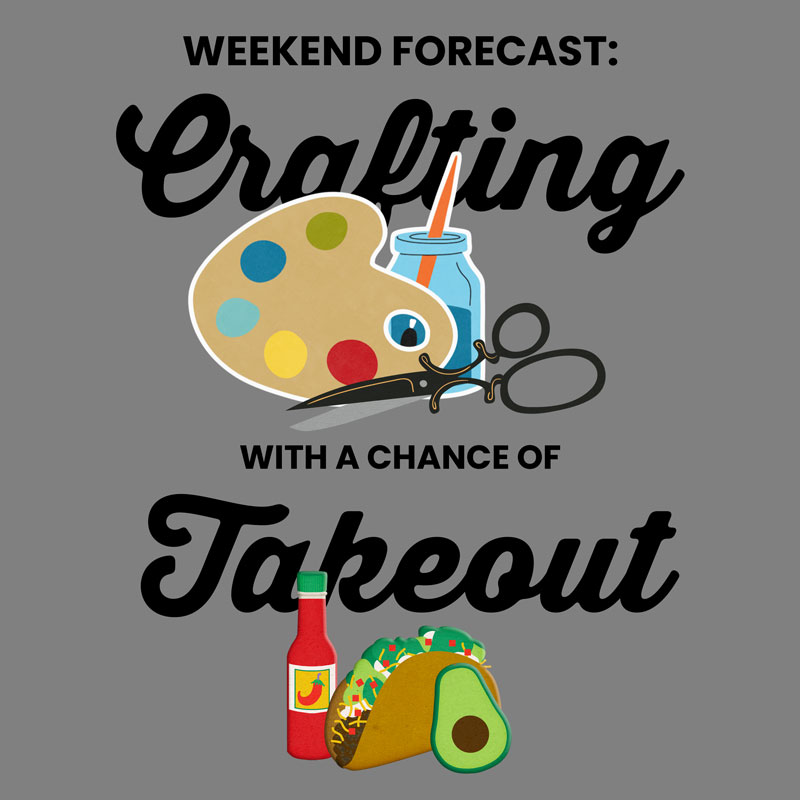
I found those gorgeous crafty illustrations in the brand-new store collabs Paper and Scissors, which you can earn for free this weekend with any $30 purchase – and the super cute Mexican food came from a brand new kit by Clever Monkey Graphics called Hola Mexico which will make its debut in the Shoppe this weekend.
Step 2: Separate your design into color blocks
Once you’ve got a design you’re happy with, it’s time to separate out the colors to create your cut files. The idea is to wind up with a stack of layers containing shapes where each is a solid color, and when you stack them together in the right order, you get your finished design.

You’ll find step-by-step instructions in this blog post.
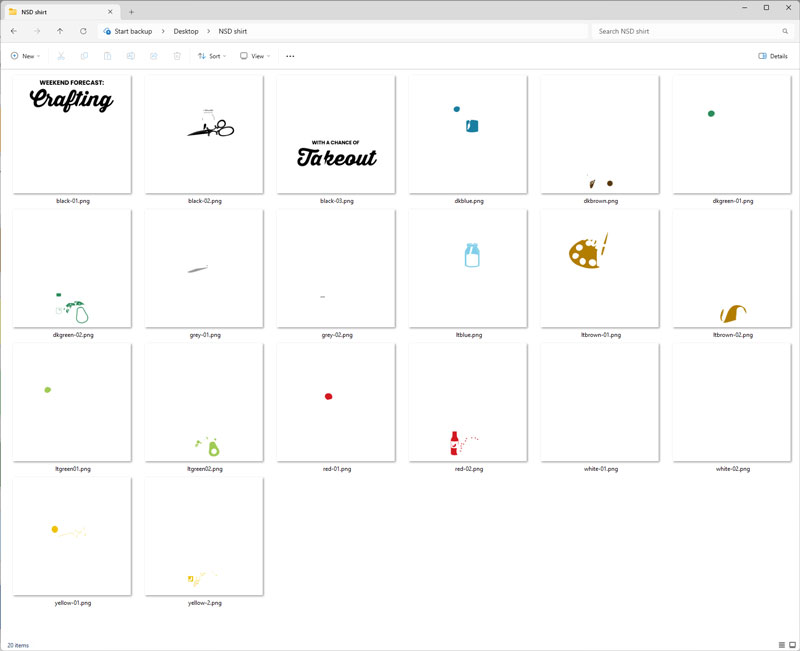
When I was done filling and slicing and dicing my design, I had a total of 20 individual transparent PNG files that, when stacked in the right order, create my final design.
Step 3: Import your images into your cutter’s design software
This step will be unique to your make and model of digital cutting machine and its software. I used Cricut Design Space to set up the canvas for cutting on my Cricut. You can learn more here.
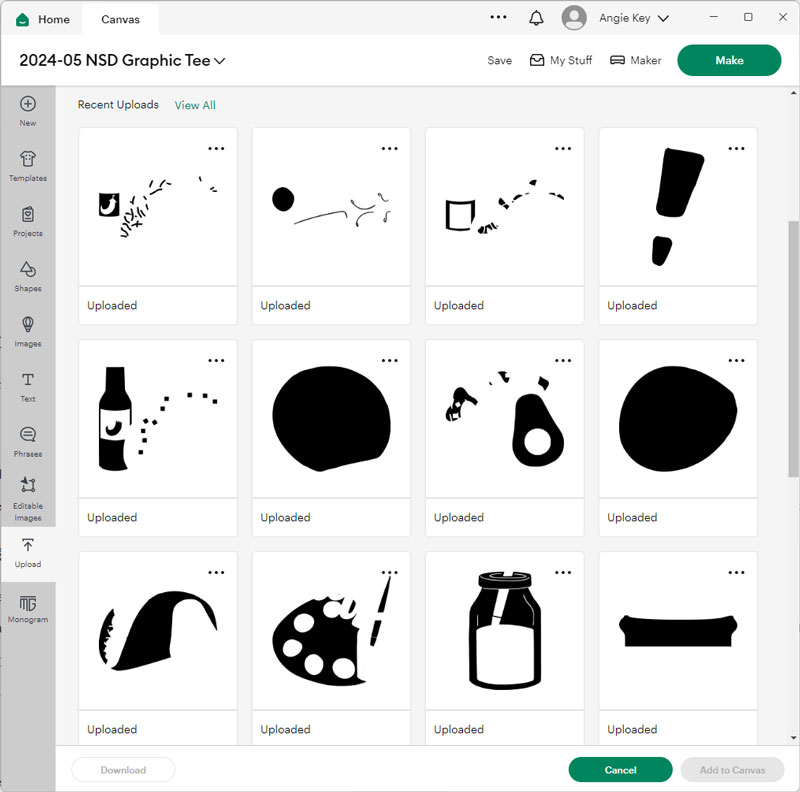
When you’ve uploaded all the layers of your design as separate images, then select them all and click Add to Canvas.
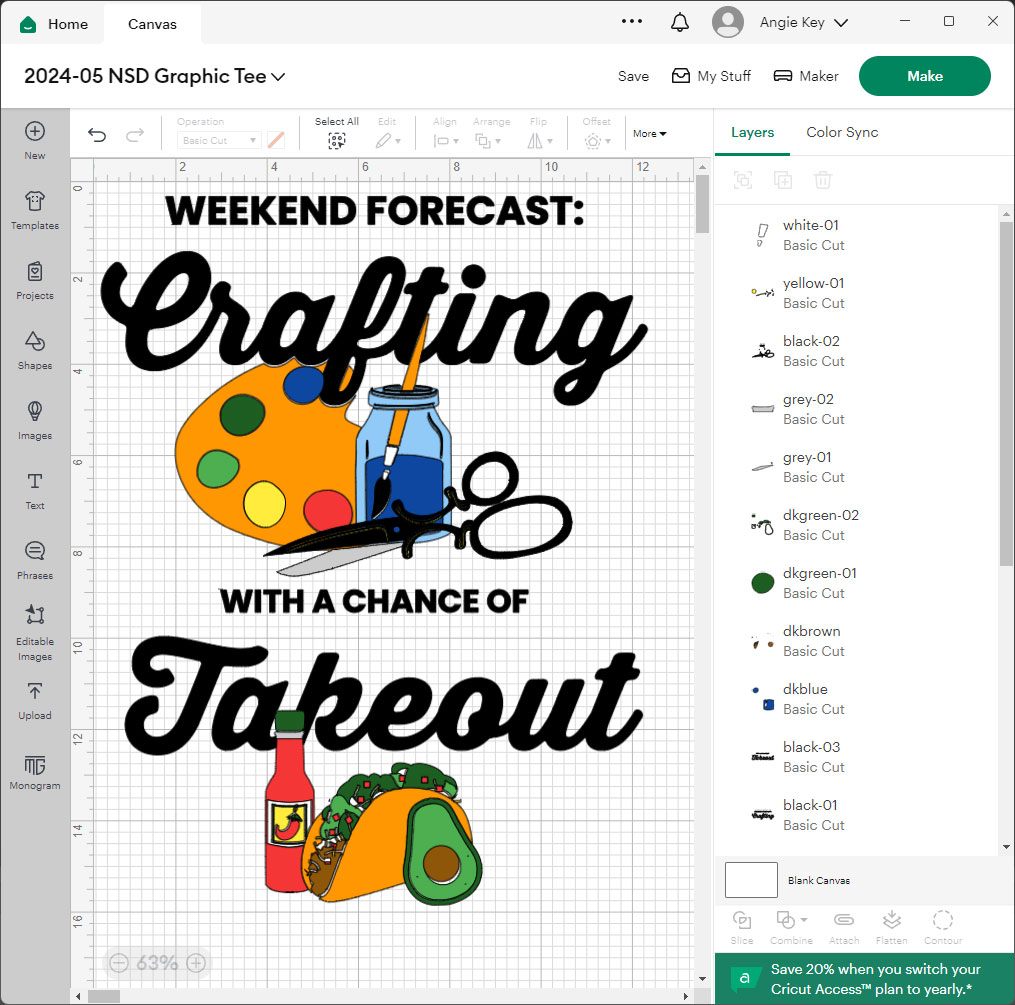
Step 4: Resize your design
This is super important: Make sure all the images are selected when you resize! If you change the size of one layer and not the rest it won’t fit together once it’s cut.
With all your layers selected, choose Align … Horizontal Centers and Align … Vertical Centers. Then drag the selection handle to resize all the selected layers to the width you want your finished graphic. In my case, this is 12″ wide.
Then, go layer by layer and set its color.
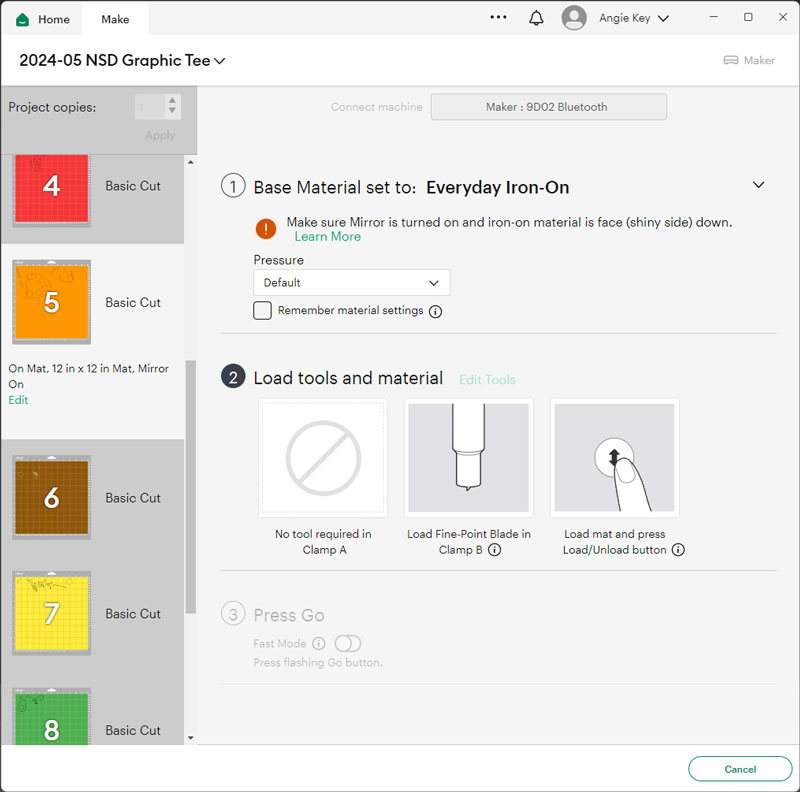
Step 5: Configure the design and send to cut
Send it to cut (in my case, for the Cricut software, I clicked Make It). Then go layer-by-layer and set your cutting options. Remember to choose “mirrored” (because we’re cutting vinyl) and set your media to Everyday Iron On or Heat Transfer Vinyl.

Then follow your cutter’s instructions to cut out each layer in the appropriate color of HTV. (And remember, the shiny side goes down against your cutting mat!)
Once it’s cut, you’ll weed the excess vinyl as usual so you’re left with just the shape as you designed it.
Step 6: Fuse the vinyl to your garment
Following the instructions for your iron-on vinyl, you’ll fuse your design to the fabric one layer at a time, starting at the bottom and working your way up.
I can’t help but feel like there’s a little magic in the way the design comes together in the end!
A quick note of caution…
Just remember the licensing and terms of use that come with your Sweet Shoppe purchases. When you buy a kit from the Sweet Shoppe, it comes with a license for personal, non-commercial use. That means you may use it to make yourself a snazzy crafting themed t-shirt like mine, or to make as gifts for people you love. You may NOT use them to make items and sell them on Etsy, at a craft fair, or as a fundraiser, no matter how good the cause. If money is changing hands, it’s considered commercial use, and you may only use SSD supplies for that if you have prior written permission from the designer. Also, you may NOT upload the design or share the project files with other makers. So personal, non-commercial use only. Got it? Awesome!
And that’s it for this month’s special NSD edition of Think Outside the Album. I can’t wait to wear my new t-shirt this weekend while I celebrate interNational Scrapbooking Day with all of YOU at the Sweet Shoppe! Be sure to join us in the forums for lots of games and giveaways. I’ll see you there!


