Think Outside the Album – Custom Graphic Tee
Welcome to the 13th installment of Think Outside the Album, where we look at different ways to take our digital supplies off the scrapbook page and instead, use them to make the rest of our world just a little bit sweeter!
In honor of our 13th post and the sweet-and-spooky month of October, I will show you how to use Sweet Shoppe digital scrapbooking supplies to make a fun Halloween-themed graphic t-shirt! With this project, you’ll learn how to combine your digi-scrapping tools with an electronic digital cutting machine (commonly known by the brand names Cricut or Silhouette) along with heat transfer vinyl (also known as iron-on vinyl) to create magic!
IMPORTANT NOTE: this blog post WILL NOT teach you how to use your Cricut or Silhouette. It assumes you know how at least the basics of how to use your machine. Ideally, you’ve already made at least one project using heat transfer vinyl (HTV). Many other bloggers have already done an awesome job of teaching the basics for your machine – just search for their blogs or YouTube channels and enjoy their tutorials.
What this blog post WILL do is teach you is how you can use your Sweet Shoppe digital scrapbooking supplies to create custom wearable artwork that you can then send to your Cricut or Silhouette. Let’s get started!
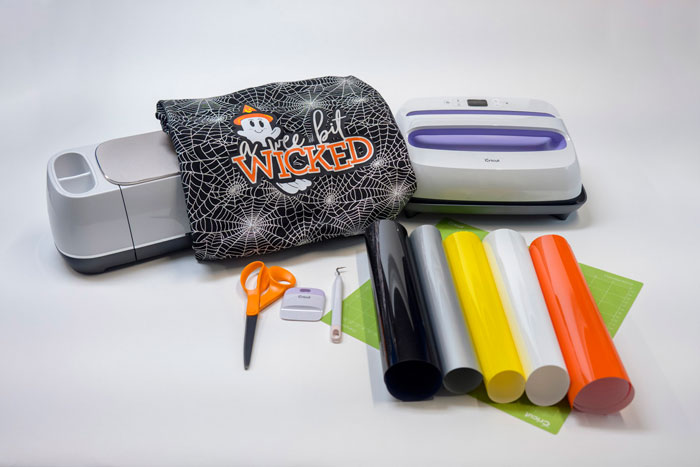
What You’ll Need
Your favorite digital scrapbooking software
I used Photoshop, but any graphics program that can save files as transparent PNGs will work.
An electronic digital cutting machine and accessories
I used my Cricut Maker, but any cutter capable of cutting heat transfer vinyl will do.
The software for your digital cutting machine
I used the Cricut app. You need the software for your machine that allows you to upload images to cut.
Heat transfer vinyl in the colors of your choice
I use a variety of brands of HTV. For this project, I needed one sheet each of black, white, silver, orange, and yellow.
A shirt or other fabric-based item for your design
For this project, I actually sewed myself a scoop-neck shirt from a cotton-spandex jersey fabric – but you can use any pre-made t-shirt, sweatshirt, tote bag, or other item with a fabric content that works with your heat transfer vinyl. (Cotton, cotton/polyester, nylon, etc. Read the instructions that came with your HTV to be sure!)
An iron or heat press
I used my Cricut EasyPress for this project, but any heat press or iron that can get hot enough for your HTV will do the trick. (Again, read the instructions that came with your HTV to determine its temperature requirements.)
Step 1: Create your design
Before you launch your favorite digital scrapbooking software, grab the item you’re putting this design on and figure out how big you’ll want it to be. In my case, I decided I wanted an 8″ wide graphic and it could be as big as 6″ tall. Now, set up a new document in your preferred scrapbooking software at those dimensions and 300dpi (ex: 8″ x 6″ x 300dpi).
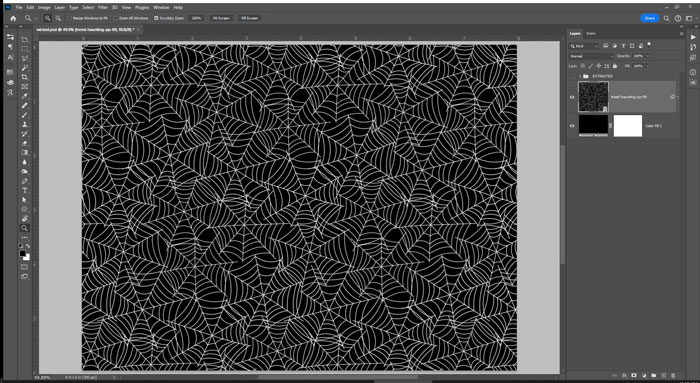
Next, create a base layer that’s identical (or as close as you can get it) to the fabric your design will go on. Working with a plain white tee? Set the background to solid white. In my case, the fabric I chose for my shirt is black with a silver foil spiderweb pattern. So I found a sheet of patterned paper that was pretty close and set that as my background.
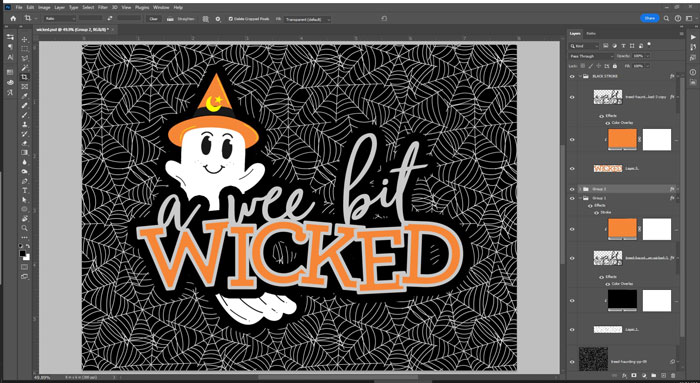
Open your favorite SSD digital scrapbooking products and start building your design. For my shirt, I worked with a brand new collection from Traci Reed that’s coming out this weekend for Digital Scrapbooking Day. The collection is called Haunted, and it’s the cutest! I selected a piece of word art along with a couple images of a sweet ghost.

Graphics from Digital Scrapbooking Collection Haunted by Traci Reed
Releasing 10/7 for DSD weekend at the Sweet Shoppe!
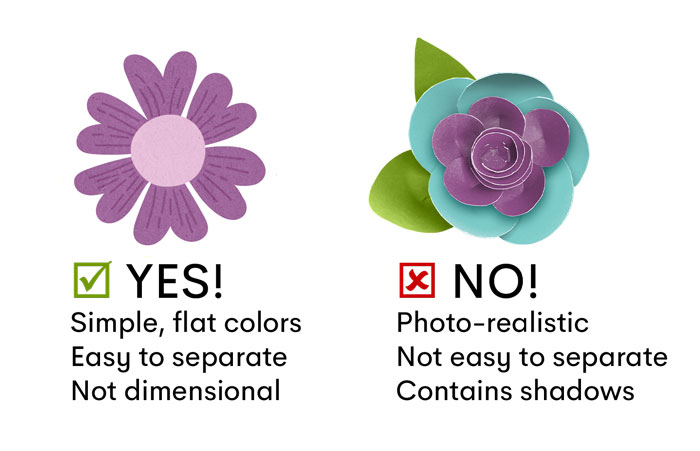
Now, it’s important to keep in mind that you’re not printing anything – you’re cutting out chunks of (usually) solid-color vinyl and putting them together like puzzle pieces. So there’s no shadows or gradients or bevels. Therefore, it’s important to select images and create a design that’s made up of flat blocks of color.
To make my design stand out against the busy spiderweb pattern on the fabric, I added a large black stroke to the outside of my design. (This is why it’s valuable to set up the background of your canvas to closely match the fabric to which you’ll be adhering your design!)
Step 2: Separate your design into color blocks
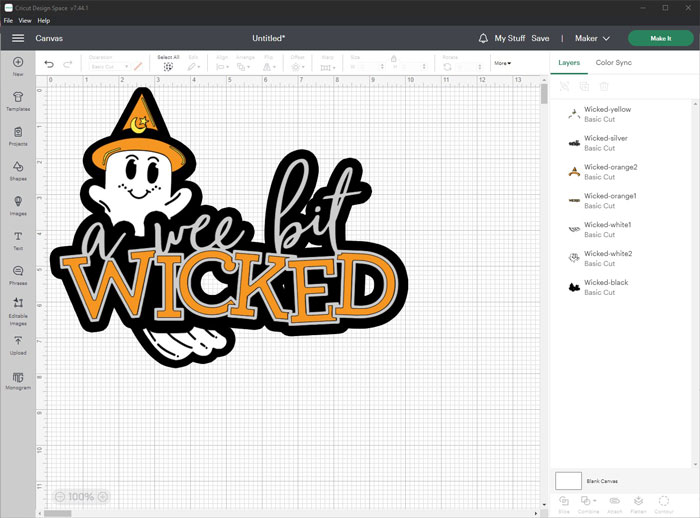
Once you’ve got a design you’re happy with, it’s time to separate out the colors to create your cut files. The idea is to wind up with a stack of layers containing shapes where each is a solid color, and when you stack them together in the right order, you get your finished design:

There’s a number of different ways you can do this. I used two different approaches to create these layers:
- Select, create new layer, and fill
- Separate style to new layer
How to … Select, create new layer, and fill
Choose one color to start with. I’m going to select everything on my canvas that’s supposed to be orange and place it on a new layer. Here’s how I did it in Photoshop:
Using your favorite selection tool (I love the Magic Wand!) select every shape that should be orange in your final design. I selected the “Wicked” text and the ghost’s hat.
HINT: Try using the Select Similar function to have Photoshop do the selection work for you! I selected the orange fill of the letter W. Then, go to Select … Similar. Every space on that layer that’s the same color is now selected!
Now, create a new layer at the top of your document, name it ORANGE, and go to Edit … Fill to fill it with a solid color.
That’s it! We now have a layer with a shape that covers everything orange in our design. Simply repeat this for all the other colors in your design.
How to … Separate style to new layer
In the case of the black stroke around my entire design, it was quickest to simply separate the style onto a new layer. Here’s how I did it in Photoshop:
With the layer selected, go to Layer … Layer Style … Create Layer.
Photoshop creates a new layer containing just the black stroke around the design.
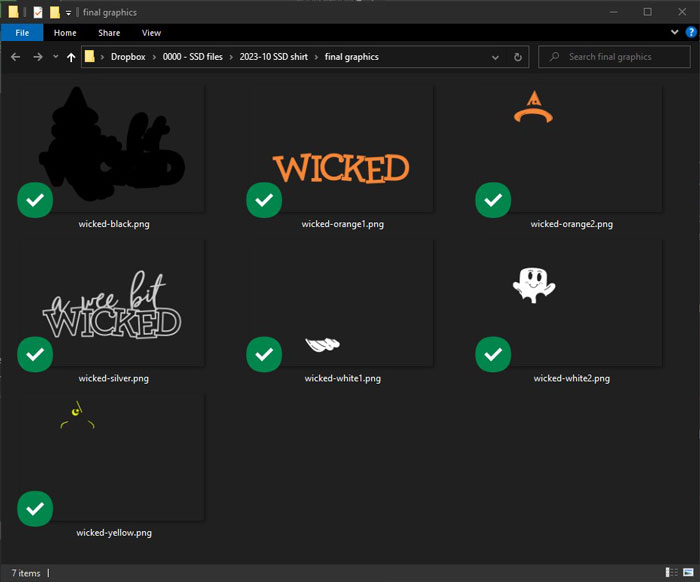
Once you’ve got all your colors on their own layer, you’re going to export each individual color block as a transparent PNG. (Be sure to hide the background before you save your files!) Don’t crop them – leave them all the same dimensions, even if there’s lots of empty space. We want it this way so they’ll stack on top of one another and your design will line up.
In my case, I now have seven files that, when stacked in the right order, create my final design!
Step 3: Import your images into your cutter’s design software
This step will be unique to your make and model of digital cutting machine and its software. For demonstration purposes, here’s how I brought my custom design into my Cricut software:
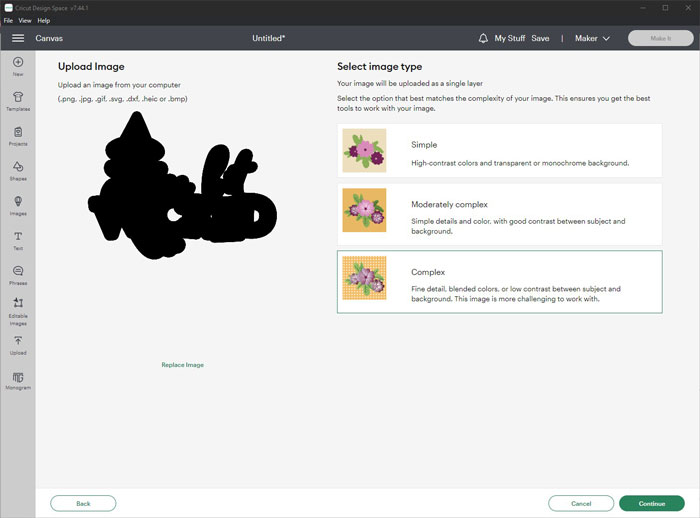
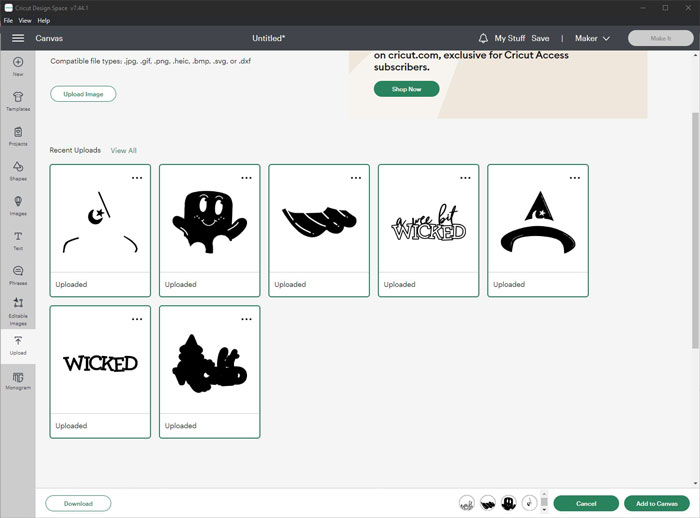
1. Select Upload from the left-hand menu and click the Upload Image button. The upload dialogue box appears. Navigate to the first file, and click to upload.
2. In the Upload Image window, under Select Image Type, choose Complex and click Continue.
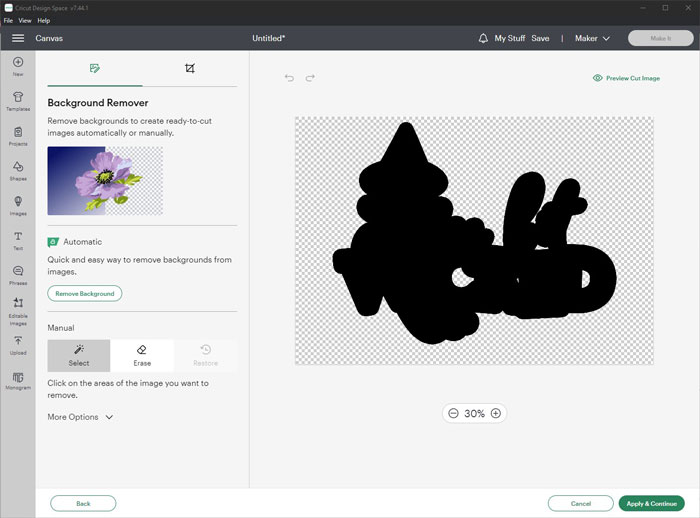
3. On the Background Remover screen, because we saved it as a transparent PNG, the shape appears with an automatically transparent background. Click Apply & Continue.
4. On the Select Upload Type screen, choose Cut Image and click Upload.
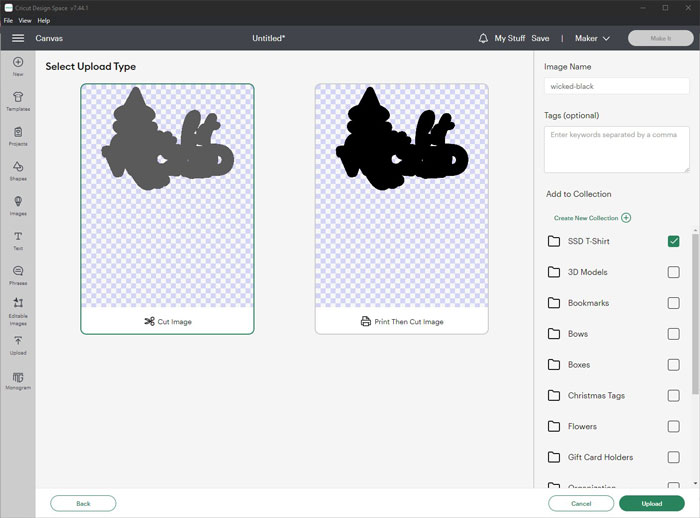
Repeat until you’ve uploaded all the layers of your design as separate images. Then select them all and click Add to Canvas.
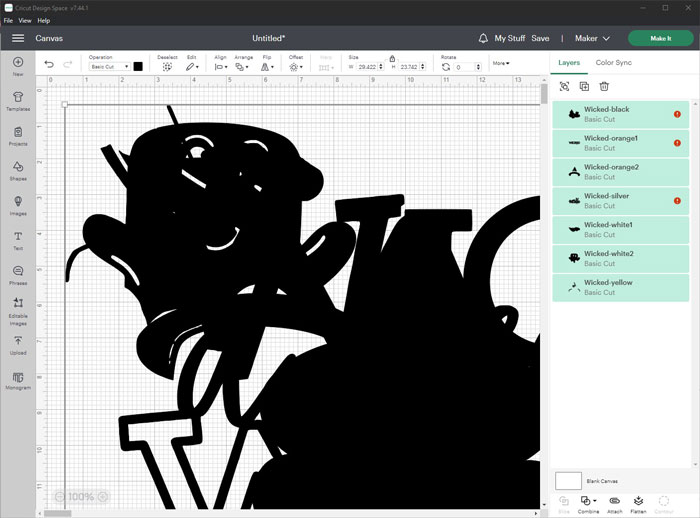
What appears is a jumbled mess, but we’re about to sort that out.
Step 4: Resize your design
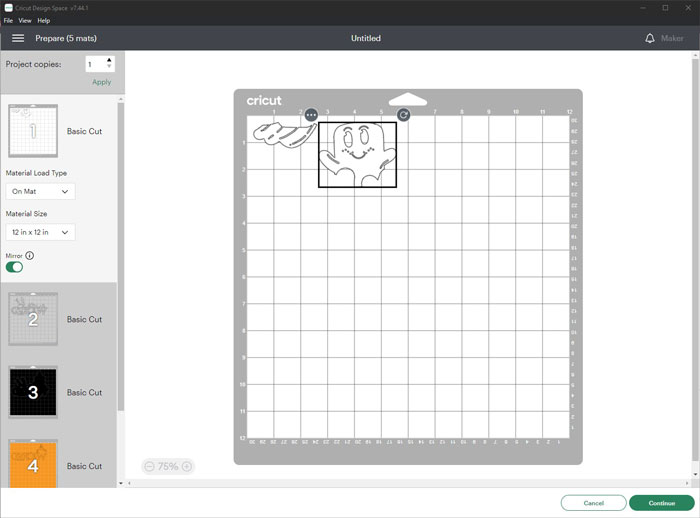
This is super important: Make sure all the images are selected when you resize! If you change the size of one layer and not the rest it won’t fit together once it’s cut.
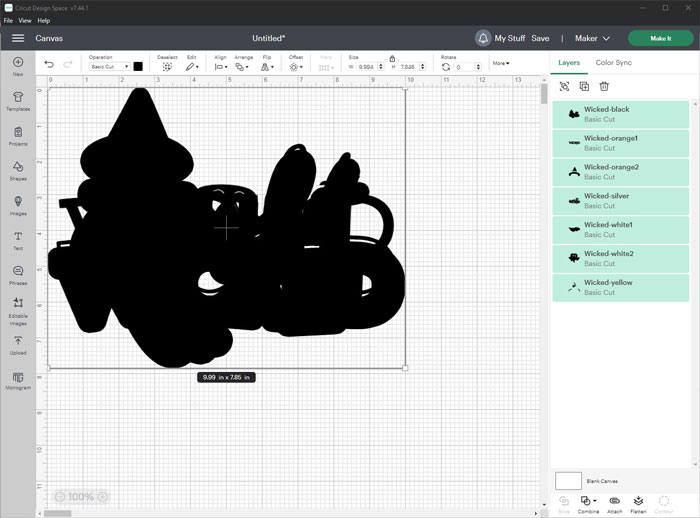
With all your layers selected, choose Align … Horizontal Centers and Align … Vertical Centers. Then drag the selection handle to resize all the selected layers to the width you want your finished graphic. In my case, this is 8″ wide.
Step 5: Configure the design and send to cut
This process will be unique to your digital cutting machine’ software. Go layer by layer and set its color.
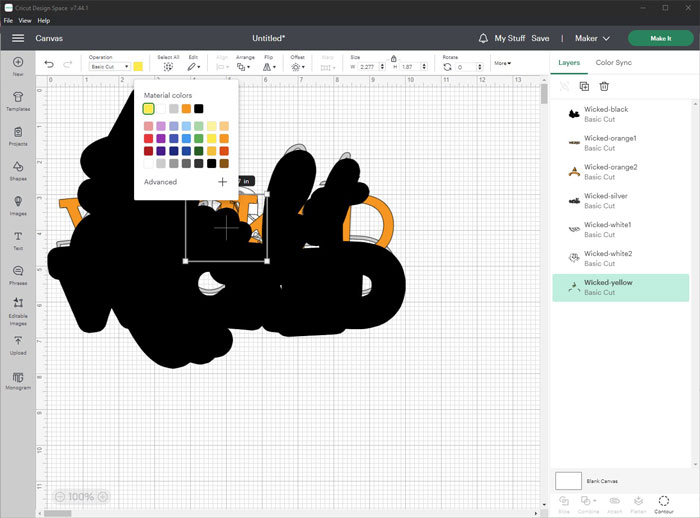
Then send it to cut (in my case, for the Cricut software, I clicked Make It). Then go layer-by-layer and set your cutting options. Remember to choose “mirrored” (because we’re cutting vinyl) and set your media to Everyday Iron On or Heat Transfer Vinyl.
Then follow your cutter’s instructions to cut out each layer in the appropriate color of HTV. (And remember, the shiny side goes down against your cutting mat!)

Once it’s cut, you’ll weed the excess vinyl as usual so you’re left with just the shape as you designed it.
Step 6: Fuse the vinyl to your garment
Following the instructions for your iron-on vinyl, you’ll fuse your design to the fabric one layer at a time, starting at the bottom and working your way up.
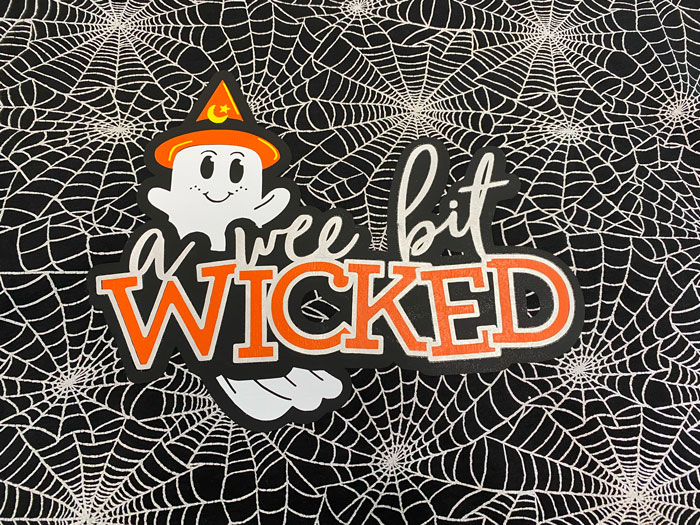
I started with my large black piece as the background. Then I added the orange pieces (the hat and “wicked”). Next came the white pieces for the ghost. And the yellow pieces to accent the hat, and finally, the silver outline for the word art.
I can’t help but feel like there’s a little magic in the way the design comes together in the end!
Artwork created using digital scrapbooking collection Haunted by Traci Reed
Releasing 10/7 for DSD weekend at the Sweet Shoppe!
Here’s a photo of my finished garment. I made it using the Concord T-Shirt sewing pattern by Cashmerette, view C.

The fabric is Holographic Spiderweb Interlock Knit by POP! and can be purchased at JoAnn Fabric here. I added waxed paper between my HTV and my heat press to keep the holographic spiderweb design from melting.
There you have it: a new way to use your Sweet Shoppe digi-scrap supplies! You’ll start looking at word art in a whole new way and begin asking yourself, “Now, what could I put that on?”
A quick note of caution…
Just remember the licensing and terms of use that come with your Sweet Shoppe purchases. When you buy a kit from the Sweet Shoppe, it comes with a license for personal, non-commercial use. That means you may use it to make yourself a snazzy Halloween shirt like mine, or to make all the gifts you want to give this holiday season. You may NOT use them to make items and sell them on Etsy, at a craft fair, or as a fundraiser, no matter how good the cause. If money is changing hands, it’s considered commercial use, and you may only use SSD supplies for that if you have prior written permission from the designer. Also, you may NOT upload the design or share the project files with other makers. So personal, non-commercial use only. Got it? Awesome!
With all the holidays, events, and gift-giving opportunities coming up in these final three months of the year, having a project like this in your mental Rolodex can help ease the stress of “what will I give them?” Whether it’s a teacher appreciation gift, a present for your bestie, or matching t-shirts for your family’s Christmas PJs, when you combine your Cricut or Silhouette with heat transfer vinyl and the gorgeous designs in the Sweet Shoppe, you’ll easily earn the title of Gift Giving Guru. So what are you waiting for? Get to designing, and be sure to share photos of your finished makes in the Gallery – because I can’t wait to see what you create when you Think Outside the Album!


Kjersti said...
on October 5th, 2023 at 3:33 pm
Absolutely adorable!!!
Cheryl said...
on October 6th, 2023 at 10:54 pm
I have never thought to just separate the layers in the colors and save them as png files to upload! This seems so so much easier than using a program that tries to help you make an SVG file – because photoshop well is familiar of course.
I also love the reminder about usage – always a good reminder for us all.
PictureMom said...
on October 7th, 2023 at 11:31 am
I always wanted to learn to make tshirts.
Angela said...
on October 7th, 2023 at 12:15 pm
What a fun project! I have always wanted to play with vinyl
AMIE said...
on October 7th, 2023 at 9:39 pm
SO fun! I love working with HTV I just never think about doing for myself it until I’m making something for someone else! 😉
Aud said...
on October 8th, 2023 at 2:09 pm
I don’t have a press, does it work well with an iron?
Stefanie said...
on October 8th, 2023 at 2:39 pm
Wow, love all the detailed instructions, I had no idea this could be done so easily.
Linda said...
on October 9th, 2023 at 9:23 pm
I love this! I don’t have a DCM and my daughter keeps pestering me to get one. But I have a history of jumping into new crafts and going nowhere, so I am hesitant. Seeing in detail how such a project comes together has been a huge help – thanks Angie!
Angie Key said...
on October 11th, 2023 at 2:29 pm
Aud, it all depends on the iron – and on the brand of HTV. For example, the brand of vinyl I used requires a temperature of 315 degrees F, with firm pressure, for 30 seconds. Too low and the vinyl won’t stick; too high and it’ll melt, bubble, or burn. I suggest lots of testing using small pieces of vinyl and scrap fabric until you iron out the right settings (pun intended!)
Aud said...
on October 11th, 2023 at 5:10 pm
thank you for your answer Angie, the press was on my wishlist… 😀
Leablahblah said...
on October 12th, 2023 at 8:07 pm
wow the result is so cool but it looks so complicated to achieve! I’ve made a few shirts for my girls but I only went as far as two different colors. I couldn’t do all these different layers. It gets confusing.