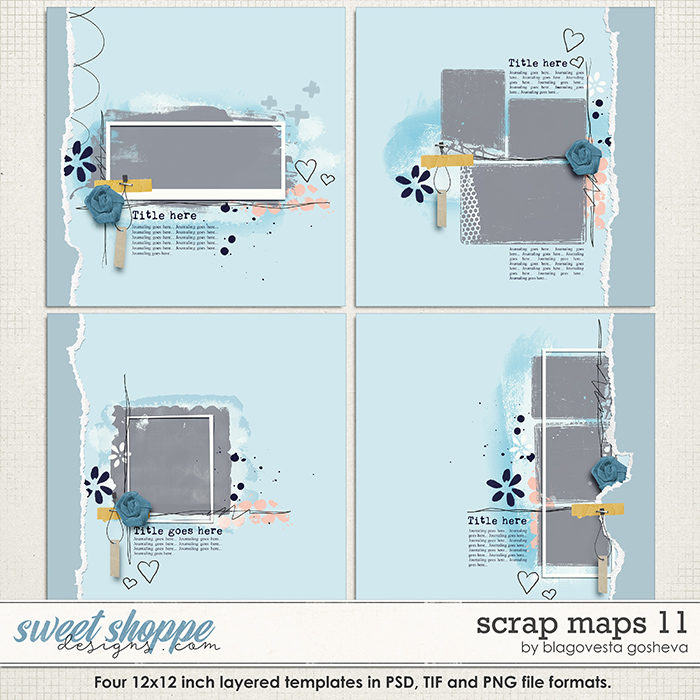
Fake It ‘Till You Make It: Element Clusters
Can I tell you a secret?
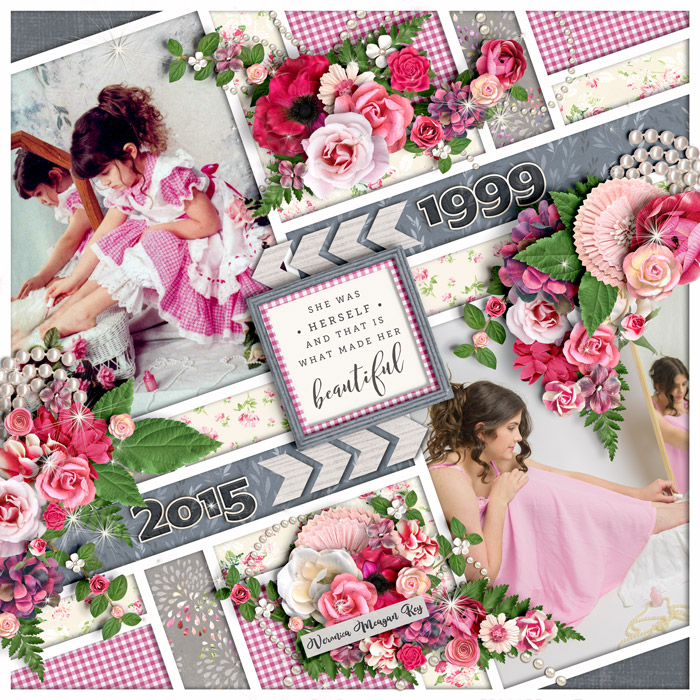
I absolutely adore the way floral & element clusters look on my scrapbook layouts … but I struggle to create them on my own. Seriously – give me a pile of elements and tell me to make a cluster, and I’ll fuss and fidget with it for 20 minutes and still wind up unhappy with whatever I’ve created.
But if you were to look through my layouts, you’ll find clusters everywhere. So, how have I faked it? How have I worked around my cluster composition issues to fill my albums with pretty bunches of flowers, cute elements, and greenery?
Templates. Specifically, cluster templates. You see, I’ve created my own library of cluster templates I can pull into any layout at any time and quickly create a well-designed, balanced, and beautiful cluster without the stress. And I know they’re well-designed because they come from the gorgeous, professionally-designed templates available for purchase in the Sweet Shoppe!
How Layered Templates Work
For those who have never worked with a layered scrapbook template, here’s a quick run-down: when you purchase a template from the Sweet Shoppe, you typically get a layered PSD file, a TIF file, a PAGE file, and a set of 12×12 PNGs that can be layered on top of one another. The one you use will be determined by the software with which you scrapbook. I’m a Photoshop user, so I work with PSDs or TIFs; that’s what you’ll see in my examples below.
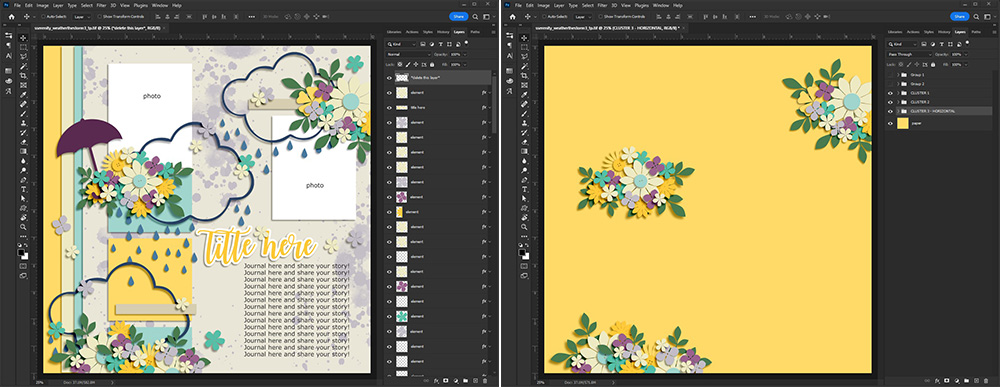
Each layer in the template represents an object – a photograph, piece of paper, title, flower, leaf, ribbon, etc. – and you either clip your digital supply to it (such as a sheet of paper being clipped to a block with a clipping mask) or simply replace it with the element (as in a cluster). Here’s a side-by side comparison of a template I used and the finished layout I created with it:
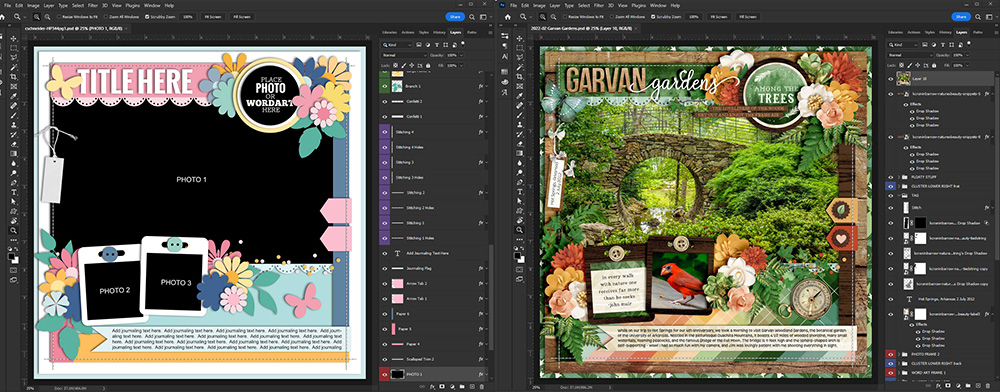
Template from Half Pack 344: Photo Focus 120 by Cindy Schneider
As I said, I’ve found that when I use a template, I don’t stress out over my clusters. I simply choose my flowers, foliage, and other elements, replace each layer with my selected item, and apply the appropriate shadow style to each element. Et voila! My cluster is finished. No muss, no fuss.
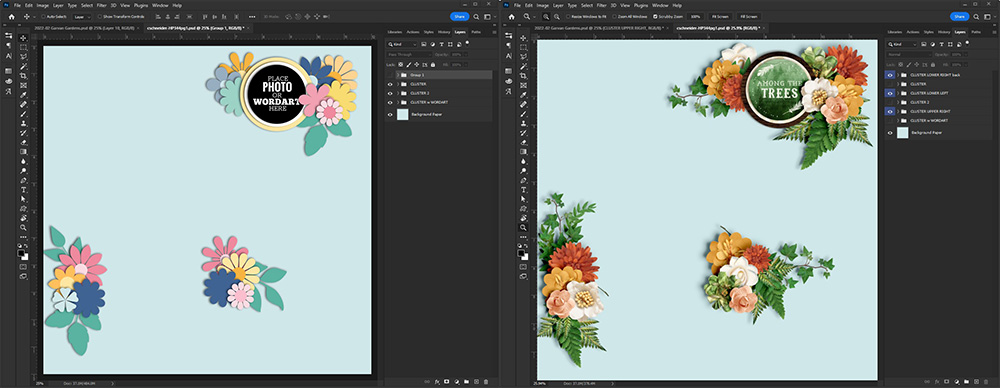
I’ve isolated just the element clusters from this template & layout so they’re easier to see.
How to Build A Cluster Template Library
But what about those times when you don’t use a template? Or when you base your layout on a sketch, or you use a template that’s minimalist or “clean-and-simple”? What’s a cluster-loving design-challenged scrapbooker to do?
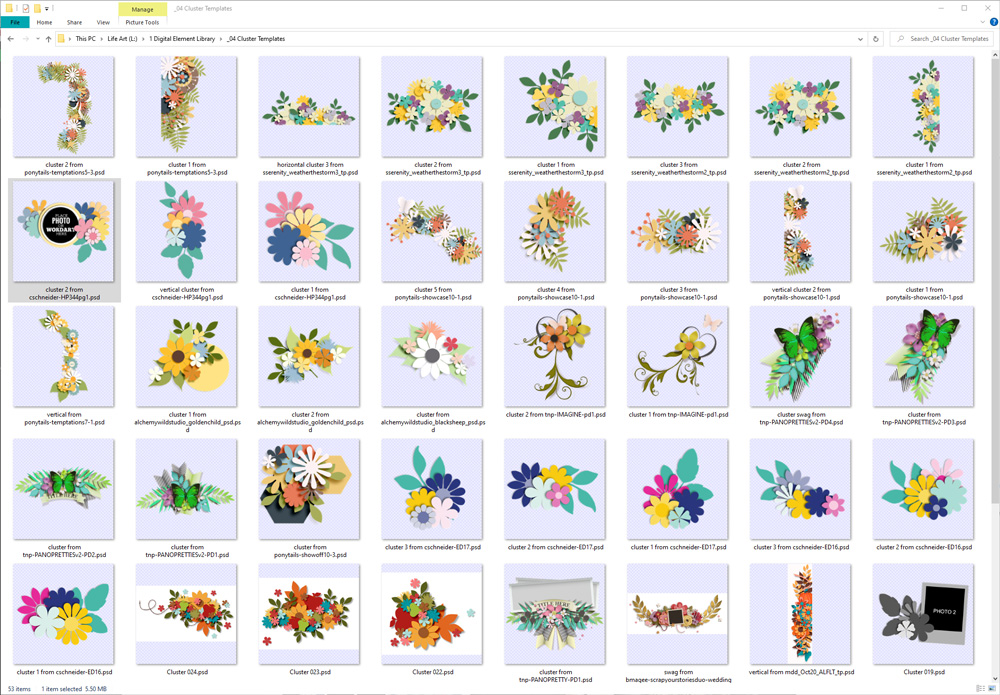
Well, that’s when it’s helpful to have a cluster template library. And building yours is easier and faster than you probably think.
- Start with a template that contains one or more clusters you love.
- Remove every layer that isn’t a decorative element.
- Group the layers for the clusters together
- Crop and save the layers for each cluster as individual files.
That’s all there is to it! Let me show you some examples.
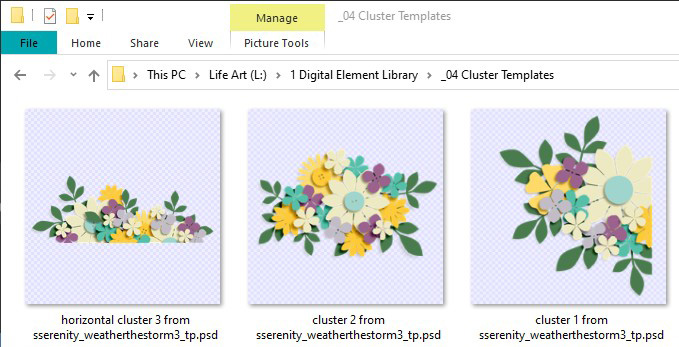
Amber Morrison’s templates, sold as Alchemy Wild Studio (formerly Southern Serenity Designs), are positively overflowing with layers, elements, and clusters. This template is from her set Weather the Storm:
Weather The Storm by Alchemy Wild Studio (formerly Southern Serenity Designs)
I was able to extract three cluster templates from this one 12×12 layout template:
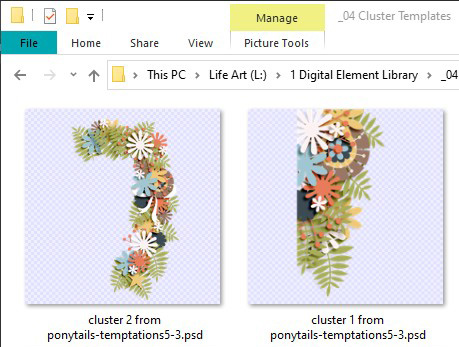
For a second example – Ponytails Designs has some template sets with gorgeous clusters, as you see in this template from her set Temptations 5:
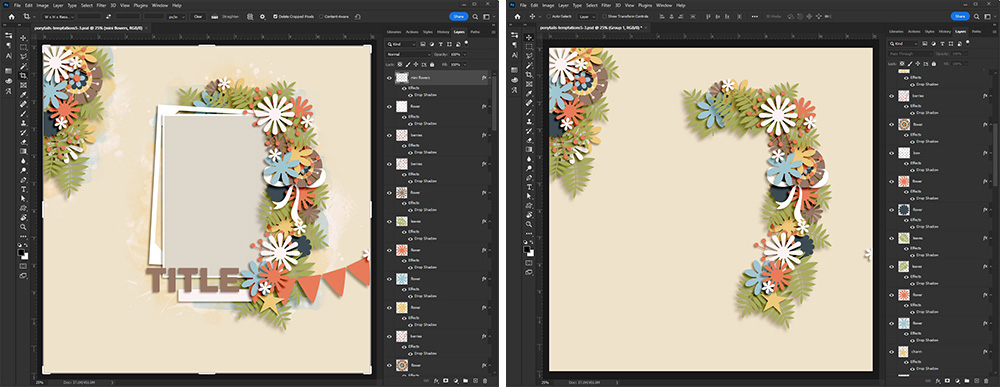
I ended up with two new cluster templates for my library:
That’s all it takes to start building your own cluster template library:
- Start with a template that contains one or more clusters you love.
- Remove every layer that isn’t a decorative element.
- Group the layers for the clusters together
- Crop and save the layers for each cluster as individual files.
How to Use Your Cluster Template Library
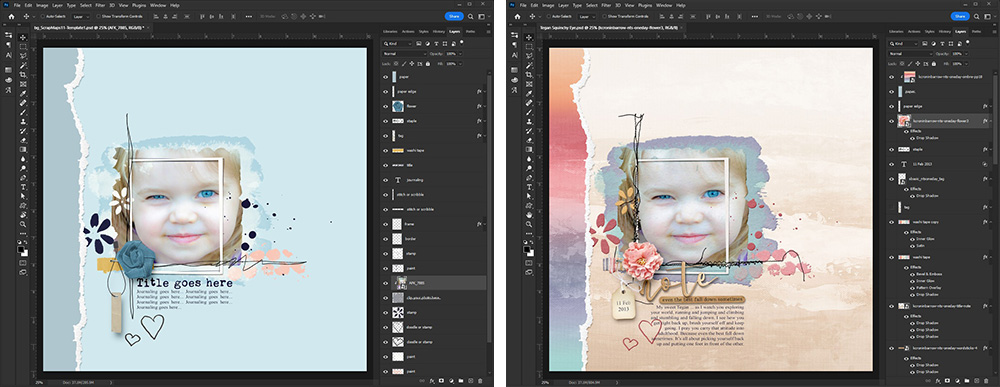
I’m creating a layout with a template from Scrap Maps 11 by Blagovesta Gosheva. I love the torn paper border, layered paint, and the way the photo mask extends beyond the frame:
So after clipping my photo to the mask, I filled the rest of the template layers using papers and elements from the kit Note To Self: One Day at a Time by Kristin Cronin-Barrow & Studio Basic Designs.
Now while it’s a lovely simple layout, I’m really itching to add some clustery goodness to it. So I looked in my cluster template library and found one I liked. I pulled it into my template, and used it to build a cluster with the flowers and foliage from the kit.
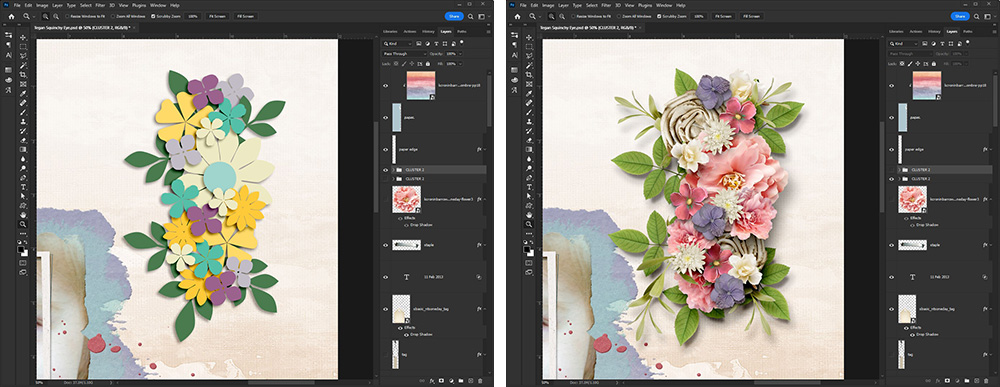
Sometimes I drag the cluster template around first to size and place it; other times I build out the cluster and then place it, which is what I did in this example. I knew I wanted a floral border peeking out from behind the torn paper, so I duplicated this cluster twice more, rotated the middle one 180 degrees, and this was the result:
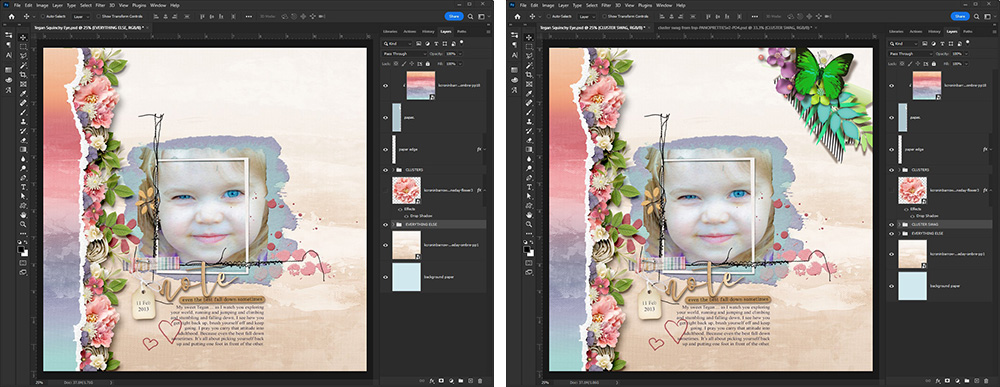
It still didn’t feel finished, so I went back to my cluster library and pulled in one I extracted last week from Panoramic Pretties V.2 by The Nifty Pixel. Back to the kit to pull elements into that template, and… here’s the final result:
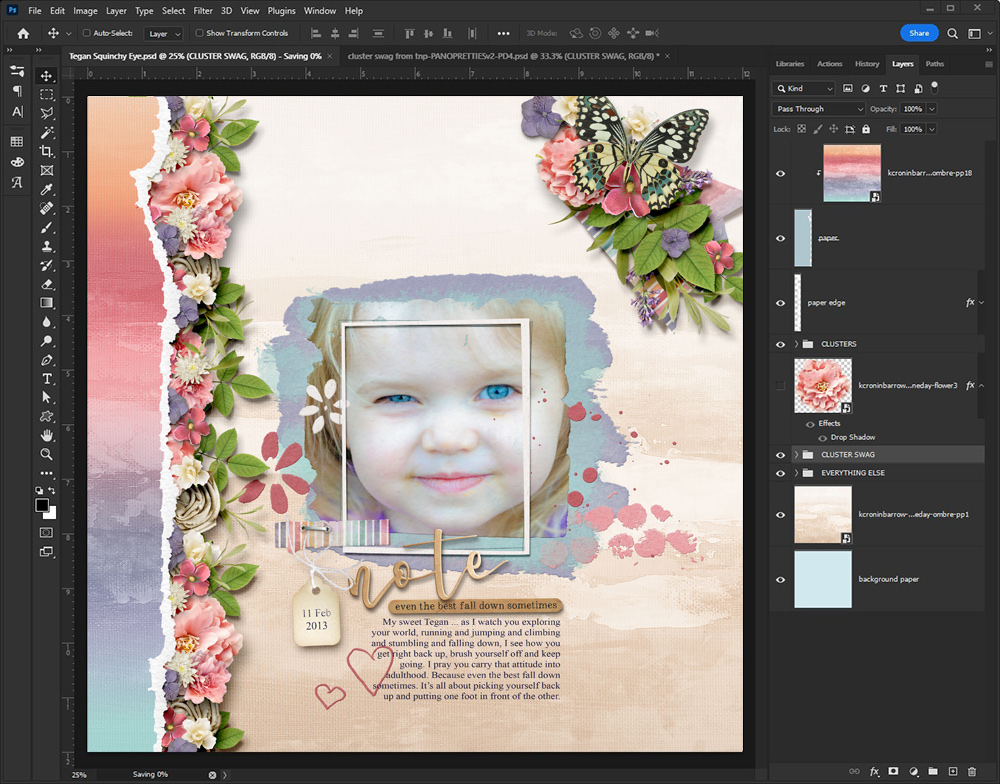
I’m pretty pleased with how my cluster-riffic layout turned out, and it took me a fraction of the time it would have had I tried to design those clusters on my own!


Bienejen said...
on May 13th, 2022 at 9:18 am
This is brilliant!!!!! My biggest issue is when I use templates I don’t have to put any thought into the sizing of the elements in my clusters. Any time I try to do my own, I always feel like my sizing is a mess. This is a brilliant hack I can’t wait to try!!!! Do you include the credits for the clusters in your gallery?
Cindy said...
on May 13th, 2022 at 11:04 am
Love this cluster template idea. I don’t use a lot of templates but I see that changing.
leablahblah said...
on May 13th, 2022 at 1:19 pm
I’ve been telling Amber to start selling cluster templates for a while now. But now your blog post defeats the purpose haha we already have all these magnificent clusters in our templates. I’m just lazy to go find them haha. But your blog post is brilliant.
StephC said...
on May 13th, 2022 at 2:06 pm
Brilliant idea! I struggle with getting my clusters to look right as well. I think we need to get Seattle Sheri to make us cluster templates as well =)
Lidia Gradzinski said...
on May 13th, 2022 at 2:17 pm
OMG, that’s so brilliant! It’s like a lightbulb went off in my head as I was reading your blog. I struggle getting clusters just right so this is going to be a big game changer for me. Thank you so much for sharing your tips with us.
eve said...
on May 14th, 2022 at 6:06 pm
Wow Angie!
I really love this blogpost, such a brilliant idea, using the clusters from templates because I have lots of templates!
This tips would change how I make/see elements clusters now, thank you for sharing!
Scrap-therapy said...
on May 16th, 2022 at 8:43 am
Such a brilliant idea Angie! I would have never think of doing this! Unfortunately I think my software wouldn’t let me use this because it only uses PNG format but the idea is really cool! And your layout are just amazing!:)
Natasha Kitos said...
on May 17th, 2022 at 11:06 am
What a great idea! It never actually occurred to me to do this. And it may sound crazy, but I can design templates with wonderful clusters, but do you think I can just sit down with a kit and make one? Nope! I need the templates too. Weird, I know!
Jenna in Canada said...
on May 17th, 2022 at 8:43 pm
This is a game changer! I struggle with this all the time and never thought of this clever idea. Thanks for sharing Angie!