Think Outside the Album: Jewelry Pendants & Charms
If you’re anything like me, you’ve had moments where you were working with a scrapbook kit and thought, “this art is so gorgeous, I wish I could wear it.” Well, my sweet scrappy friends, today’s blog post is going to blow your mind! I’ve got a project to share that’s surprisingly easy but with results that are astonishingly gorgeous.
Welcome to the September 2024 installment of Think Outside the Album, where we look at different ways to take our digital supplies off the scrapbook page and instead, use them to make the rest of our world just a little bit sweeter.
This month, we’re making custom jewelry pendants you can use as necklaces, earrings, charms, keychains, zipper pulls and more. They’re perfect for gift-giving (Hanukkah and Christmas will be here before we know it!) and they’re a fun way to add a little seasonal spice to your own life. Let me show you just how easy it is to create these beautiful accessories.

Before we begin, though, it’s time for a quick but important reminder about licensing and terms of use. Because as soon as people see you with one of these and find out you made it, they will tell you that you need to open an Etsy shop or set up a table at an upcoming craft fair. However: when you buy a kit from the Sweet Shoppe, it comes with a license for personal, non-commercial use. That means you may use it to make pendants for yourself to wear. You may use it to make zipper pulls for the kids and teens in your life. And you may use it to make keychains to give as gifts to anyone you’d like. You may NOT make pendants or charms from these designs and sell them on Etsy, at a craft fair, or as a fundraiser, no matter how good the cause. If money is changing hands, it’s considered commercial use, and you may only use SSD supplies for that if you have prior written permission from the designer. So personal, non-commercial use only. Got it? Cool.
What You’ll Need: Pendant Tray Kits
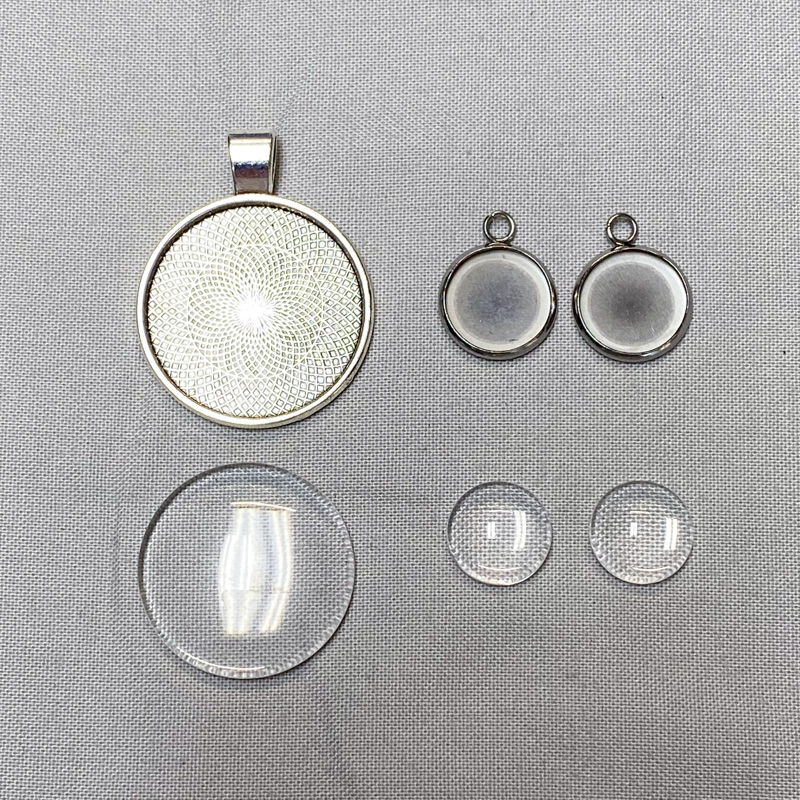
2-piece Pendant Tray kit(s) with metal back and glass front
You might find these at your local craft store in the jewelry-making aisle. You can also find them easily by hitting up your favorite search engine and using the keyword “jewelry pendant tray kit” or “bezel pendant tray blanks”. They’re often available from resellers on Esty and at hardware shops specializing in handbag and wallet-making supplies for sewists. And, of course, there are lots of options available for sale on Amazon.
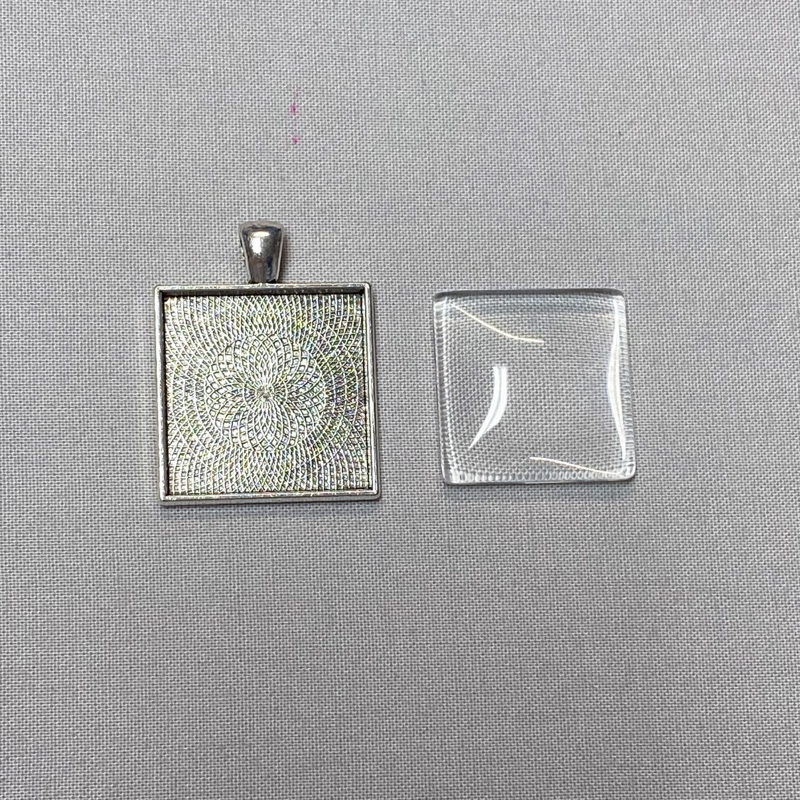
Each pendant is made up of two pieces: a metal tray and a glass cover called a cabochon.
I ordered three different sets of pendant kits online, from two different manufacturers on Amazon and one more expensive set from Kam Snaps.
This set contained 30 pendant trays – five different shapes in two finishes – along with the 30 glass cabochons to match. That’s enough for 30 necklaces, large charms, keychains, or zipper pulls for $9.99.
This set contained 60 pendant trays – all round, all silver – and the 60 glass cabochons to match. These are about half the size of the pendants in the other kit, and are the right size for earrings and small charms. You can make 30 pairs of earrings or 60 small charms for $8.49.
Finally, this is the set I ordered from Kam Snaps when I placed my last order for rivets and snaps for sewing. It includes 10 round silver-toned trays and the 10 glass cabochons to match for $4.99.
By the way, I did a side-by-side comparison of the pendant trays I got from Kam Snaps against the ones I got from Amazon. They’re the exact same size and they seemed to be identical in weight, materials, and quality of build. Once I mixed them up on my work table, I couldn’t tell them apart. Going forward, I’ll be ordering the less expensive ones!
WORD OF CAUTION: Be careful to double-check the size before you buy online. The seller should list the size of the tray – where the artwork goes – in either millimeters or fractions of an inch. Just something to be aware of, because size definitely matters in the difference between a necklace pendant and a charm for earrings.
You’ll Also Need
In addition to your Pendant Tray kit(s), you will need:
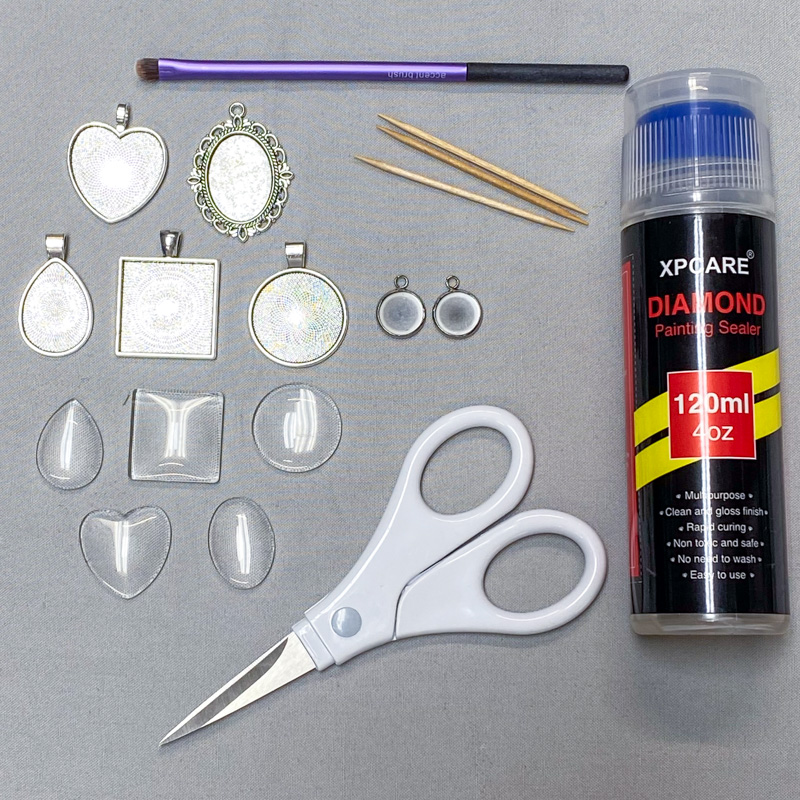
Clear-drying adhesive that will adhere to metal, glass, and paper.
Many reviewers recommend Judikins Diamond Glaze or E6000 craft adhesive. Personally, I used what I had on hand: this Diamond Painting Sealer, designed to create a crystal-clear glaze over the top of completed jigsaw puzzles and Diamond Painting projects. It worked beautifully.
Small detail-size paintbrush or toothpicks for spreading the adhesive.
A color printer. Either inkjet or laser is fine; I used my HP OfficeJet Pro 9010 All-In-One.
Quality printer paper, preferably bright and on the thicker side.
I recommend 48lb and up, with the highest brightness rating you can find. I used HP Professional Business Paper (48lb, 180g/m, glossy) for this project.
Something to measure your pendant trays.
A ruler or measuring tape with millimeter (mm) markings works best for this project.
Fine-tip scissors
Any additional jewelry findings necessary to complete your desired project.
This might include earring hooks or leverbacks, necklace chain or cords, keychain rings, jump rings and lobster clasps for zipper pulls, etc. You can find these easily at your local craft store and all over online, including Amazon.
Needle-nose pliers
If you’re attaching any hardware to your pendants – like jump rings and earring hooks – you’ll want to use a pair of fine tip needle-nose pliers to open and close the rings.

Step-by-Step Overview: Making a Custom Pendant
Once you’ve gathered your supplies, making these pendants is simple and straightforward. I’ll take you through each of these step in detail in the rest of this post, but I don’t want it to look more complicated than it actually is.
- Step 1: Measure your pendant trays
- Step 2: Set up a template
- Step 3: Design your insert
- Step 4: Print your insert
- Step 5: Trace & cut your insert
- Step 6: Assemble & adhere pendant, insert, and glass cabochon cover
- Step 7: Add jewelry findings to finish
That’s all there is to it: measure, set up a template, design your artwork, print, trace, and cut it out, and then glue it all together. So let’s do this!
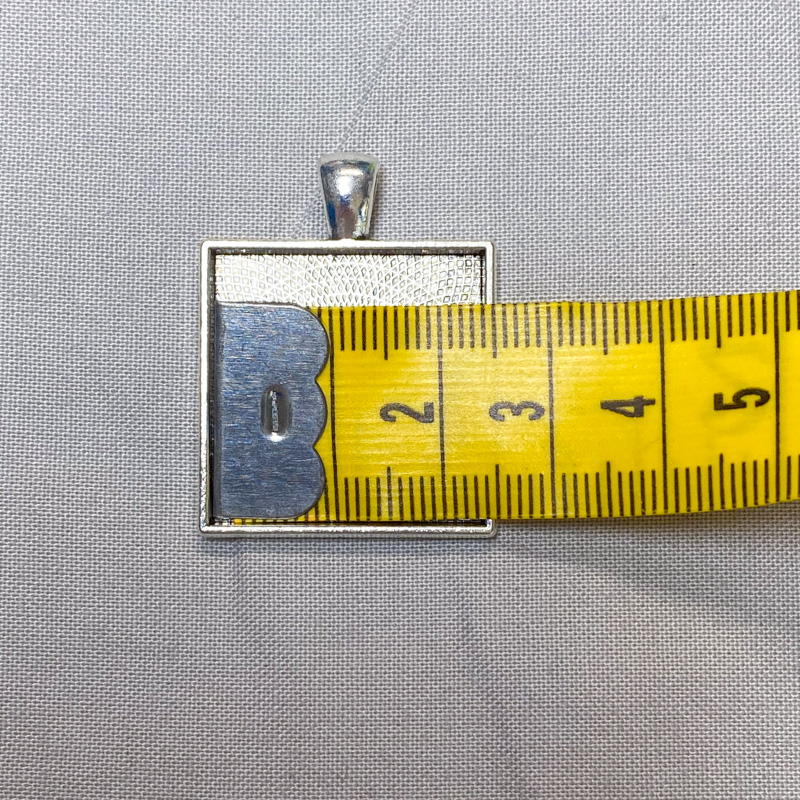
Step 1: Measure your pendant trays
This is an important step to save yourself much frustration and from having to re-print your artwork to get it to fit.
Grab your ruler or measuring tape and carefully measure the inside of the metal tray. Write down both width and height in mm.
Step 2: Set up a template in your design software
I’m using Adobe Photoshop, but you can do this using the design software of your choice. I’ll include keyboard and menu shortcuts for Photoshop and Elements users, but you should be able to do these same things in other popular digital design programs … just check your software’s Help for specifics.
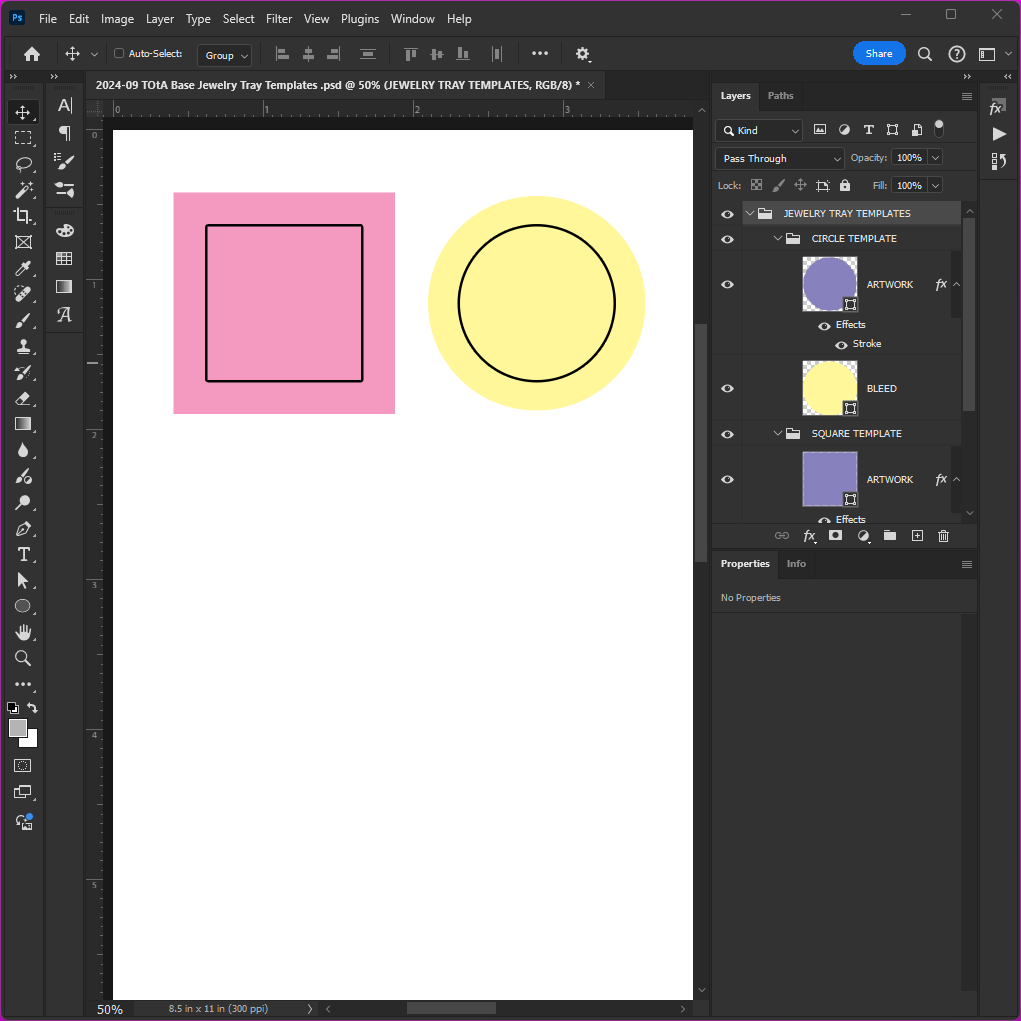
1. Set up a new document sized for your printer paper. In my case, that’s 8.5 inches wide by 11 inches high and 300dpi with RGB color and a white background.
2. Use the shape tool (U) to create a square on a new layer. But rather than dragging out the shape, simply click once on your canvas and the Create Rectangle window will open. You can then specify exact measurements for your square. The insert of my square tray is 26mm x 26mm, so that’s what I entered in width and height.
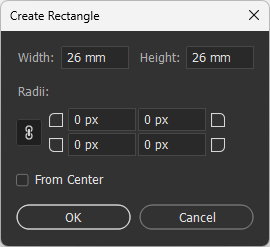
NOTE: Be sure to include the units (mm), or else Photoshop will create a square based on whatever your default units are set to – for example, 26 in or 26 pixels.
Click OK. Your square will appear, properly sized.
3. Duplicate the layer so you have two squares sitting directly on top of one another. Change the color of the bottom square – you can make it any color, as long as it’s different.
4. With the bottom square layer selected, Transform it (CTRL+T) to increase its size. This is our “bleed” layer, so we have extra printing around the edges of our artwork when we cut it out. You want it to be both wider and taller, but just by a little bit. HINT: In Photoshop, hold down the ALT key, then click and drag one of the corners. It will resize the square from the center, rather than from the edge. Quick and easy! Then press ENTER to accept the transformation.
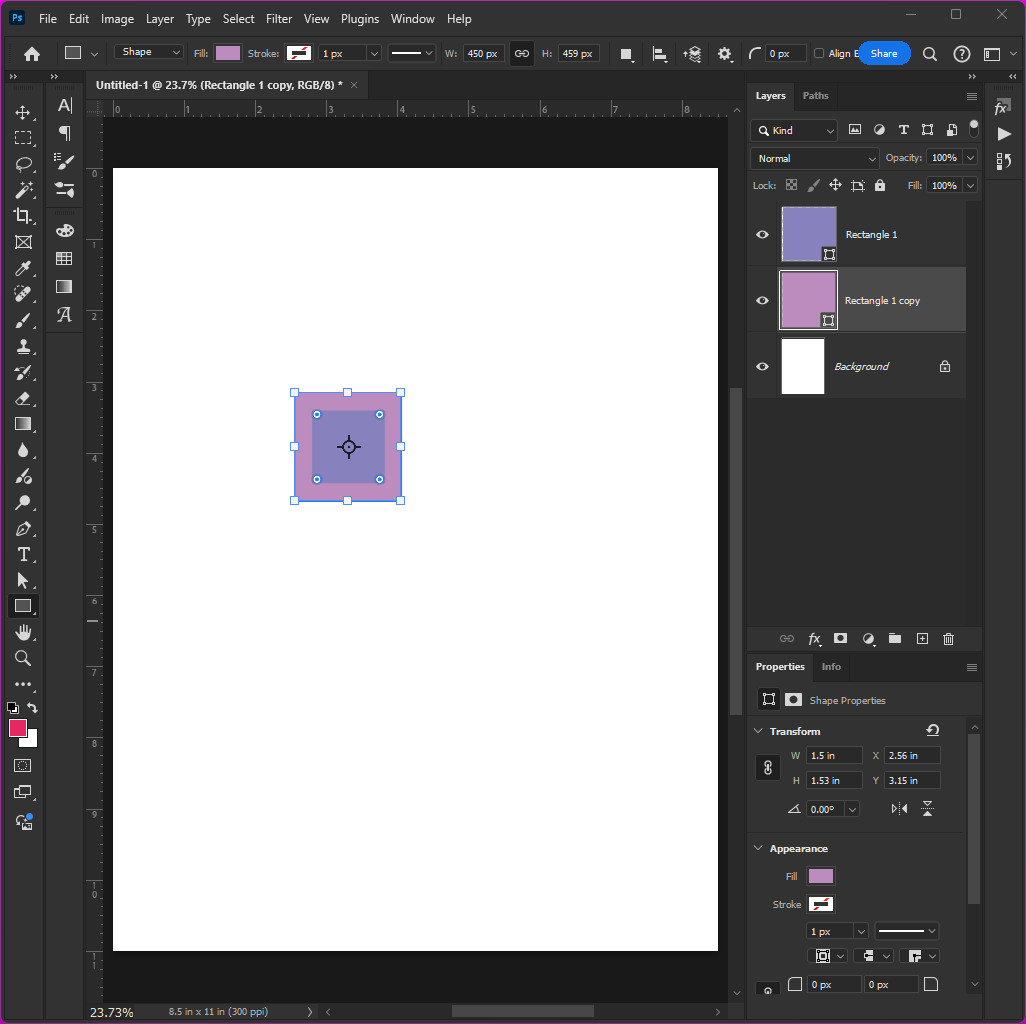
5. I like to rename my template layers so I don’t get lost, so name your top layer ARTWORK and your bottom layer BLEED.
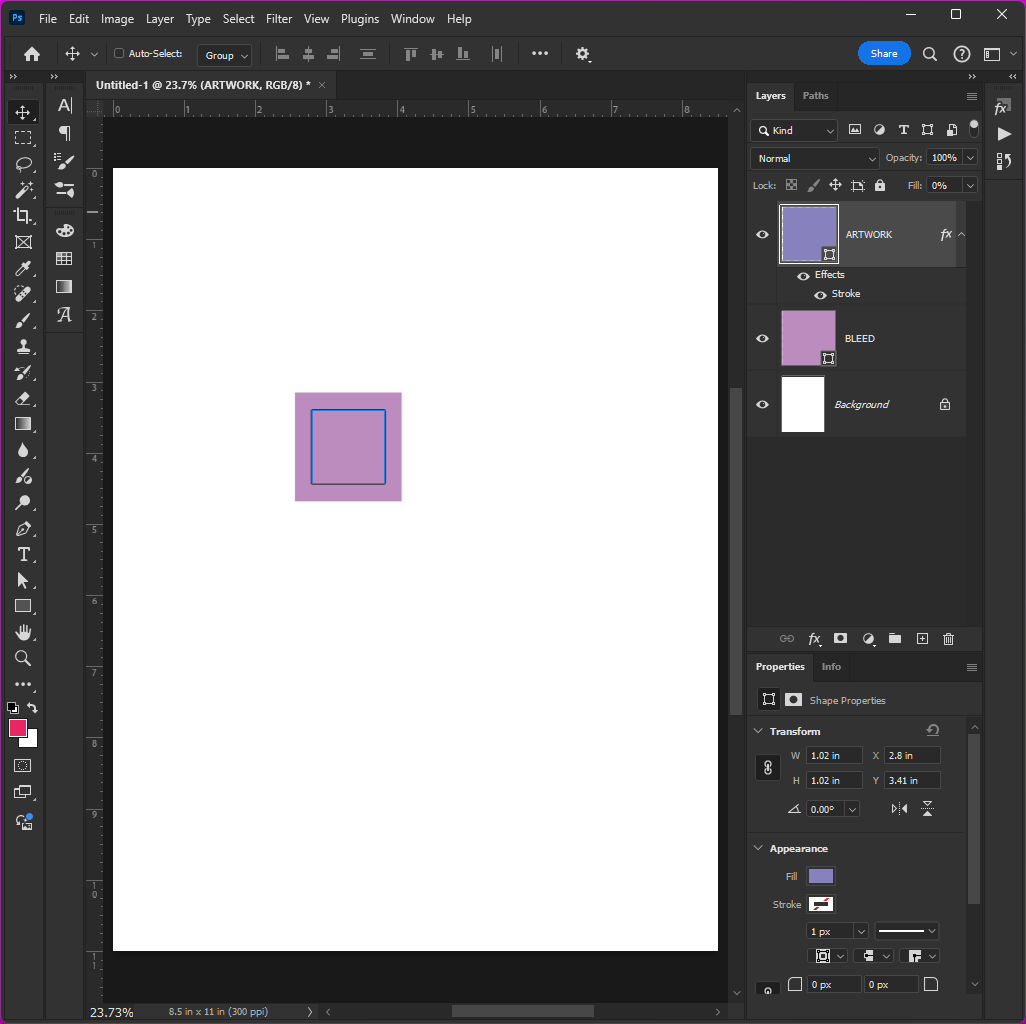
6. Double-click the ARTWORK layer and add a Layer Style: a stroke in a contrasting color (either black or white works well; it doesn’t matter, we’re going to hide this before we print) with a size of 5 and position of Outside. Click OK.
7. With the ARTWORK layer selected, change the Fill value to 0%. That will hide the contents of the layer but leave the stroke around the outside. Voila! If we keep the important part of our artwork inside that square, it’ll be the right size for our pendant. Just make sure the background extends out to the edges of the BLEED layer.
That’s all there is to setting up your template! If you like to organize your layers like I do, select ARTWORK and BLEED and create a group, naming it SQUARE TEMPLATE.
Now, let’s do it again; this time to create a template for the round tray.
1. Create a new layer named ARTWORK.
2. Select the shape tool (U) and change it to the Ellipse shape.
3. Click once on your canvas, and the Create Ellipse window will open. Enter the exact measurements for the height & width of your round pendant (they should be the same). Don’t forget to include mm as your units, and click OK.
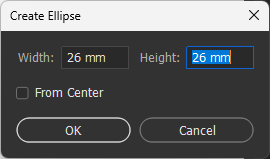
Your circle will appear.
4. Duplicate the layer (CTRL+J) so you have two circles. Rename the bottom layer BLEED. Change its color to something different than the artwork layer.
5. With the BLEED layer selected, Transform it (CTRL+T) to increase its size. Remember, hold down the ALT key as you click-and-drag one of the corners and it will resize from the center. Once it’s a little bigger than your ARTWORK circle, press ENTER to accept the transformation.
6. Apply the same layer style and fill value to your ARTWORK layer as we did for the Square ARTWORK layer. TIP: You can do this quickly and easily by right-clicking on the square ARTWORK layer and choosing Copy Layer Style. Then right-click on your Circle ARTWORK layer and choose Paste Layer Style.
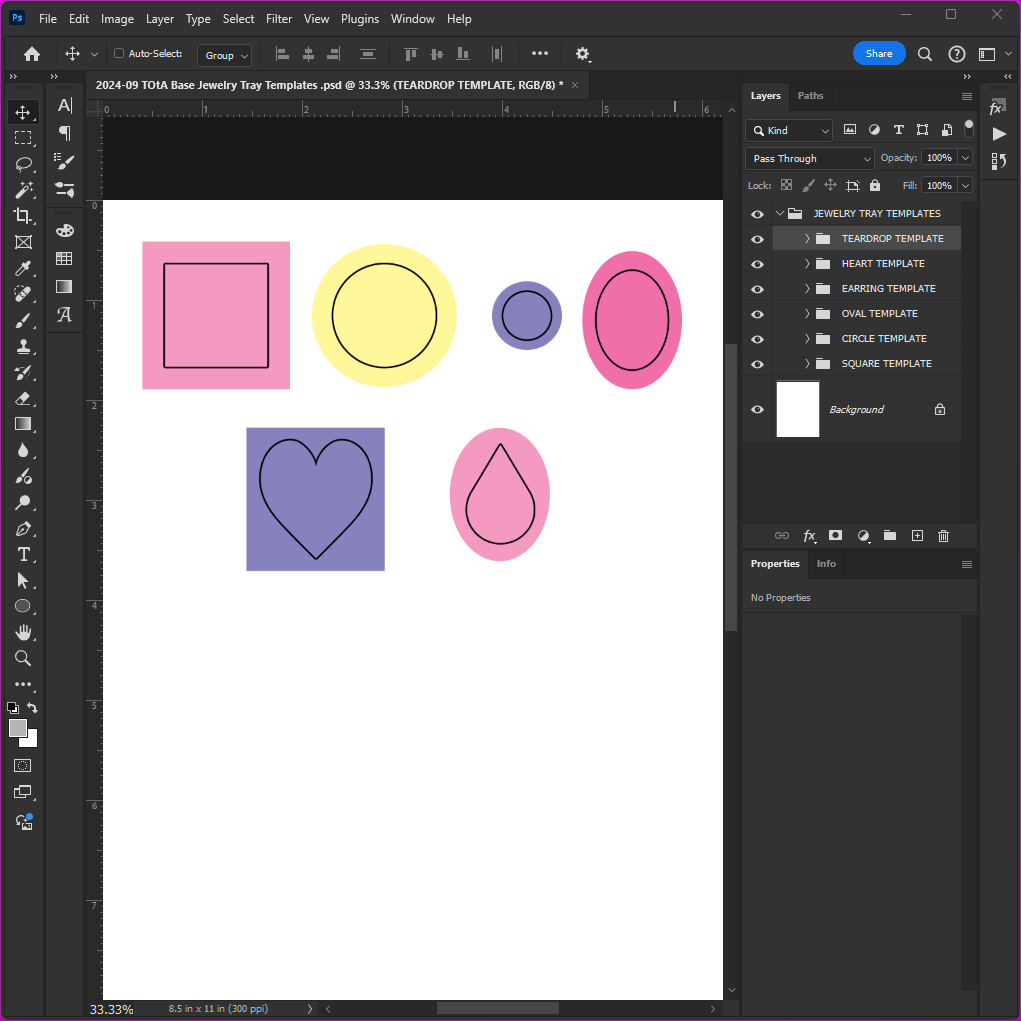
7. Group your two circle layers together and name them CIRCLE TEMPLATE.
You’ve got the hang of it now! Once you’ve got your templates set up, you’ll be able to use them over and over again. QUICK – save your work! The hard work of measuring and numbers is over – now, let’s have some fun!
Step 3: Design your artwork
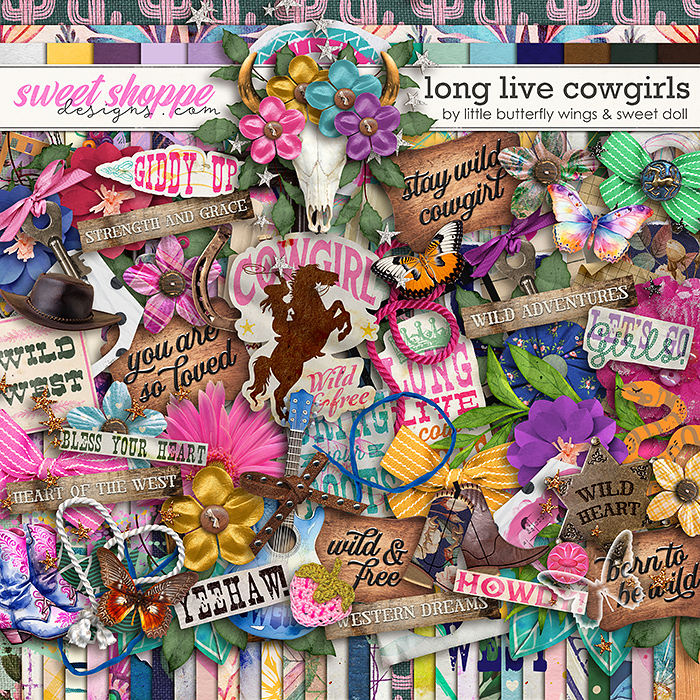
Pull out your favorite SSD digital scrapbooking supplies and start building the artwork for your first pendant. I want to create a square charm for a keychain using the sweet & sassy kit Long Live Cowgirls by Little Butterfly Wings & Sweet Doll.
I pulled in a denim patterned paper, a pair of cowgirl boots, and a tin star. A little resizing, a few shadow styles, and this is the result:
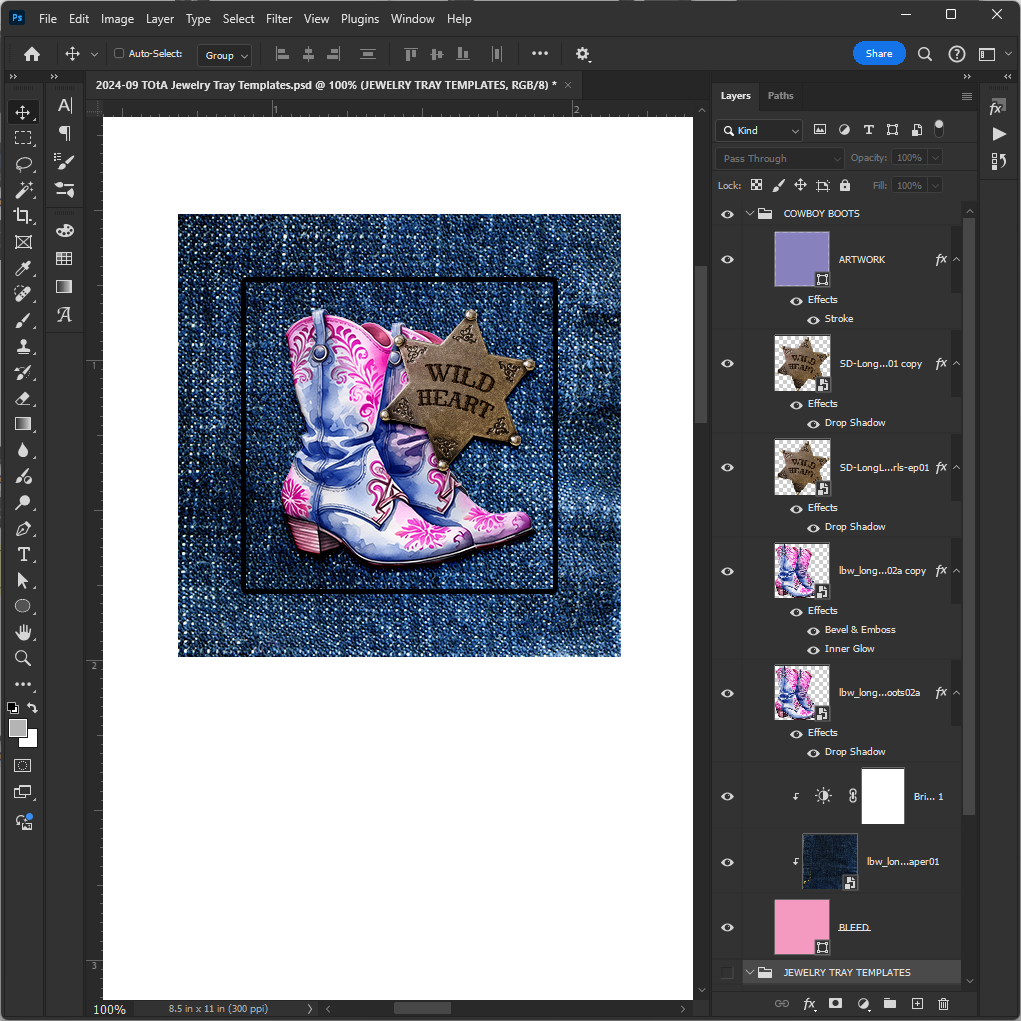
You’ll notice the patterned paper extends to the edges of my BLEED layer, but the important art – the boots and star – are inside the square that’s the exact size of the pendant tray.
IMPORTANT NOTE: Be sure to hide the ARTWORK boundary layer so the outline doesn’t print on your final copy.
Step 4: Print your artwork
When you’re happy with what you’ve created, print a copy on bright white heavy-weight paper. Be sure to check your print settings and ensure that the quality is set to Best.
Allow plenty of time for your printout to dry before moving on to the next step, especially if your paper is glossy.
Step 5: Trace & cut your insert
When you’re sure your artwork is good and dry, it’s time to trace and cut it out. The key here is to use the glass topper – otherwise known as a cabochon – to trace the design.
REMEMBER: We measure and set up our template using the metal tray, but we trace and cut using the glass cabochon.
Place the glass on top of your printed design. When you have it exactly where you want it, use a sharp pencil or a fine-tip pen to trace the outside of the glass.
Then use a pair of fine-tip scissors to cut it out just slightly to the inside of the tracing you’ve done.
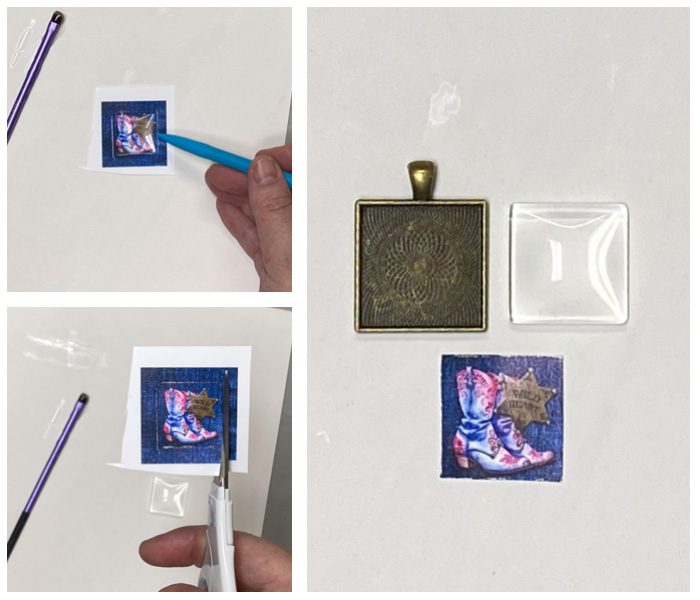
Your cutting job doesn’t have to be perfect; the edges will be slightly hidden by the metal and the edge of the glass.
Test the fit of what you’ve cut by placing the artwork inside of your metal tray. Trim off any extra if you need to.
Step 6: Assemble & adhere pendant and artwork pieces
Now it’s time to grab your adhesive. Put down some scratch paper to protect your work surface.
Then use a fine-tip brush or a toothpick to apply a small amount of adhesive in the metal tray.
Spread it evenly all the way to the edges.
Place your artwork on top of it and gently press it down. A toothpick can help you ensure it’s securely in the tray all the way to the edges.
Put more adhesive on top of your artwork, being sure to cover it completely without getting it too thick.
Then place the glass cabochon on top and gently but firmly press it together so it sits inside the edges of the metal tray.
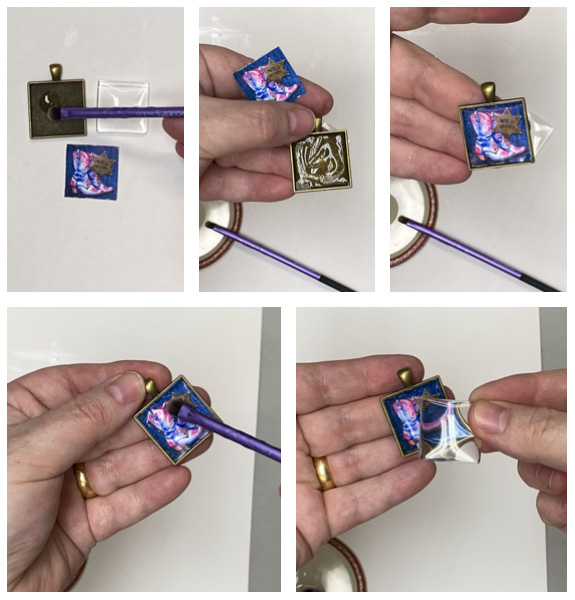
If any adhesive bubbles out over the sides, you can wipe it off with a damp cloth. (I recommend using a piece of scrap fabric – paper towels will stick to the adhesive and tear.)
Once you’ve cleaned off the excess adhesive, set your pendant aside to dry according to the instructions on the adhesive. (Mine said to allow 2 hours.)
Step 7: Admire your handiwork (and add findings)
You’re almost done! Once the time has elapsed and your adhesive has fully set, you’re ready to add any jewelry findings to complete your project. I was turning this pendant into a keychain, so I used a pair of needle nose pliers to attach a keyring blank to the loop on the pendant. And here’s the finished product – one adorable keychain perfect for a cowgirl who is wild at heart:
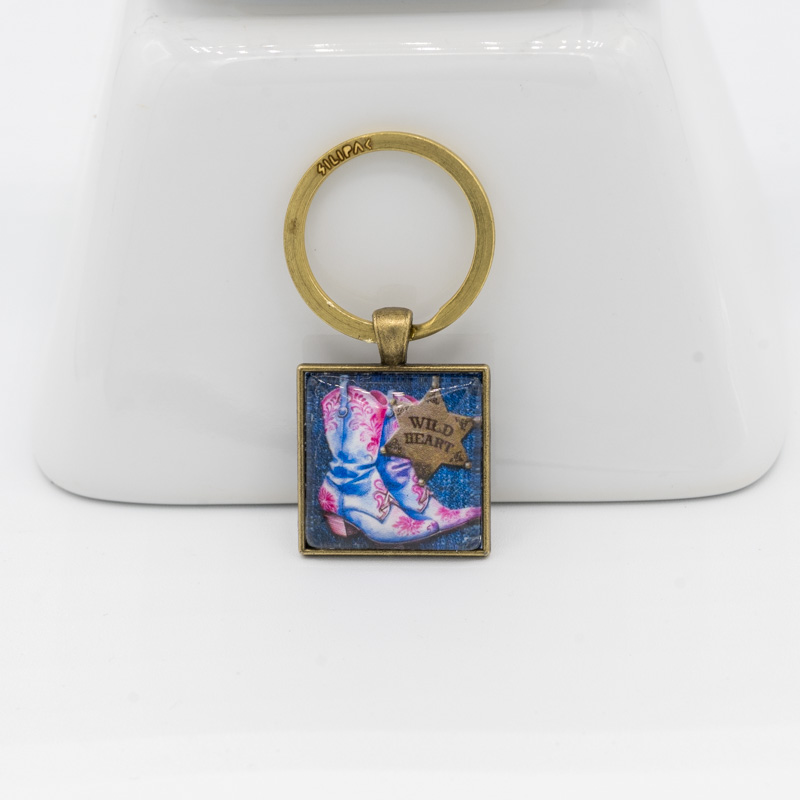
Created with Long Live Cowgirls by Little Butterfly Wings & Sweet Doll
There was another piece of patterned paper that caught my eye from this kit… so I quickly whipped up an oval-shaped pendant and turned it into another keychain:
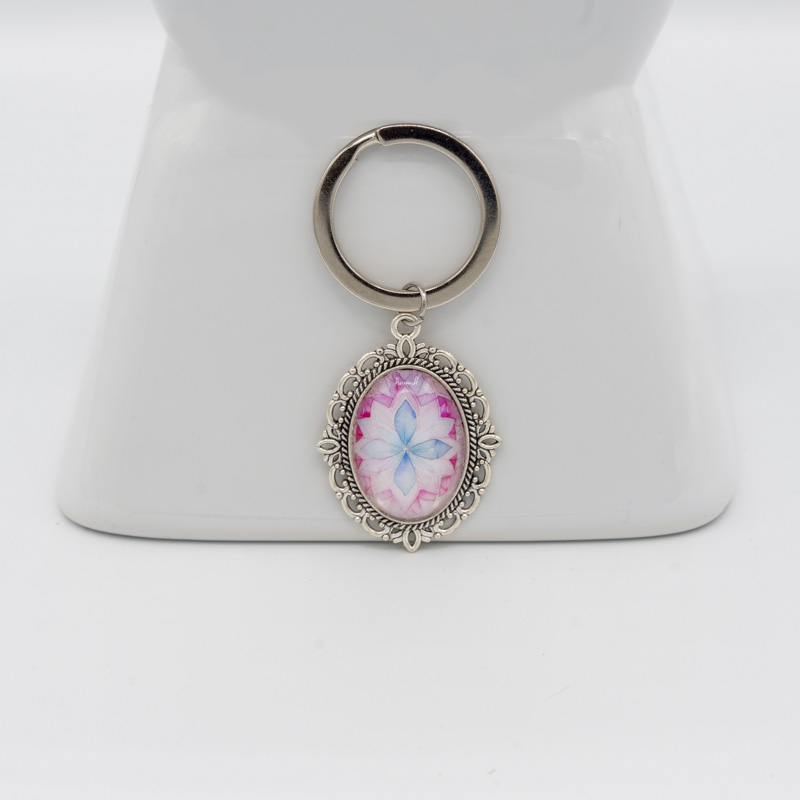
Created with Long Live Cowgirls by Little Butterfly Wings & Sweet Doll
Once I got started, I had so many ideas and was having such fun, I couldn’t stop myself from making more and more and more!
Fall-themed Necklace & Earrings
When I spotted this brand new digital kit by Ponytails Designs, it was giving me all the fall vibes – and I knew I wanted a pendant I could string on my charm necklace and a pair of earrings to match. I’ll be wearing them all through October and November for sure!
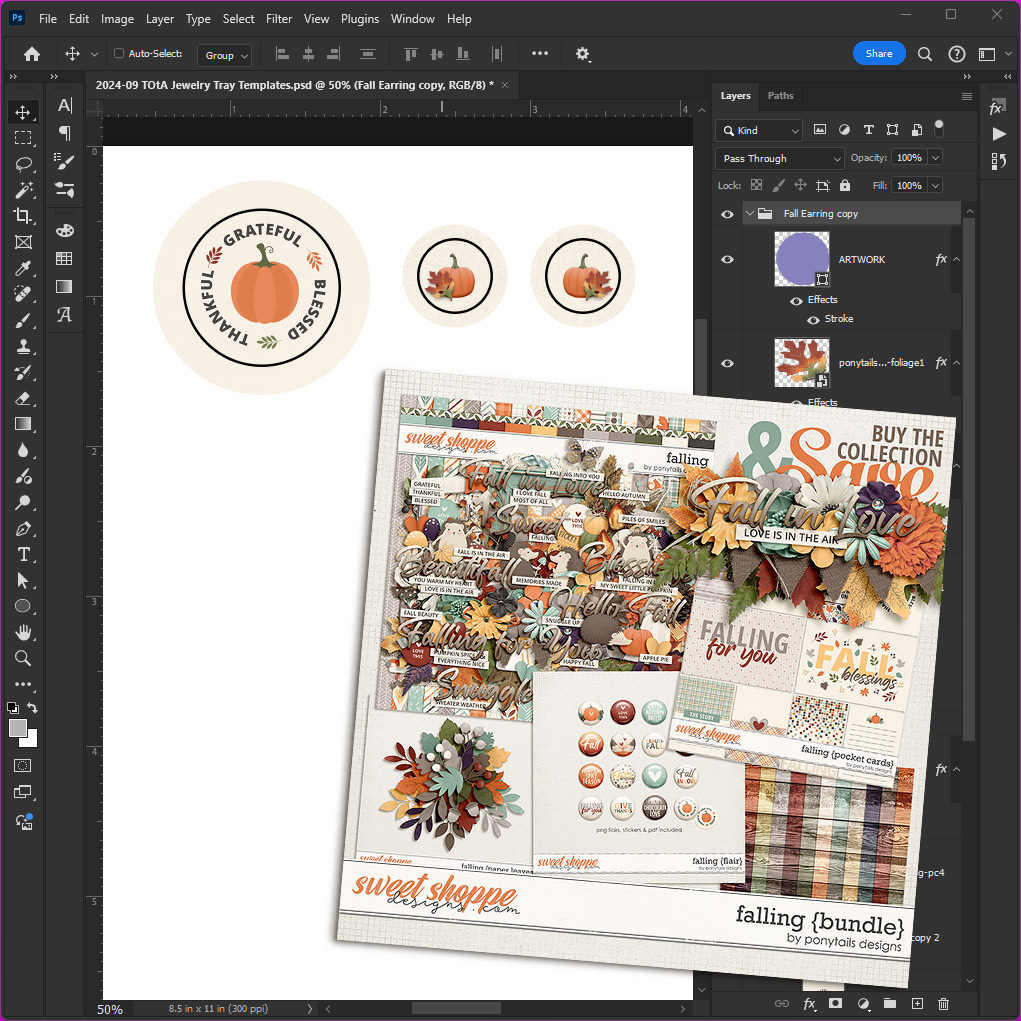
Created with Falling by Ponytails Designs
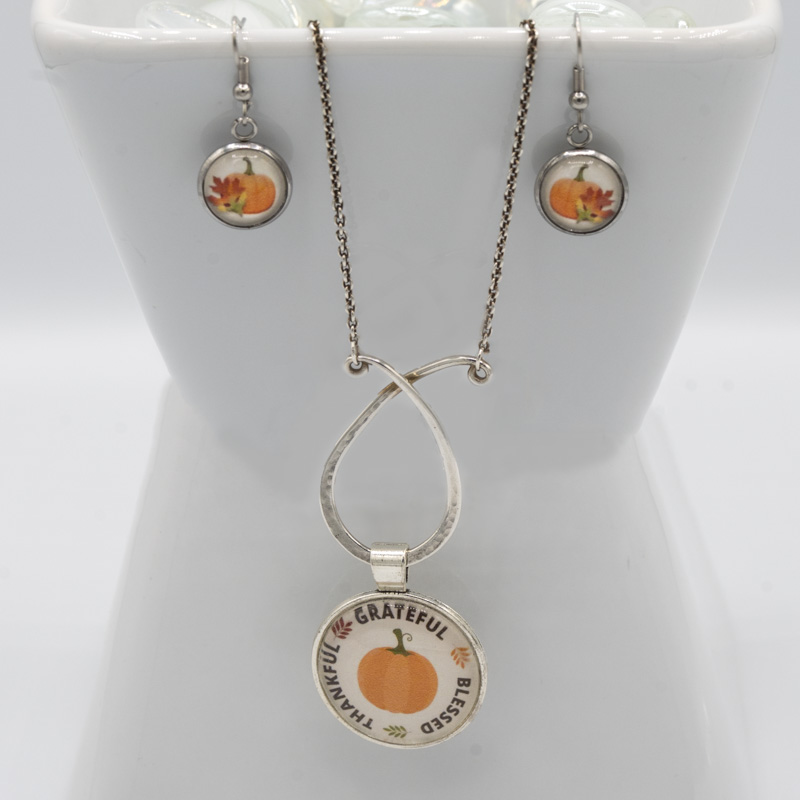
Created with Falling by Ponytails Designs
Flawed but Fabulous Cameo Necklace
Pink Reptile Designs creates some of the most beautiful hand-drawn digital elements. I particularly love the woman in her recent kit Flawed but Fabulous. I paired it with one of the papers from the collection as well as a swath of paint, and set it in a gold-toned oval pendant tray:
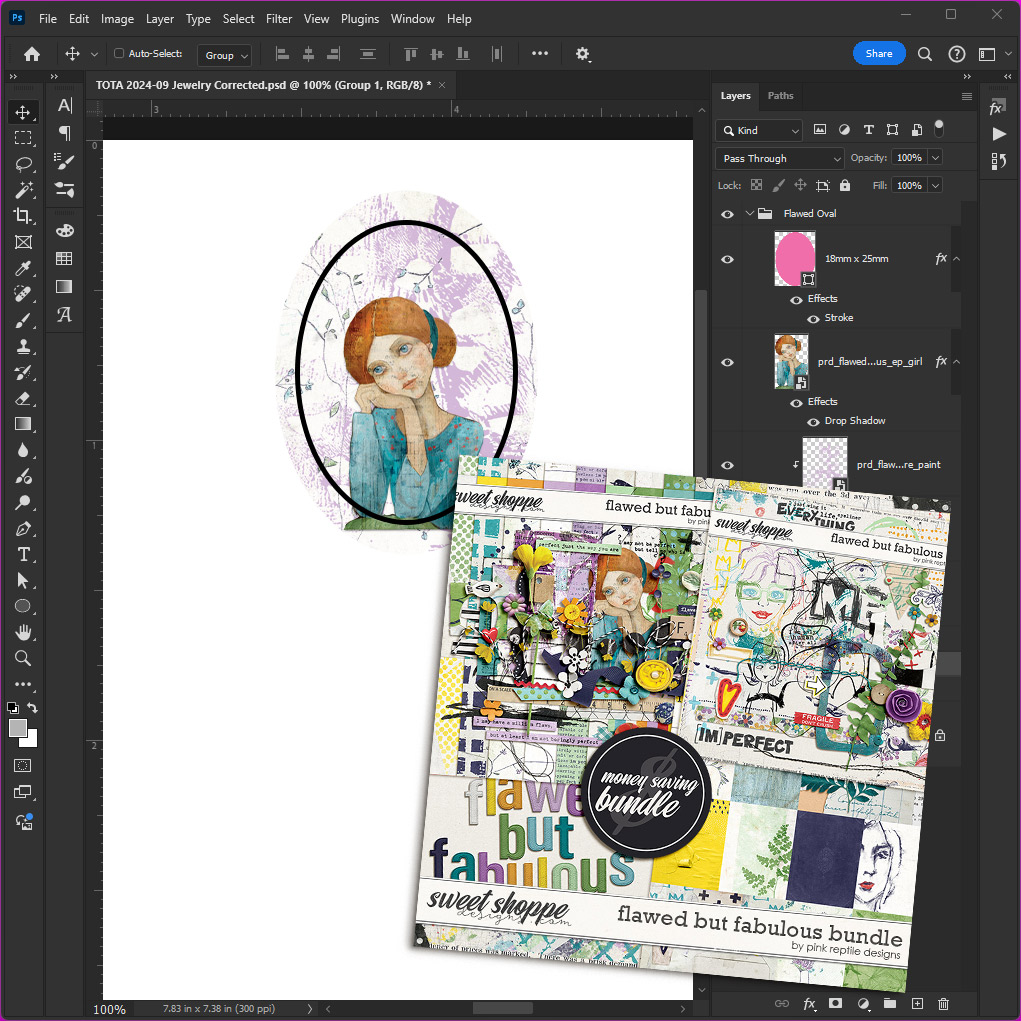
Created with Flawed but Fabulous by Pink Reptile Designs
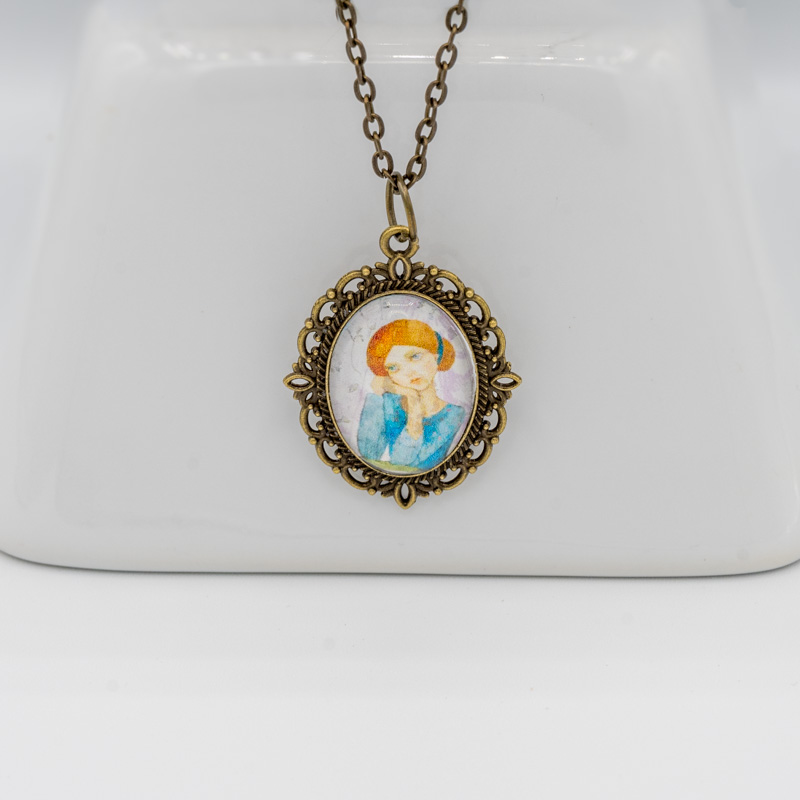
Created with Flawed but Fabulous by Pink Reptile Designs
A Pair of Lavender Pendants
I’m still completely obsessed with Blagovesta’s recent release, Lavender Whispers. I created this simple pair of pendants by clipping a patterned paper to one and using a gorgeous floral element atop a solid paper for the other.
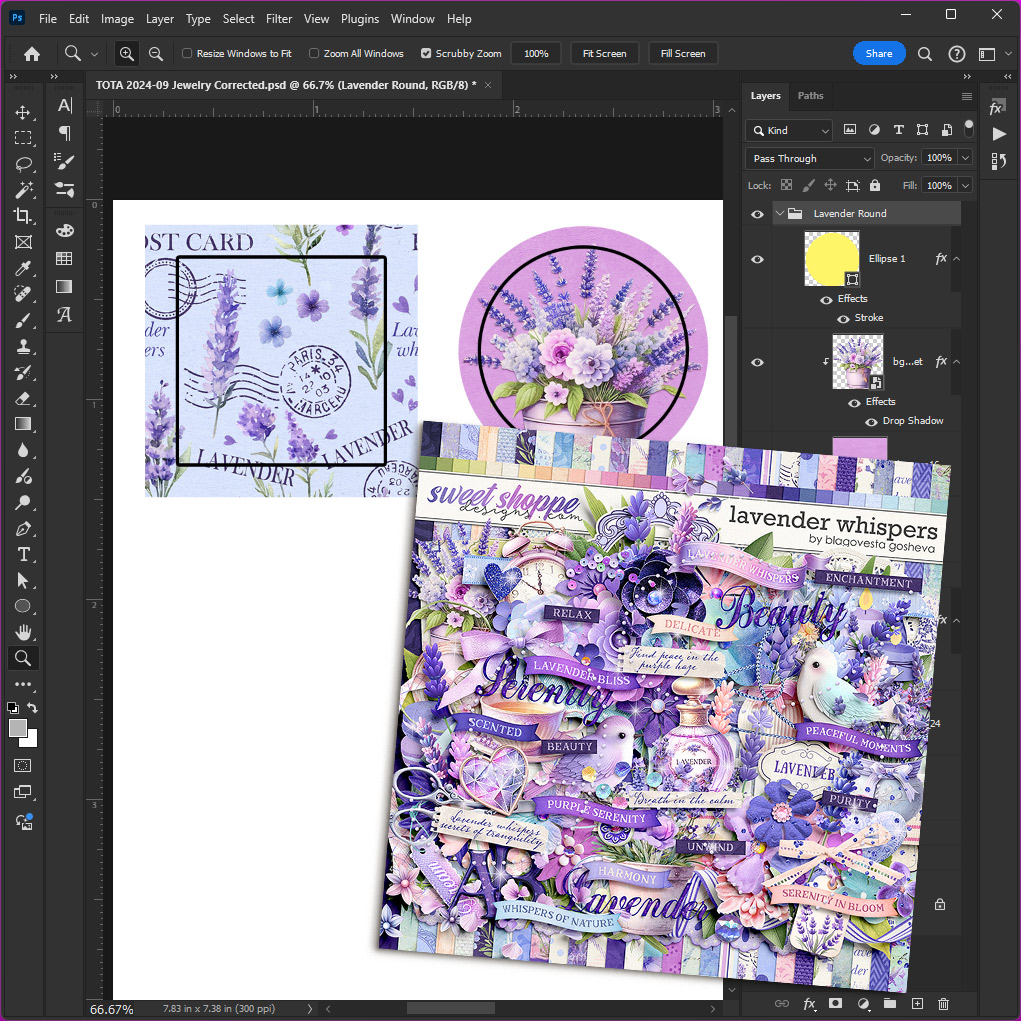
Created with Lavender Whispers by Blagovesta Gosheva
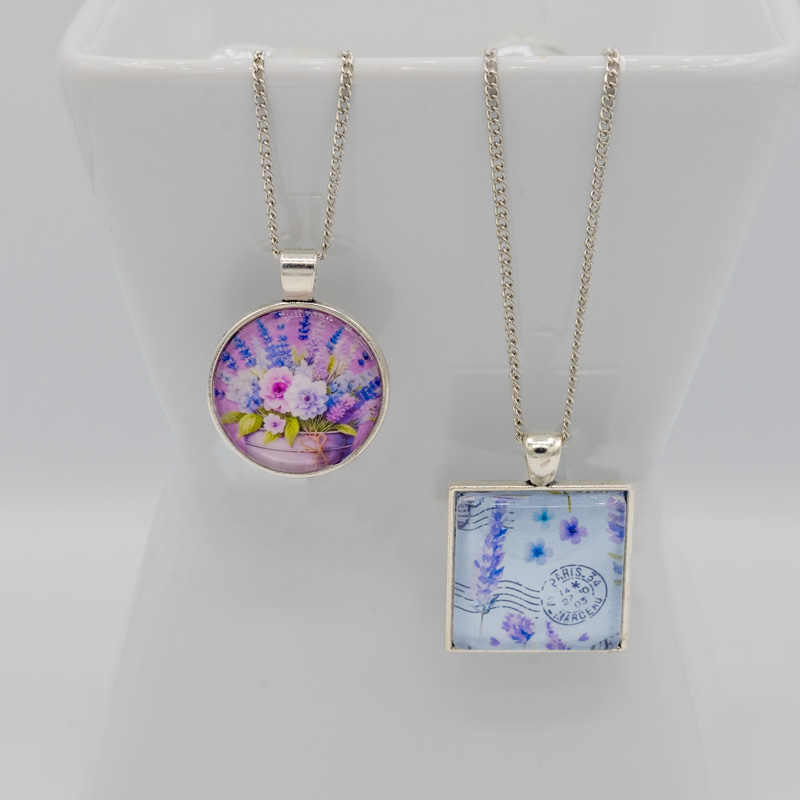
Created with Lavender Whispers by Blagovesta Gosheva
Gymnast Teardrop Pendant
If you have a gymnast or dancer in your life, the newest release from Connection Keeping – Quite Sporting: Gymnastics – is a must-have. I used an ombre paper and this gorgeous silhouette element from the kit to create this teardrop-shaped pendant.
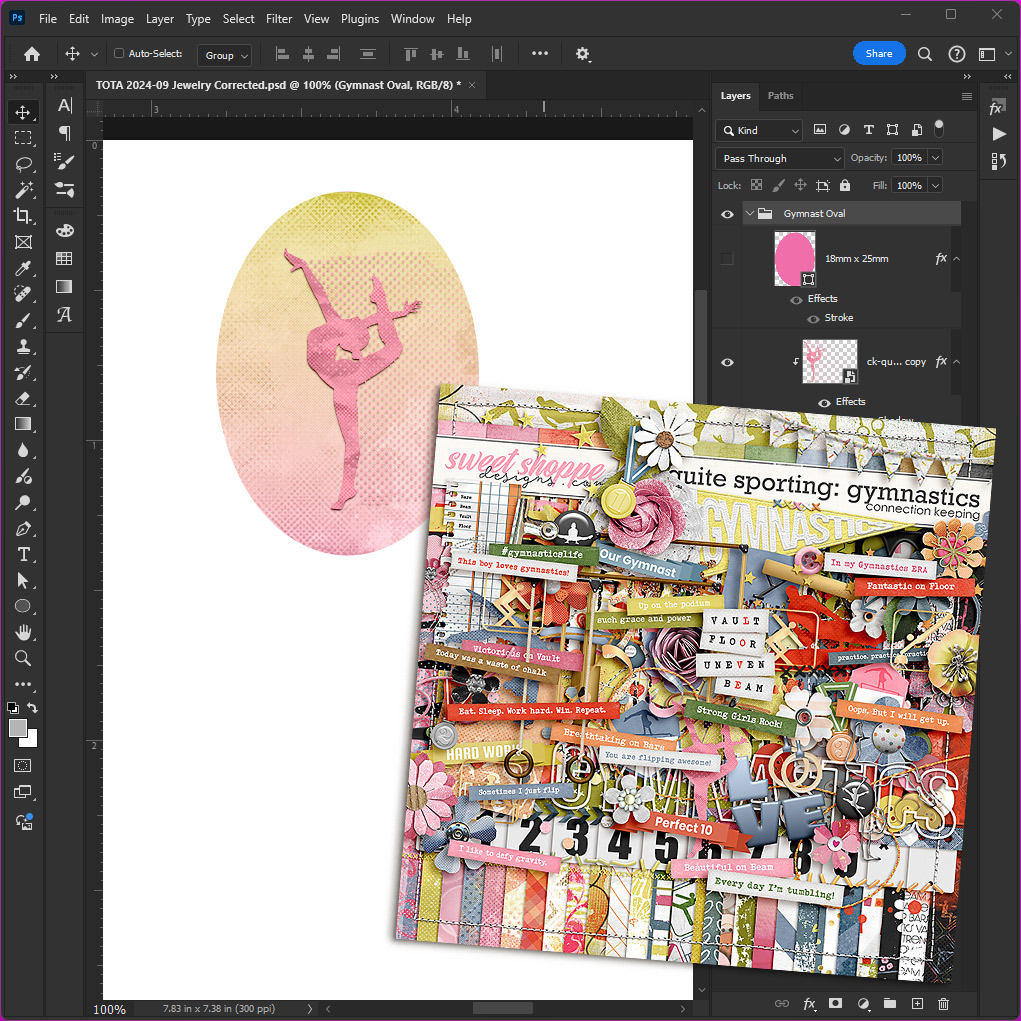
Created with Quite Sporting: Gymnastics by Connection Keeping
I can’t wait to wrap it up and give it as a gift this winter!
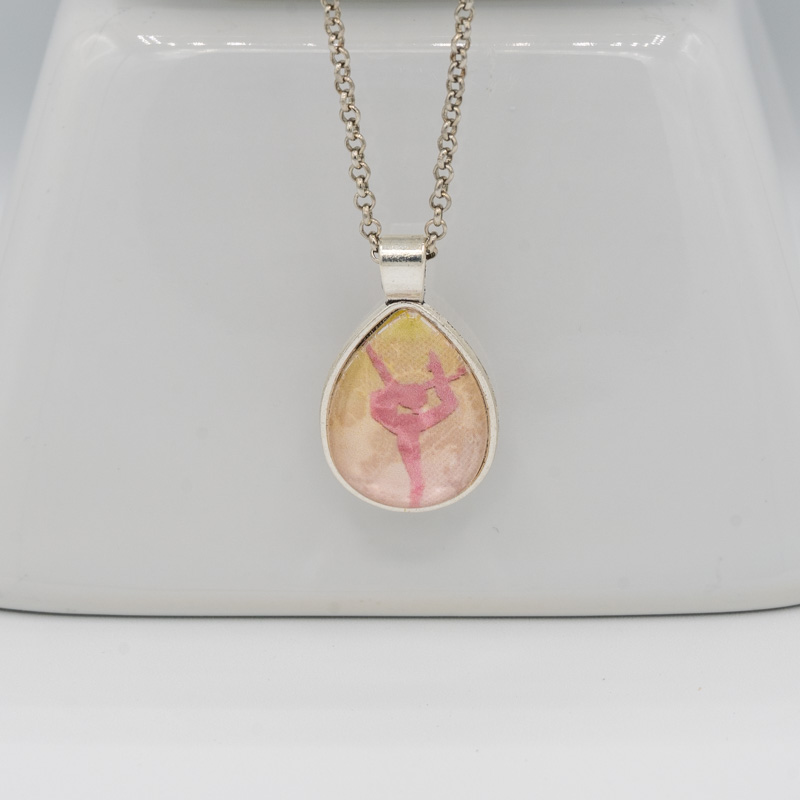
Created with Quite Sporting: Gymnastics by Connection Keeping
Gymnastics Love Zipper Pull
While I was working with Quite Sporting: Gymnastics this piece of word art caught my eye. It lists four categories of gymnastics – Vault, Floor, Uneven Bars, and Beam – and highlights the letters that spell LOVE. I knew it would be perfect for the heart-shaped pendant tray. I paired it with one of the coordinating patterned papers from the same kit and created this:
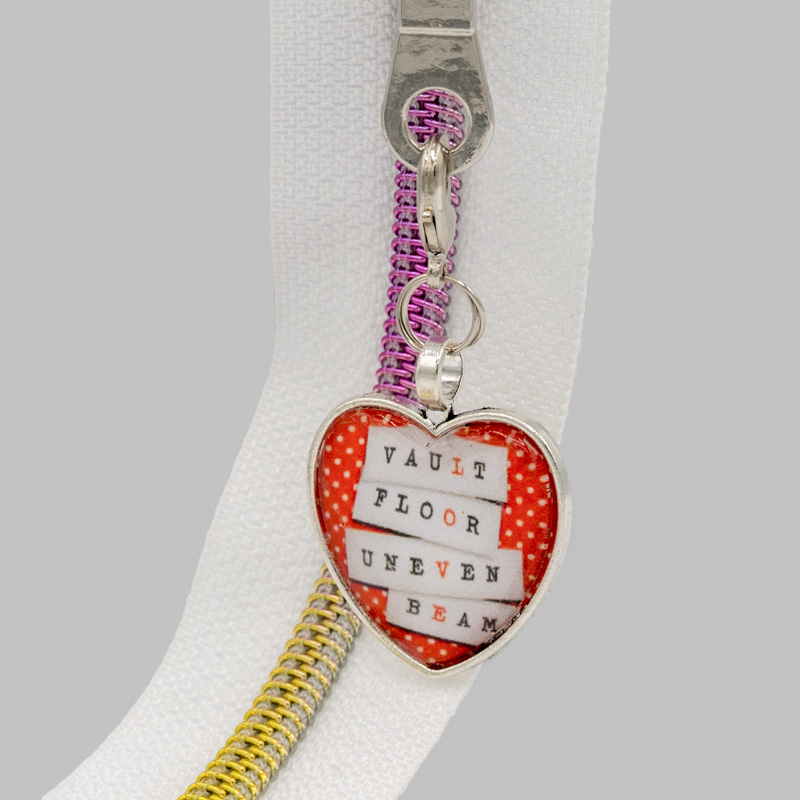
Created with Quite Sporting: Gymnastics by Connection Keeping
This would be perfect to adorn a gym bag … and why not make enough for everyone on the team? You could do something similar for cheerleading or dance, soccer or basketball, or any fandom or favorite just by using a different digital scrapbooking kit. There’s so many to choose from here at the Sweet Shoppe!
Created with Quite Sporting: Gymnastics by Connection Keeping
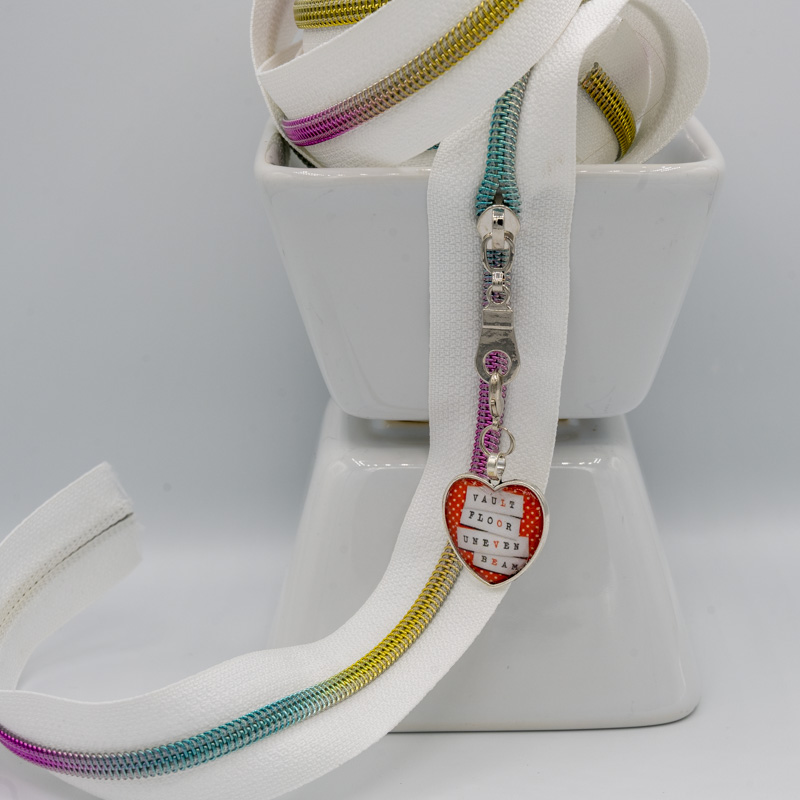
Zipper Pulls to Match Anything
If you’re a long-time reader, you may recall the custom fabric I printed and sewed up into a new handbag back in June 2022.
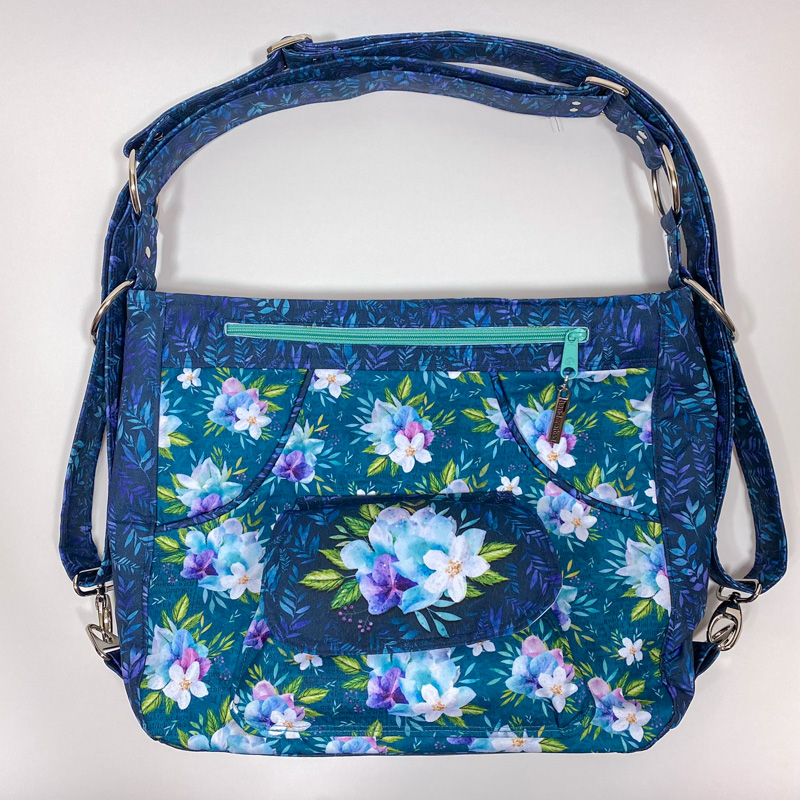
Created with custom fabric printed using Outdoors: Enchanted Forest by Kristin Cronin-Barrow
Well, it’s still my favorite purse. I used the leftover fabric scraps to sew myself a matching wallet last year:
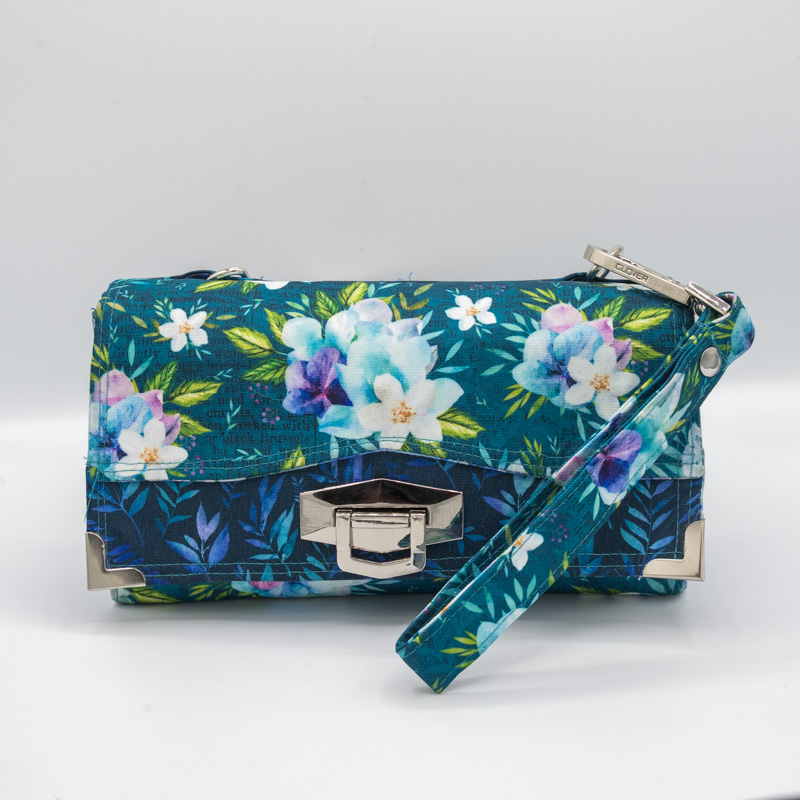
Created with custom fabric printed using Outdoors: Enchanted Forest by Kristin Cronin-Barrow
I decided that I wanted a set of zipper pulls to coordinate with my wallet and handbag. I used the same digital kit – Great Outdoors: Enchanted Forest by Kristin Cronin-Barrow – and created four designs for a round pendant tray:
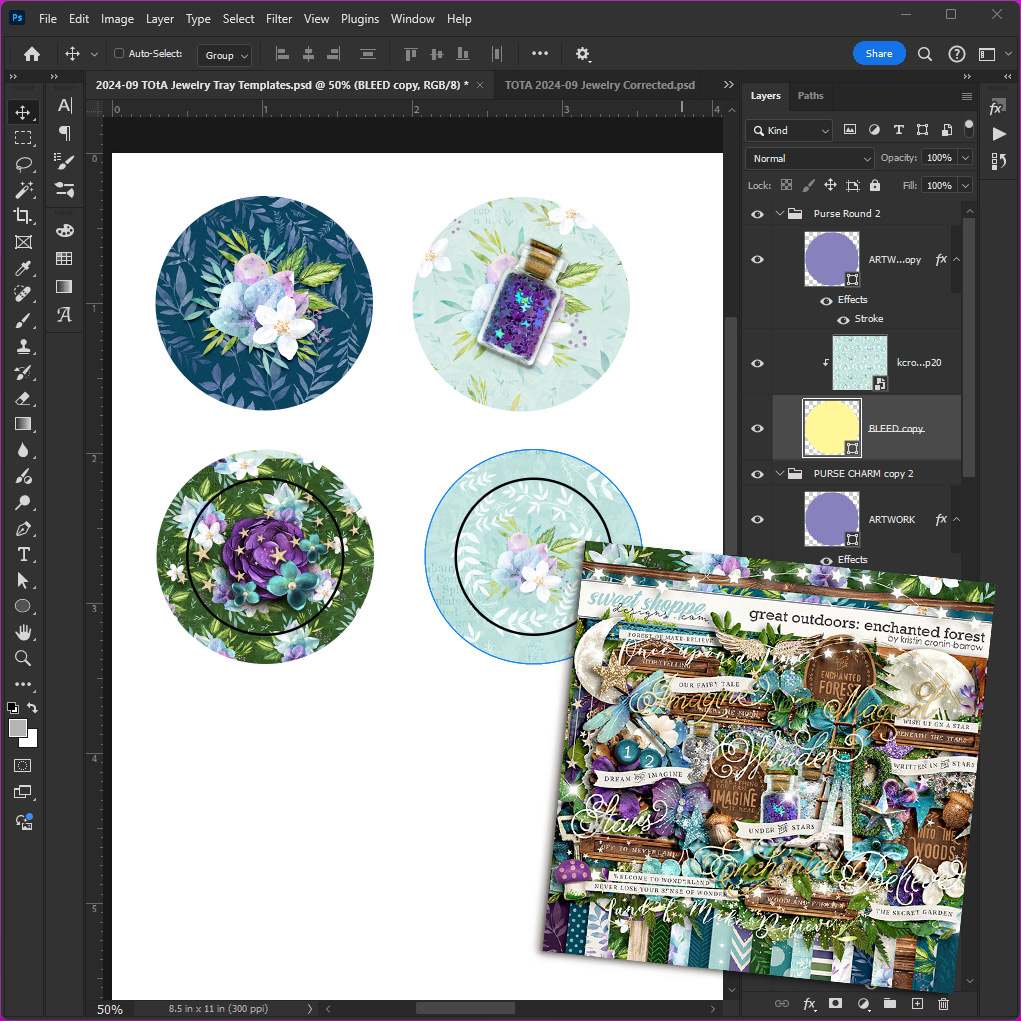
Created using Outdoors: Enchanted Forest by Kristin Cronin-Barrow
These will attach to all the zippers on the bag, both inside and out, to make it easier for me to open and close. Woo hoo!
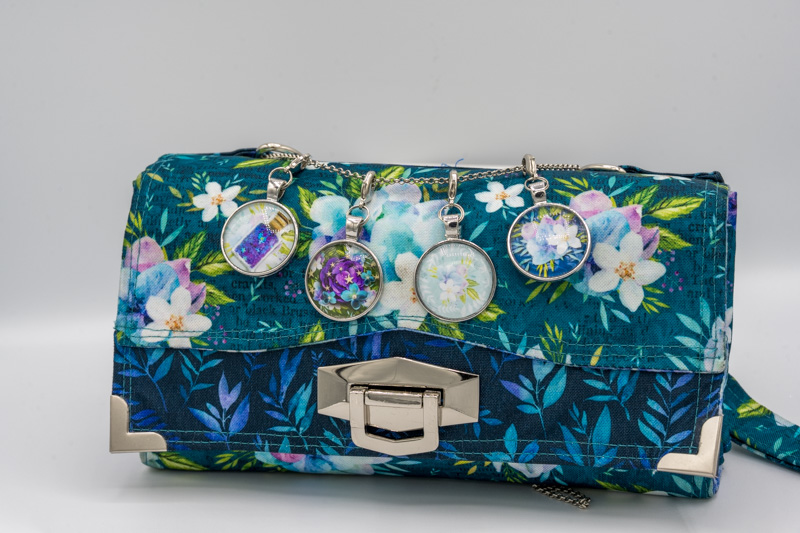
Custom fabric and zipper pulls created with Outdoors: Enchanted Forest by Kristin Cronin-Barrow
Okay … I’d better wrap up this edition of Think Outside the Album before I keep going down the rabbit hole of how many more ways can I use these jewelry pendants and charms. I hope you’ll remember this project the next time you need a small, custom gift for someone. Whether you’re planning ahead for Christmas presents or creating seasonal accessories to brighten up your own life, making keychains as thank-you gifts for your team or whipping out coordinated zipper pulls as an “I love you” gift … when you combine a set of jewelry trays and glass toppers with the vast and varied digital scrapbooking designs you’ll find in the Sweet Shoppe, the possibilities truly are endless!
I hope as you tackle your next hybrid project you’ll take a moment to snap a few photos and share it with us in the Gallery. I know I always say it, but it’s true – I can’t wait to see what you create when you Think Outside the Album!


Heather Hines said...
on September 21st, 2024 at 12:05 pm
Wow! Angie these are spectacular! You are so creative!
Kelly said...
on September 22nd, 2024 at 1:51 pm
Angie, these are so fun. As a mom of girls I’m thinking these would be so fun to do at a birthday party with monograms from an alpha or with the theme of the party.
This is so fun and a great instant reward!
Ps your purse is gorgeous!