Hot 4 Hybrid – Birthday Book
Hey there! Jen Tapler here with your first Hot 4 Hybrid post of 2011. I figured everyone is starting out the new year all gung ho and motivated to earn those Portfolio points, right!? And one of the easiest ways to rack up a grip load of points is by completing that super exciting Ten Point Task! This month’s task is to create some type of hybrid Birthday Book / Birthday Planner to help you keep track of all those important birthdays each month. I was SO excited when I saw this challenge as I’ve always wanted to make one of these books, but have just never taken the time to sit down and do it! So I thought for my post today I’d put together my own version of a Birthday Book and share my project with all of you so you can see how easy it is (AND how amazingly functional the finished project is) and hopefully inspire you to get those 10 points this month!
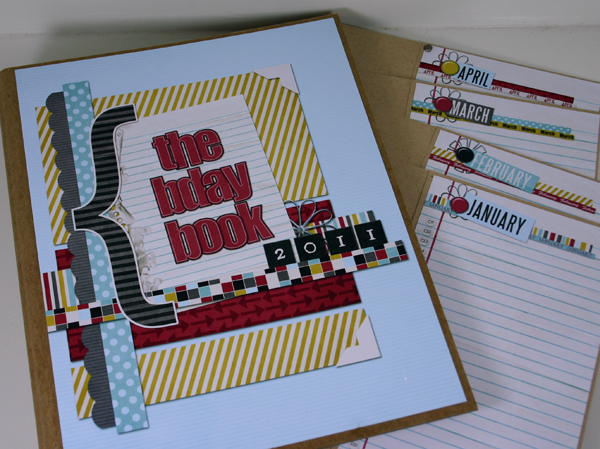
For my book, I decided to use a little Kraft colored chipboard binder (it’s about 7×9 inches) I’d had laying around for several months as the base for my book. (I think I purchased this binder from Papertrey Ink). There are any number of ways you could tackle this project, so please don’t feel like you are restricted to creating a binder book just because I did. Be creative and do whatever works best for you! But here’s a look at my boring, unadorned binder:
I knew I definitely wanted to use Libby’s 8 Days a Week kit for this project – the colors are amazing and I loved having all those month labels and ribbons to play with and the circular numbers sure came in handy for my inside pages!! I went ahead and designed my front cover digitally using a slightly altered version of one of Cindy’s Layered Templates Set #43. I also used Libby’s Paper Clips Alpha Stitches templates on the front cover. Once I finished with my cover design in Photoshop, I printed it out and adhered it to the front of my binder using Mod Podge.
Next I needed to make the heart of the book – the actual calendar pages. I knew I wanted my inside pages to actually be some type of pocket folder type of thing so I could store cards inside the pocket for each month – that way when I noticed on the calendar that it was getting close to someone’s birthday, I just reach inside the little pocket for that month and pull out one of my cards and stick it in the mail – good to go! So to create my pocket pages, I started with a 8×10.25 inch piece of Kraft cardstock and scored at 4 inches (along the 10.25 inch side), then folded the 4-inch flap over and adhered it along each end with strong double-sided tape, forming a pocket. I then adhered my calendar page to the front of the flap. The calendar pages were also designed digitally, flattened and then printed out:
So there you have it! Each month has it’s own pocket page with calendar that has a line for each day of the month – all ready for me to fill in with the names of people who are important in my life, to help me remember their birthdays! See how easy it is!?
So what do you have planned for the 10-point hybrid challenge? Any ideas yet? I’d love to see what you make. If you can, link us up to your projects in the gallery! Can’t wait to see what everyone creates!!


Dee said...
on January 5th, 2011 at 6:22 am
This is very cool, Jen! I need one of these anyway, and of course I need points . . . so I might just have to lift this idea 🙂
Zora (DeepGirl) said...
on January 5th, 2011 at 11:55 am
Perfect, Jen, I love it!
blurooferika said...
on January 6th, 2011 at 2:32 pm
Great project. Love that it’s easy enough for anyone to do. Thanks for the post!