A Pirate’s Life …
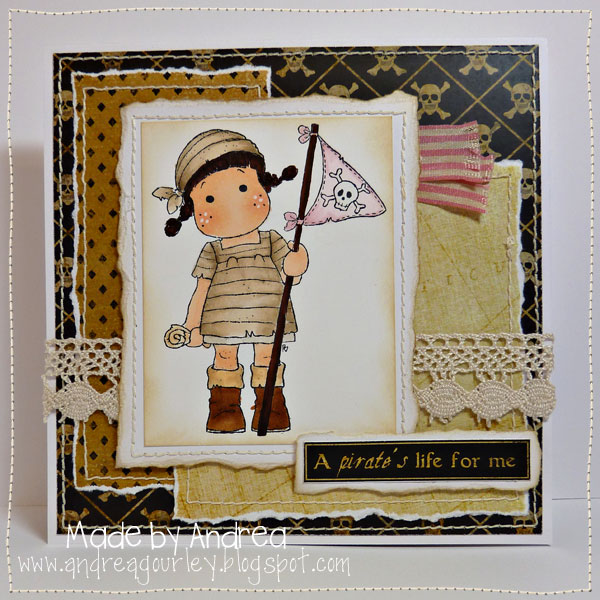
Hello it’s Andrea here taking over the blog with my gluestick and scissors to share a hybrid project. Today I have some step by step photographs that I took whilst making one of my most favourite cards ever. This is the card that I made
I started by resizing and printing the digital papers and gathering my physical supplies. I stamped my image and coloured her with Copics
I stitched the background paper directly to the square cardbase …
… and then stitched around the other paper panels. After stitching I tore around the edge to give a distressed edge
I trimmed the coloured image and inked around the edges with distress inks, matted onto white card, stitched using the sewing machine again and then tore around the edges. I also sponged some distress ink onto the torn edge to make it really stand out from the background
When all the paper panels had been torn, stitched and distressed it was time to assemble the card
Wrap the lace all around the card and secure the ends inside – don’t worry about the ends being seen because you can print more paper to create an insert which will cover any unslightly joins and ends of ribbon etc.
Before adhering the stamped image tuck a length of ribbon behind the paper panel. I chose pink striped ribbon to pull in the pink from the little pirate girl’s flag but the striped ribbon I had was obviously very new and neat and clean and not all like it had been on a pirate voyage to look for treasure so I distressed it first 🙂
First I coloured it with my Copic pen – I found E42 to be the perfect ‘make it grubby’ colour – then I tweaked the edges to make them roughed up and raggy
The little word art sentiment had the same torn and distressed treatment before being attached to the bottom of the card
To finish off my card and make it a truly special card for my 11 year old little friend I printed more coordinating paper to line the envelope …
… and I finished off the inside too
The final touch was to use the same rubber stamp that I used on the front of the card to decorate the envelope
My Supplies:
Digital Kit – Black Pearl by Misty Cato
Rubber Stamp – Magnolia Pirate
Ribbon – Pencil Stripe
Copics
Sewing Machine
I hope you’ve enjoyed this insight into how I made my card, I’d love to see your own projects if you are inspired to try, Andrea x


Jacinda said...
on February 16th, 2011 at 4:04 am
Wow, what an awesome card! I love that stamp and how you colored it.
Julie Billingsley said...
on February 16th, 2011 at 5:06 am
wow, what an awesome tutorial! Thanks Andrea! All the wonderful details in this card make it so stunning!
Brittney said...
on February 16th, 2011 at 5:52 pm
I love it, makes me wanna go make some cards today!
Kendall said...
on February 16th, 2011 at 8:56 pm
This is just incredible! I’m seriously in awe of your talent!
Sharyn said...
on February 18th, 2011 at 6:28 am
Thanks for the fab photos and instructions. This really is so cute!