Learning Something New
Hi, this is Andrea bringing you today’s blog post here at the Sweet Shoppe. I’ve been thinking for a few weeks about what to write about today and through the week I spent a happy evening crafting with my Mum who wanted to know how to make a drawer card that she had seen somewhere online. Whilst helping her to work out exactly how to make the card I thought about how nice it is to share knowledge and to learn to do new things together and so todays blog post is a mini tutorial on how to make a drawer card so that we can all learn something new.
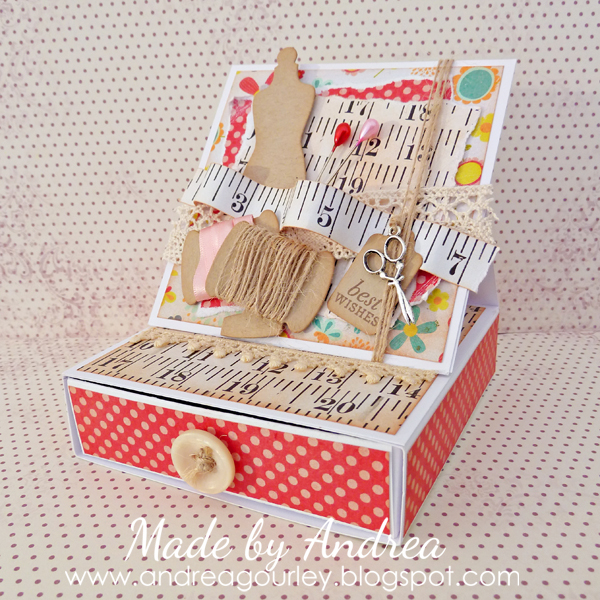
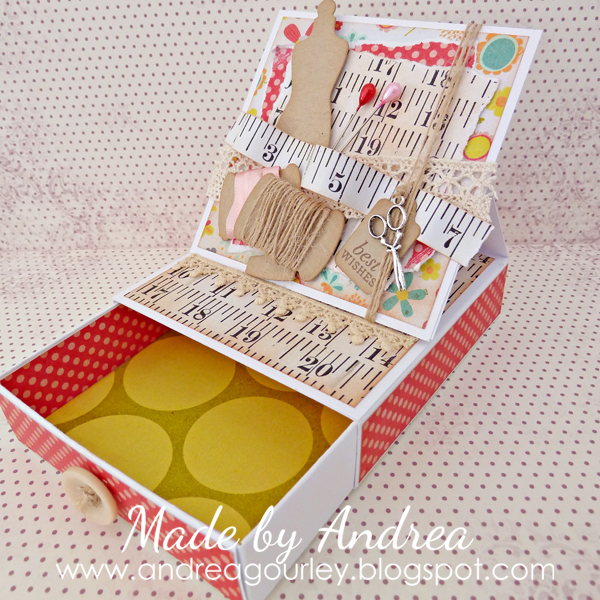
This is what I mean when I say a drawer card, it’s a pull out drawer with the card on top. I put a small present in my drawer and my Mum popped a gift card in to her drawer when she gave it to her sister last night.
I’m going to share how to make the basic structure of the box, drawer and card. Don’t worry, it looks complicated and there are quite a few photographs but really it’s very simple and straightforward. Also I should apologise for the colours in the photographs, taken at night under dodgy lighting they all had a horrible yellow tinge so I’ve changed them all to black and white to save your poor eyes 🙂
Making the box:
Cut 2 pieces of cardstock 9 7/8″ x 9 7/8″ which will make the drawer and 11″ x 5″ which will make the box framework
Score the large square at 1, 2 and 3 inches from each side and the rectangle piece of cardstock at 1, 5, 6, and 10 inches starting from the left side then turn it around and score all the way along the long edge at 1 inch
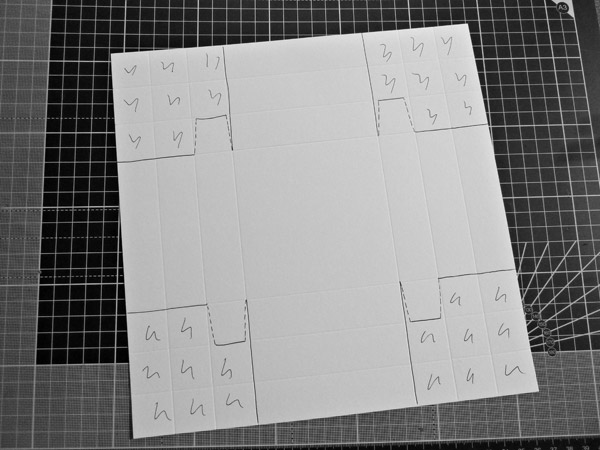
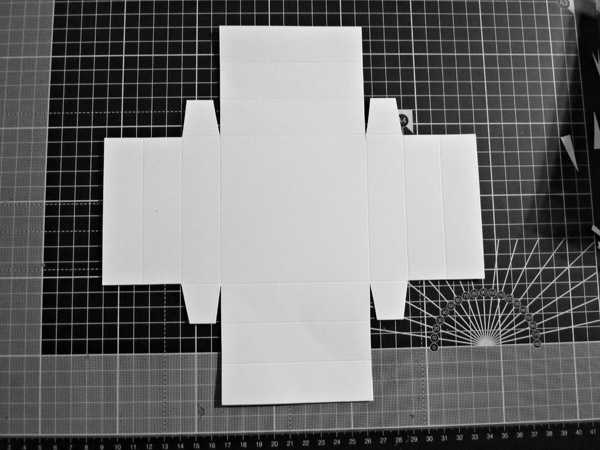
Your card pieces should look like this (I’ve marked the scores with a black pen so you can easily see them)
Making the box first, fold along all the score lines you just made then cut as in this photograph to create the flaps and then add glue to the flaps where I’ve added the squiggles
Fold over the flaps to make the box
Taking the square piece of card that you have already scored you need to cut away all the sections that I’ve squiggled on in the photograph to make the drawer, you can see the main shape of the drawer with the 4 sides and flaps to tuck in
Fold on the score lines for each side. From the centre fold in on the first score line …
From the centre fold in on the second score line …
From the centre fold out on the third score line, repeat this for all four sides of the drawer
Construct the drawer by folding in the tabs …
Folding over the side …
… and pushing down into the drawer. As you have already scored and folded each line your drawer will basically come together by itself with just a little pushing and pulling
Slot the drawer into the box
To make the card that is attached to the top of the drawer take a piece of card that is 8″ x 4″ and score at 4 and 6 inches from the left side
Fold over to make a little easel shape (without the drawer this type of card is called an easel card as the front stands up as if on an artists easel) apply glue to the bottom and attach to the top of your box
Cut a second piece of card that is 4 inches square which will become the decorated front of the card, glue it to the easel on the bottom 2 inches only which keeps the back of the card nice and neat. This will simply fold down when you want to give the card to the recipient.
Now that you have made your basic structure simply print papers and cut to size, gluing them to all the sides of the box, the front of the drawer and the card. It’s nice to cover the inside of the drawer too and remember to tie on a button to the drawer front so it can be pulled open
Supplies:
Papers – Happy and Healthy for Life by Jenn Barrette at Sweet Shoppe Designs
Haberdashery dies – My Favorite Things
Tag die and sentiment stamp – Papertrey Ink
Ribbon, twine, button, lace, pins and charm – Ribbon Girl






Astrid said...
on February 19th, 2012 at 12:09 pm
This is such a cool project and a fantastic tutorial, THANK YOU!!!
I first saw this project on Ribbon Girl’s blog and she gave me the link to this tutorial. I really, really like your version of it too!!!
One quick question, where did you get your score board? It looks way better than mine…..
Jacinda said...
on February 19th, 2012 at 3:01 pm
Great project! I so need a proper scoring set up like you have.
Lydia Tarbox said...
on February 19th, 2012 at 3:16 pm
Amazing project! One of these days, you may convince me to try my hand at one of these! 🙂
Calvina said...
on February 19th, 2012 at 6:43 pm
Very Cool! The score board looks like a Martha Stewart one. They can be found on Amazon.com.
Sheri (SeattleSheri) said...
on February 19th, 2012 at 7:53 pm
That is really fantastic! Thanks for sharing! How long does a project like this take to make?
Andrea Gourley said...
on February 20th, 2012 at 1:30 am
It is indeed the Martha Stewart scoreboard from amazon, they have it for a good price and it even got over here to the other side of the world in only 4 days!
Andrea Gourley said...
on February 20th, 2012 at 1:35 am
About 15 minutes to make the basic structure but it depends how much detail and ‘stuff’ you add to your card to determine how long that would take, about an hour possibly a little more?
Cristina said...
on February 20th, 2012 at 7:04 am
What a gorgeous project!! Thanks for sharing!