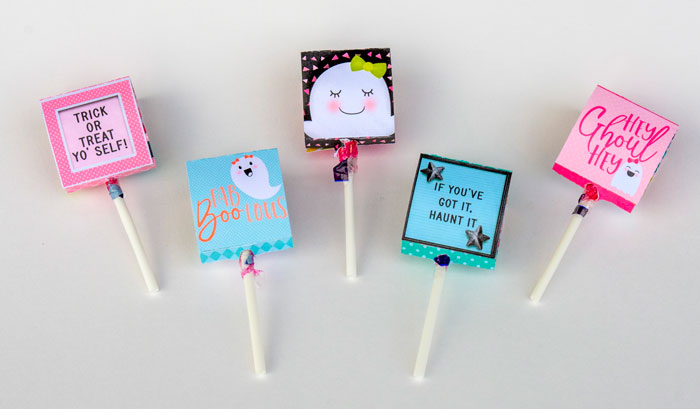
Think Outside the Album: Lollipop Covers
Our lives are busier than ever, but that doesn’t mean we don’t want to fill our world with sweetness. Sometimes, you just need a quick-and-easy craft that looks adorable, is super simple to make, and makes the recipient feel extra-special. And that’s what I’ve got for you today!
Welcome to our bonus October 2023 2nd edition of Think Outside the Album, where we look at different ways to take our digital supplies off the scrapbook page and instead, use them to make the rest of our world just a little bit sweeter! And this time, I mean that literally – because today’s project is definitely sweeter. We’re making lollipop covers!
Since Halloween is just over two weeks away, I thought this would be a fun project to share with you. It’s a way to take a simple store-bought treat and elevate it with a bit of “wow!” It’s perfect for sending to school with kids to share with the class, for giving out around the office as a sweet thank-you, or for using as party favors for your Halloween gathering. And, of course, you can stretch this craft beyond Halloween; it’s perfect for Christmas goodies and Valentine’s sweets as well as birthdays. Let’s take a look!
What you’ll need:
- lollipops, suckers, cookie pops, cake pops, or any treat-on-a-stick of your choice
- ruler, tape measure, or other tool to measure your treat
- white cardstock
- color inkjet or laser printer
- paper trimmer
- scoring tool or scoring blade for your trimmer
- long-reach hole punch
- rolling adhesive or adhesive dots
The exact measurements of your cover will depend solely on the lollipop, sucker, cookie pop, or cake pop you’re trying to cover. Always buy your pops first, then make your covers to fit.
For my samples, I’m using two different lollipops to demonstrate the two kinds of covers you might need to make. One is a flat sucker – I used Caramel Apple Pops from Tootsie – and the other is a 3D sucker with a round head – I used Chupa Chups.
Cover Style #1 – the flat lollipop
Step 1 – Measure your treat
Begin by measuring the width and height of the top of your treat. Your measurement doesn’t have to be super precise as long as you round up. You’ll want your cover to be just a smidge larger than the treat so it covers up its packaging and only shows your cute design.
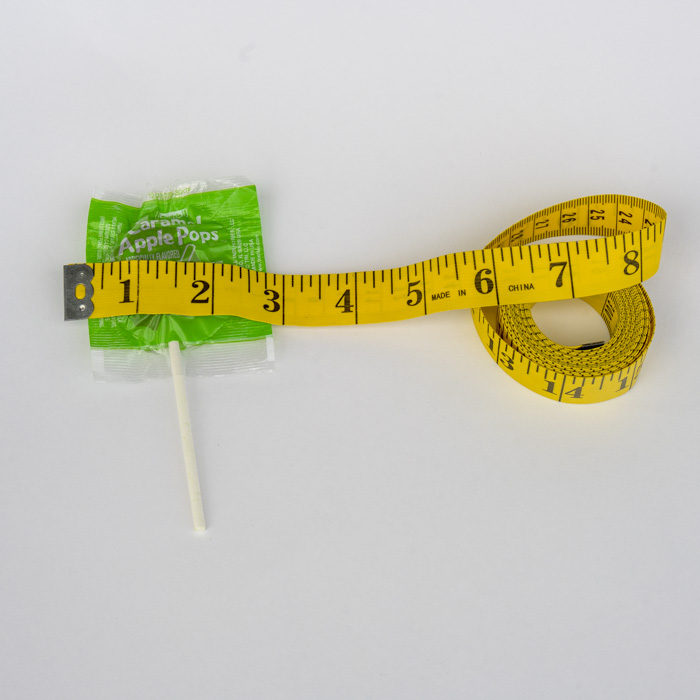
My treat measures 3″ wide and 3″ high.
Step 2 – Set up your template
This is what the template looks like for a flat lollipop cover that’s 3″ wide and 3″ high:
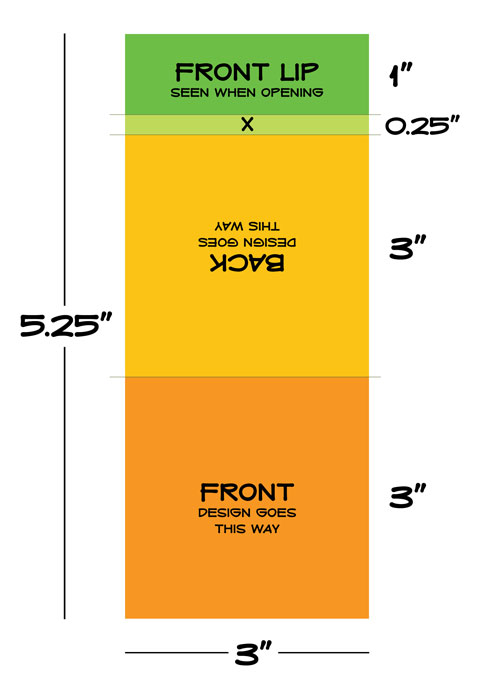
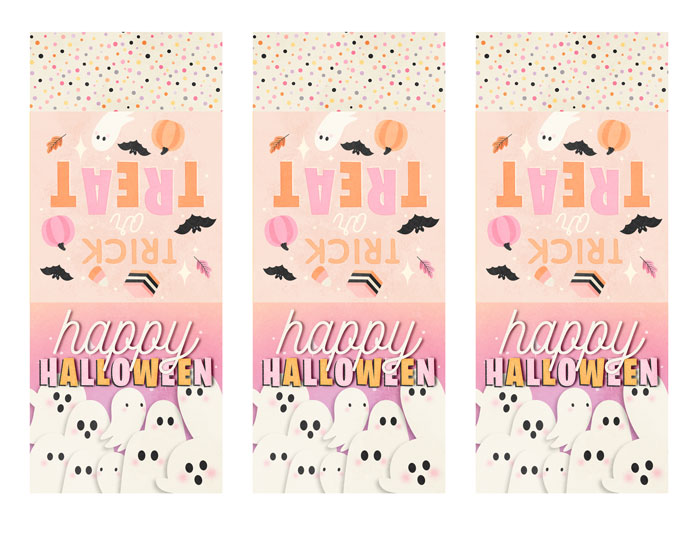
Launch your preferred digital design software and start with a blank canvas the same size as the cardstock you’ll be printing on (ex: 8.5″x11″). Set up your template for one lollipop cover using the layout above and the measurements you took of your lollipop. Once you’ve set up the template once, it’s easy to copy-and-paste to fit as many as you can on one sheet of cardstock. I was able to fit 3 covers on a single sheet in landscape orientation (11″w x 8.5″h).
Once your template is set up, it’s time to do the fun part – making it look pretty!
Step 3 – Design!
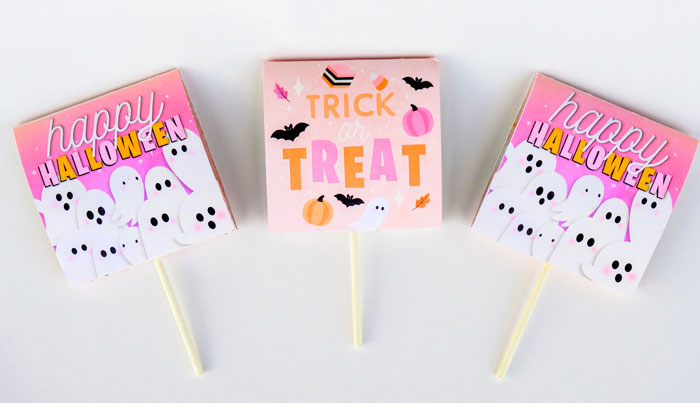
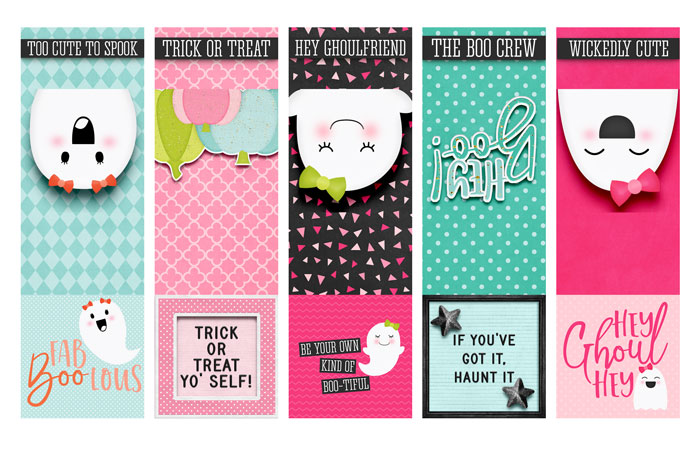
Pull out your favorite Sweet Shoppe digital scrapbooking kits and start designing! And if you want to keep it quick-and-easy, start with pre-designed journaling cards. I worked with Creepy, Kooky, Sweet & Spooky by Studio Flergs, an adorable Halloween-themed collection that was released a couple weeks ago. I needed just two journaling cards, one piece of word art, and one sheet of patterned paper to create this design:
Created with Creepy, Kooky, Sweet & Spooky Mega Collection by Studio Flergs
CAUTION: It’s important to note that the “back” panel of your design must be upside down in order to have the correct orientation once printed and folded. This is a common thing to mix up and wind up wasting cardstock when you have to fix and re-print it. Save yourself the frustration and double-check before you hit print!
HINT: If you’d like the inside of your treat cover to look as cute as the outside, I suggest printing a coordinating sheet of patterned paper on the back of your cardstock.
Created with Creepy, Kooky, Sweet & Spooky Mega Collection by Studio Flergs
Step 4 – Print
This is pretty straightforward – load up your printer with white cardstock and hit “print”.
WARNING: Allow plenty of time for the ink to dry before you move on to the next step. Nothing is more frustrating than smudging an almost dry printout when you put it through your paper trimmer. Specialty paper is expensive! So be patient and give it a little extra time to dry.
Step 5 – Trim, Score, and Punch
Now’s the time to break out your paper trimmer, scoring tool, and long-reach hole punch.
- Cut out your lollipop cover. A paper trimmer will do the job quickly and easily, but a pair of scissors or a rotary cutter and ruler will work just as well.
- Score your cover 3 times. Using a scoring blade for your trimmer or a scoring board, you’ll score your cover between each of the design blocks on your template. In the case of our 3×3 cover, that’s at 3″, 6″, and 6.25″.
- Punch a hole for the stick. Using a long-reach hole punch or an “anywhere” punch and hammer, punch a hole in the middle of the skinniest block on your cover – marked by an X on the template, in the light green block.
Step 6 – Assemble
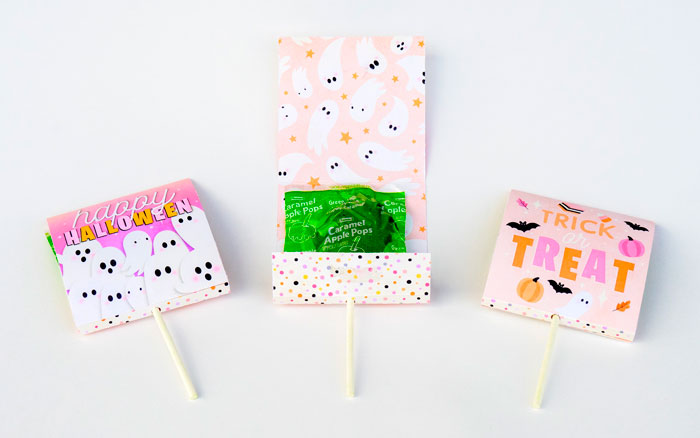
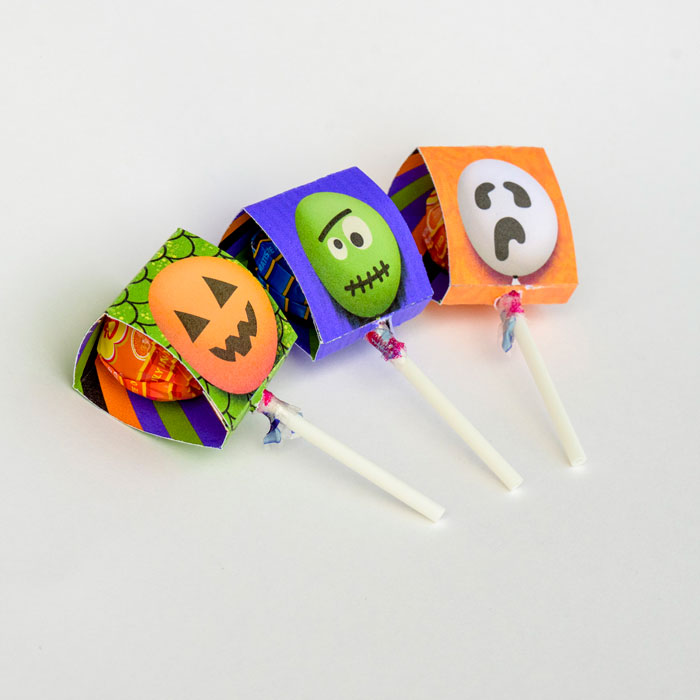
Grab your lollipops and rolling adhesive or glue dots. Fold your cover along the score lines with your main design on the outside of the folds. Insert the stick through the hole and fold the cover up around the head of the sucker. The front square goes over top of the smaller flap. Add some adhesive and stick them together, and voila! You’re done!
Created with Creepy, Kooky, Sweet & Spooky Mega Collection by Studio Flergs
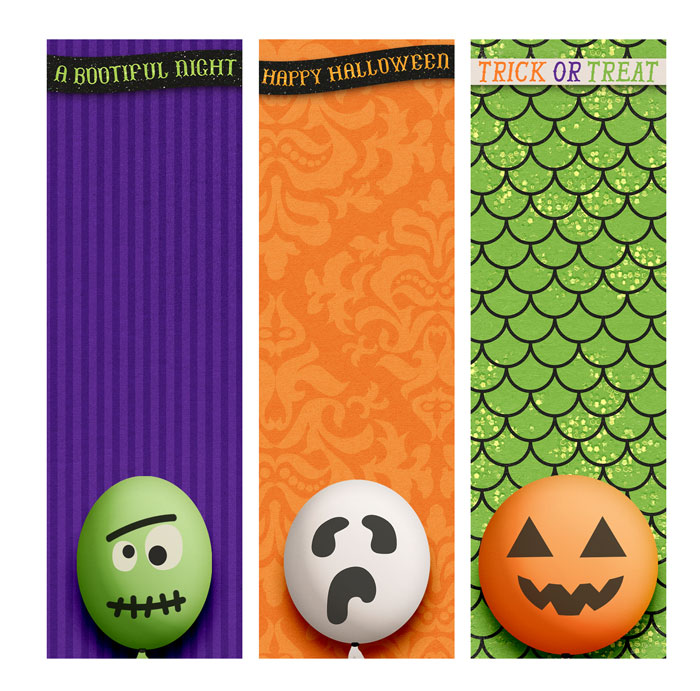
That was so fast, I decided to whip out a second set using the more masculine half of the collection:
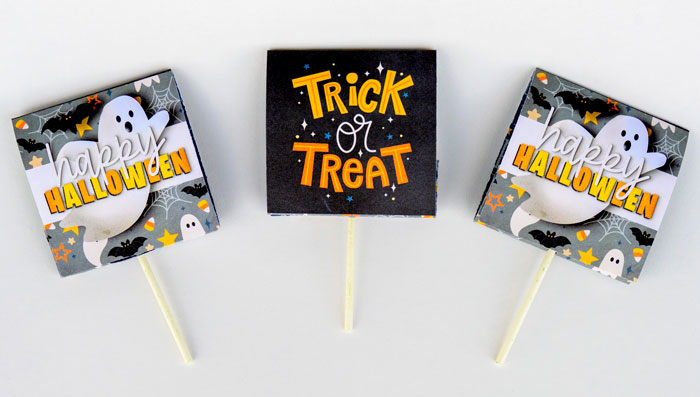
Created with Creepy, Kooky, Sweet & Spooky Mega Collection by Studio Flergs
Now that you know how to make a cover for a flat lollipop, let’s look at what you need to change if your treat isn’t flat.
Cover Style #2 – the dimensional lollipop
If you’re working with a treat that isn’t flat – like the spherical head of a Chupa Chups, Tootsie-Pop, or cake ball – the template looks a little different. You’re going to need one additional panel to cover the top of the pop.
Step 1 – Measure your treat
Begin by measuring the width, height, and thickness of the top of your treat. Your measurement doesn’t have to be super precise as long as you round up. You’ll want your cover to be just a smidge larger than the treat so it covers up its packaging and only shows your cute design.
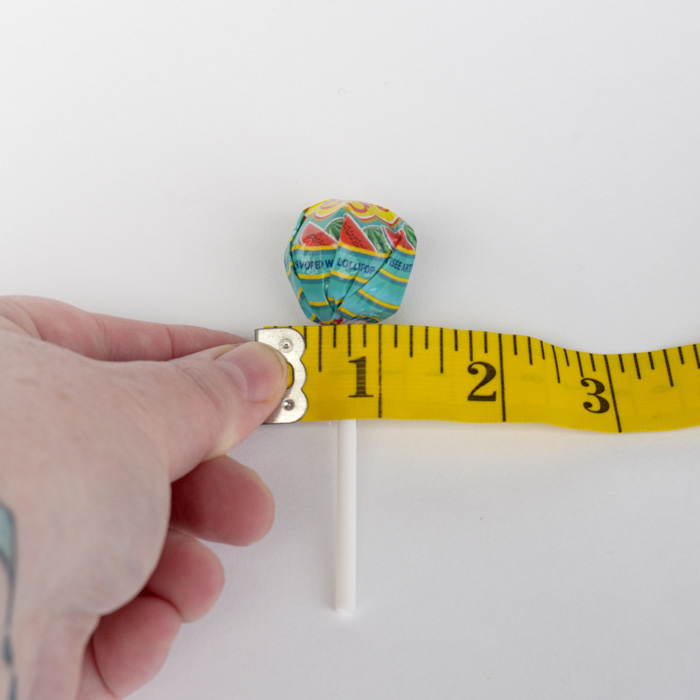
My treat measures 1.5″ wide, 1.5″ high, and 1″ thick.
Step 2 – Set up your template
This is what the template looks like for a round lollipop cover that’s 1.5″ wide, 1.5″ high, and 1″ thick:
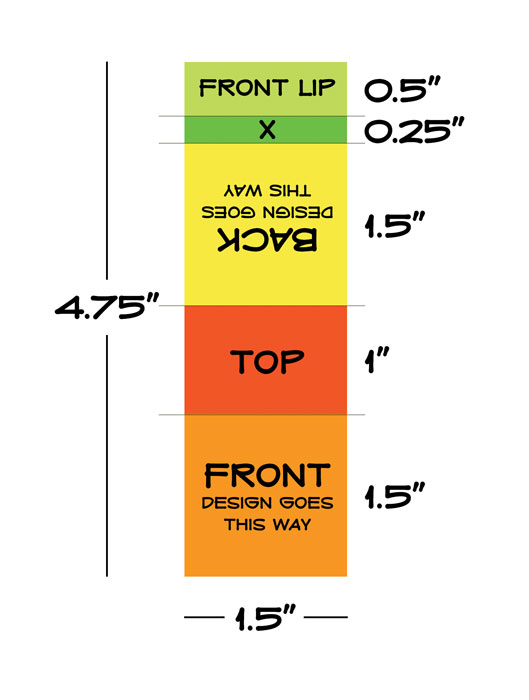
NOTE: If your treat is much thicker than 1″, you will also want to change how big the bottom of the cover is (the green block with the X).
Launch your preferred digital design software and start with a blank canvas the same size as the cardstock you’ll be printing on (ex: 8.5″x11″). Set up your template for one lollipop cover using the layout above and the measurements you took of your lollipop. Once you’ve set up the template once, it’s easy to copy-and-paste to fit as many as you can on one sheet of cardstock. I was able to fit 10 of these covers on a single sheet in portrait orientation.
Once your template is set up, it’s time to do the fun part – making it look pretty!
Step 3 – Design!
Pull out your favorite Sweet Shoppe digital scrapbooking kits and start designing! I created two sets of covers: the first using A Bootiful Night by Blagovesta Gosheva and Digital Scrapbook Ingredients, and the second using Hey Ghoul, Hey by Meghan Mullens.
Created using A Bootiful Night by Blagovesta Gosheva and Digital Scrapbook Ingredients
Created using Hey Ghoul, Hey by Meghan Mullens
Step 4 – Print
This is pretty straightforward – load up your printer with white cardstock and hit “print”.
WARNING: Allow plenty of time for the ink to dry before you move on to the next step. Nothing is more frustrating than smudging an almost dry printout when you put it through your paper trimmer. Specialty paper is expensive! So be patient and give it a little extra time to dry.
Step 5 – Trim, Score, and Punch
Now’s the time to break out your paper trimmer, scoring tool, and long-reach hole punch.
- Cut out your lollipop cover. A paper trimmer will do the job quickly and easily, but a pair of scissors or a rotary cutter and ruler will work just as well.
- Score your cover 4 times. Using a scoring blade for your trimmer or a scoring board, you’ll score your cover between each of the design blocks on your template. In the case of our 1.5×1.5 cover, that’s at 1.5″, 2.5″, 4″, and 4.25″.
- Punch a hole for the stick. Using a long-reach hole punch or an “anywhere” punch and hammer, punch a hole in the middle of the skinniest block on your cover – marked by an X on the template, in the green block.
Step 6 – Assemble
Grab your lollipops and rolling adhesive or glue dots. Fold your cover along the score lines with your main design on the outside of the folds. Insert the stick through the hole and fold the cover up around the head of the sucker. The front square goes over top of the smaller flap. Add some adhesive and stick them together, and voila! You’re done!
Created using A Bootiful Night by Blagovesta Gosheva and Digital Scrapbook Ingredients
Created using Hey Ghoul, Hey by Meghan Mullens
And that, my sweet friends, is a wrap! I hope this quick-and-easy treat helps take some of the stress of your shoulders this holiday season. And remember, this project isn’t just limited to Halloween – you can repurpose it for Thanksgiving or Friendsgiving, Christmas, Valentine’s Day, birthdays, teacher appreciation events, party favors, Scouting, and more. With the vast variety of digital scrapbooking kits available for sale in the Sweet Shoppe, the possibilities are practically endless! What ideas do you have for using this project? Tell me in the comment section below, and be sure to snap a few photographs of your next project to share in the Gallery. I can’t wait to see what you create when you Think Outside the Album!


bienejen said...
on October 12th, 2023 at 11:45 am
Very cute idea!
June T. said...
on October 30th, 2023 at 12:49 am
happy that i found this page. the designs are so cute. kids will be super happy!!!!