Think Outside the Album: Magnetic Bookmarks 7/25
It’s time for another installment of Think Outside the Album, where we look at different ways to take our digital supplies off the scrapbook page and instead, use them to make the rest of our world just a little bit sweeter!
We started this series with custom candy bar wrappers before moving on to customizing double-walled tumblers; and last time, we stepped up the complexity quite a bit with our post on iron-ons for t-shirts and home decor and printing custom fabric for creating apparel and accessories.
This time, I thought we’d tackle a project that’s fun, inexpensive, and incredibly versatile, but above all else, easy. Best of all, there’s probably only one thing you’ll need to purchase to make these! I bet you already have all the other supplies in your craft stash.
I’m talking about magnetic bookmarks.
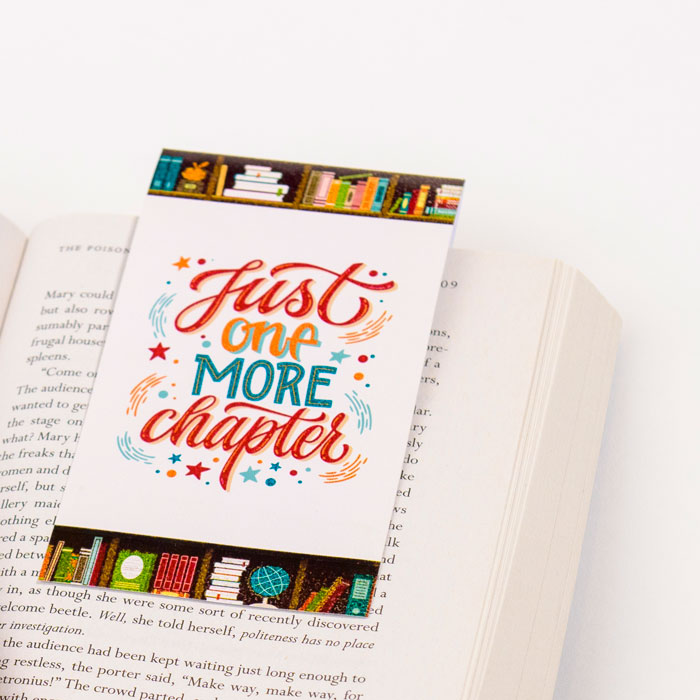
Have you ever seen one? Unlike a standard bookmark which is slid between two pages and can easily fall out, a magnetic bookmark folds over the page and grips it. Thanks to the power of two thin magnetic strips, it hangs onto the page and is much less likely to fall out of the book.
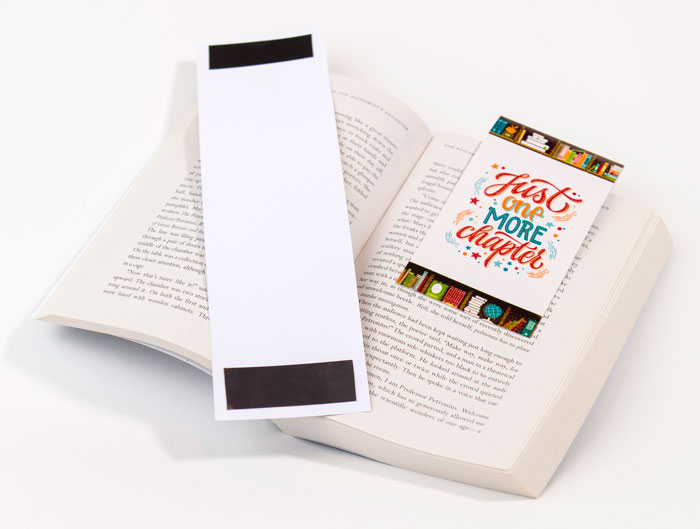
Now, I know what you’re thinking – and yes, many of us indeed prefer to use e-readers like Kindles, iPads, Nooks, or other tablets, but there are still lots of times a physical bookmark comes in handy. You can use it in your planner or a recipe book, to mark your page in a magazine, or to hold your spot in a binder full of printed information. Kids are still given lots of printed schoolbooks, and college-age students are required to purchase printed textbooks. Many older family members prefer to check out printed library books. All of those situations are fantastic opportunities for using magnetic bookmarks as adorable little gifts!
This is the kind of project you can make as simple or as complex and over-the-top as you desire. To begin, I’m going to show you how to make a quick and simple magnetic bookmark using only 2 digital elements: a decorative journaling card and a sheet of digital paper. Then, we’ll get a little more complex in our design and create a shaped bookmark. Finally, I’ll wrap up this post with a magnetic bookmark that has a major WOW factor. Let’s get started!
Project #1: Quick & Simple Magnetic Bookmark
What you’ll need:
- Color Printer (either inkjet or laser is fine)
- White cardstock or heavyweight paper (I recommend 48lb and up)
- Thin magnets backed with adhesive
- You can buy this in paper-sized sheets, as rolls of tape, or as pre-cut strips or squares.
- There are lots of brands available, and I don’t advocate any one over another.
- That said, I used X-Bet Magnet’s Flexible Magnetic Paper with Strong Self Adhesive. I paid approximately $14.00 for 5 8×10 sheets, which will make a slew of bookmarks.
- Scissors
- optional: paper trimmer
- optional: scoring blade or scoring board
- optional: bone folder
Step 1: Create your bookmark’s design.
I opened my favorite digital design software and started with a blank canvas the same size as the cardstock I’d be printing on (8.5″ x 11″). After setting up 0.25″ margins, I divided the page in half vertically to determine just how tall I could make my bookmark. Keep in mind this will fold in half, top to bottom, so the final size can be no bigger than 1/2 the height of your printable area.
My printable area was 10.5″, so my bookmark height will be 5.25″. With me so far?
Since I’m keeping this simple, my bookmark will be 3″ wide – the same width as a standard decorative scrapbooking card. Here’s what my template looks like:
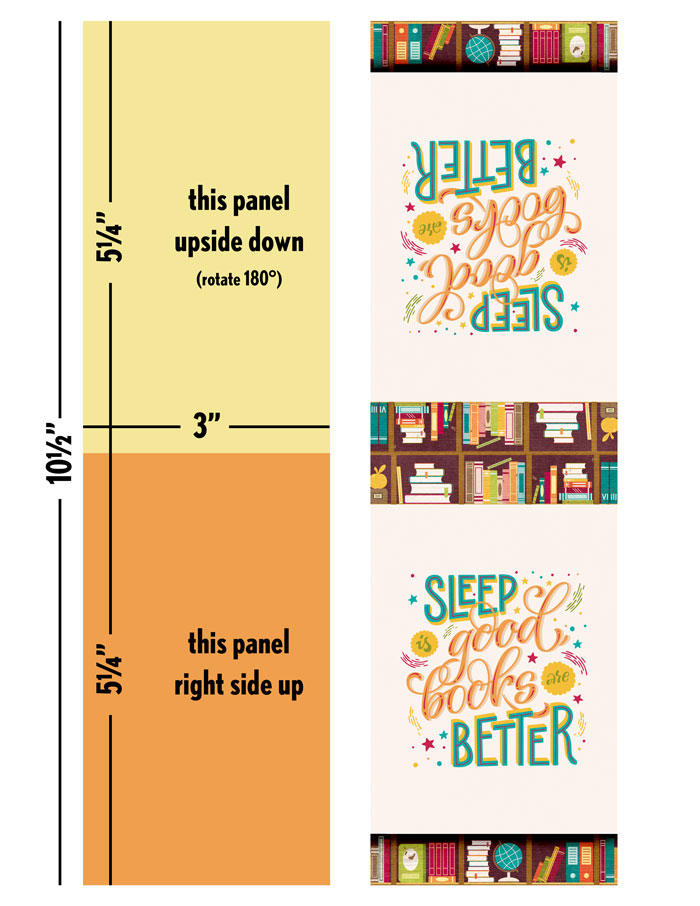
WARNING: It’s important to note that the top half of your design must be upside down and the bottom half must be right side up in order to have the correct orientation once printed and folded. This is a common thing to mix up and wind up wasting cardstock when you have to fix and re-print it. Save yourself the frustration and double-check before you hit print!
Once I had my template set up for sizing, I dragged in one card and one piece of patterned paper, clipped them to the bottom rectangle, and added a drop shadow. These supplies are from the gorgeous book-themed kit Turn The Page by LJS Designs. It’s fantastic for creating bookmarks!
When I was happy with my design, I duplicated those layers, flattened them, rotated them 180°, and clipped them to the top rectangle. Design finished! It doesn’t have to be complicated.
Step 2: Print your bookmark.
This is pretty straightforward – load up your printer with cardstock or heavy-weight paper and hit “print”. Glossy or matte, it’s your choice … you can also give photo paper a try if you’d like.
WARNING: Allow plenty of time for the ink to dry before you move on to the next step. Nothing is more frustrating than smudging an almost dry printout when you put it through your paper trimmer. Specialty paper is expensive! So be patient and give it a little extra time to dry.
Step 3: Assemble your bookmark.
Assembling your bookmark is easy as 1-2-3: 1 – you’re going to cut it out, 2 – you’re going to fold it and score it, and 3 – you’re going to attach the two magnets. How you do that all depends on what tools you have and prefer to use.
- Cut out your bookmark. My trusty paper trimmer did the job quickly and easily, but a pair of scissors or a rotary cutter and ruler will work just as well.
- Fold your bookmark in half. If you have a scoring blade for your trimmer or a scoring board, measure your bookmark’s height (in my case, 5.25″) from one of the short ends and score a line through the center of the bookmark. If you don’t have one of these tools, don’t sweat it. Simply fold your bookmark in half, wrong sides together, matching the short ends. Do this slowly and carefully to make sure you get an accurate fold. Then, run a bone folder (or your fingernail) along the fold to press it flat. Flip the bookmark over and run it over that side of the fold as well.
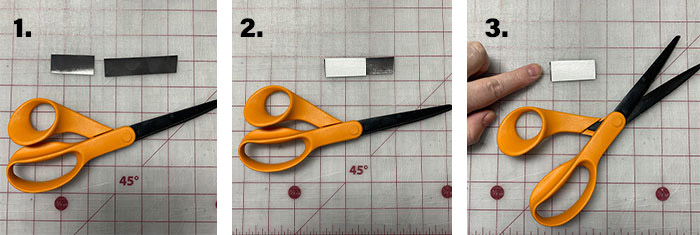
- Attach your magnets. Depending on the type of magnets you bought, you will probably need to cut off a piece from the roll or sheet. How big of a piece do you need? Well, if you’ve got a roll of magnet tape, cut a piece that’s slightly less than the width of your bookmark. If you have a magnetic sheet, cut a piece that wide by 1″ high.
PRO TIP: After you cut your first piece (image below, see #1), turn it around and place it face-to-face against the roll or sheet so that the magnets snap together (2). Once you have it lined up and the magnets are clinging properly, trim your second piece so it matches exactly (3). You’ll want to do it this way because the magnetic fields aren’t completely even along the tape and sheets. You can feel that as you try to put two pieces together, they will resist at some points and then snap together a quarter inch to the left or right. Ensuring your pieces match up and attach properly when you cut them means your bookmark will attach properly and lie flat in the book.
Once you’ve got both pieces trimmed, peel the backing paper off one piece and stick it on the wrong side of your bookmark at the opening end (away from the center fold). Don’t place it right at the edge, but about 1/2″ away (image below, see #1).
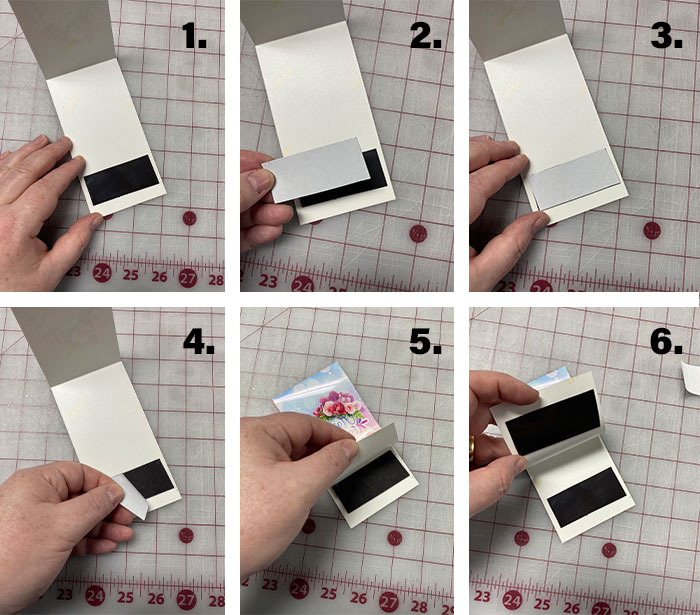
Now peel the backing paper off the other piece of magnet but don’t stick it on the other side of the bookmark. Instead, place it on top of the first magnet with the magnetic sides face-to-face and the adhesive side facing up. Once it’s clicked in place and the magnets are holding together, carefully fold your bookmark in half and press it together (5). The second magnet has now adhered to the second side of your bookmark (6) and it’s perfectly aligned to the first.
How quick was that?!? It’s a simple formula – and template – you can use as a starting point for all sorts of creativity. Add word art, stickers, flowers, and more to amp up the design. Give each side of the bookmark a different design (just ensure they’re rotated correctly before you print them!). There’s so much you can do with this basic template!
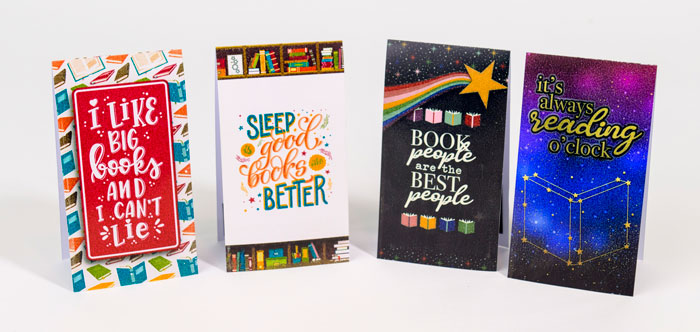
The two on the left make use of LJS Designs’ Turn the Page Bundle, and the two on the right are made with papers and elements from Traci Reed’s Ex Libris Galaxias products.
There’s a slew of book-themed kits in the Shoppe that would make fun bookmarks for all the readers in your life.
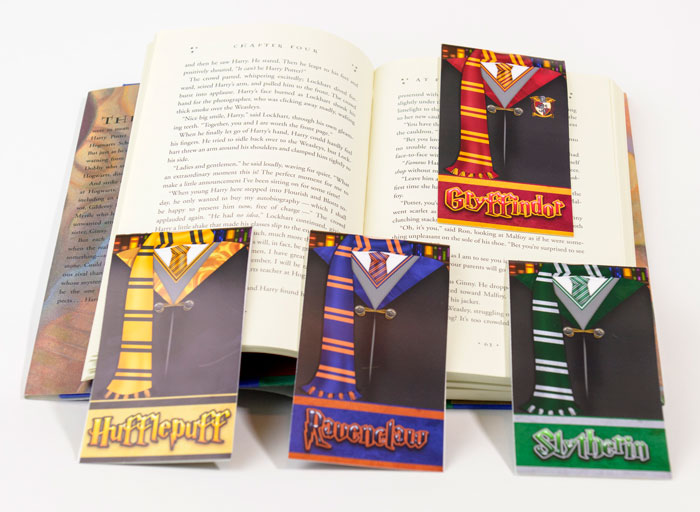
Made with cards and papers from The Boy Who Lived by Studio Flergs and Traci Reed
These are specifically for the Harry Potter fans out there. These bookmarks are a perfect way for the Potterhead in your life to show off their House pride. Or if there’s a Harry Potter-themed party in your future, these would make cute party favors!
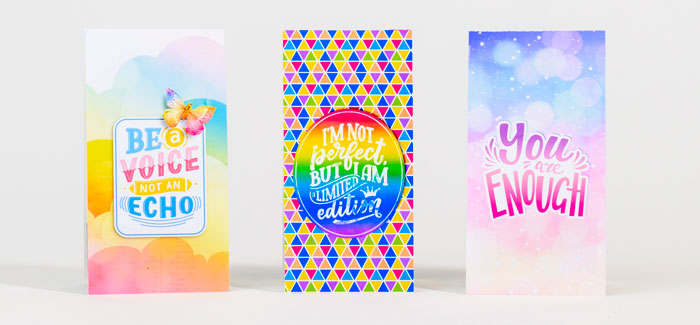
Made with affirmation stickers and cards from Daily Dose Words by LJS Designs and Just the Way by LJS Designs, and supplies from Look Up: When It Rains Look For Rainbows by Kristin Cronin-Barrow and Carpe Diem by Meghan Mullens and WendyP Designs
Do you have a child heading off to college soon? Whip up some magnetic bookmarks with affirmations to remind them just how much you love them!
One of the best things about these is their small size. You can slide them into an envelope and send it to your student for the cost of a single postage stamp.
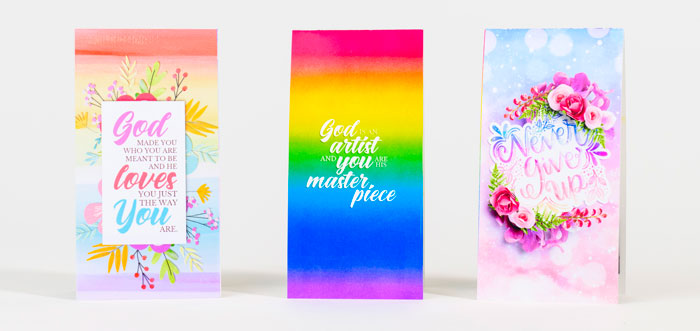
Made with affirmation stickers and cards from Daily Dose Words by LJS Designs and Just the Way by LJS Designs, and supplies from Look Up: When It Rains Look For Rainbows by Kristin Cronin-Barrow and Carpe Diem by Meghan Mullens and WendyP Designs
With your imagination and the wide range of products from The Sweet Shoppe, the possibilities for this project are endless!
Project #2: Shaped Bookmarks
Now that you know how a magnetic bookmark works and how to make a rectangular one, you’re ready to branch out and start playing with shape. Because the bookmark doesn’t have to be squared off – all you really need is enough space for a strip of magnet on each side so they can clamp to the page.
SugarBabe Jacinda went for a pennant or ribbon-style bottom on her Snoopy bookmarks, and they turned out great!

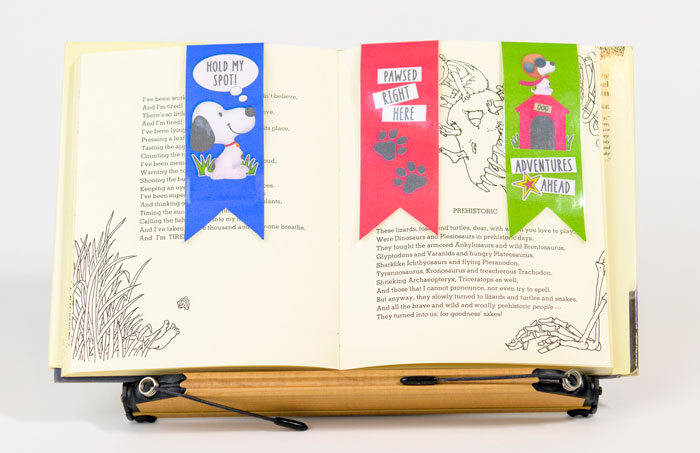
Made with Animated Dreams: Peanuts by Meagan’s Creations & WendyP Designs
Knowing that younger readers often have sticky fingers, I decided to laminate these for added durability. I have a small Scotch brand Thermal Laminator ($30) that I bought years ago and it was fun to pull it out for this project. Do you have a Xyron machine somewhere you haven’t used in a while? Remember they have lamination cartridges! And you can always take your finished bookmarks to an office supply store, teacher supply store, or Mardel’s and pay by the inch to have them laminated. Be sure to call around first as prices can vary greatly.
I experimented with adhering the magnets to the bookmark both before and after laminating and discovered that the type and thickness of lamination I’m using doesn’t interfere with the magnet at all. In other words, it works just as well with the magnet under the lamination. How perfect is that for a small child? But remember that results will vary based on the supplies you use, so be sure to run a test with your magnets and your lamination first if you want to go this route.
SugarBabe Rebecca (MamaBee) came up with a clever design for her bookmarks by going with a narrow strip and adding a circle:

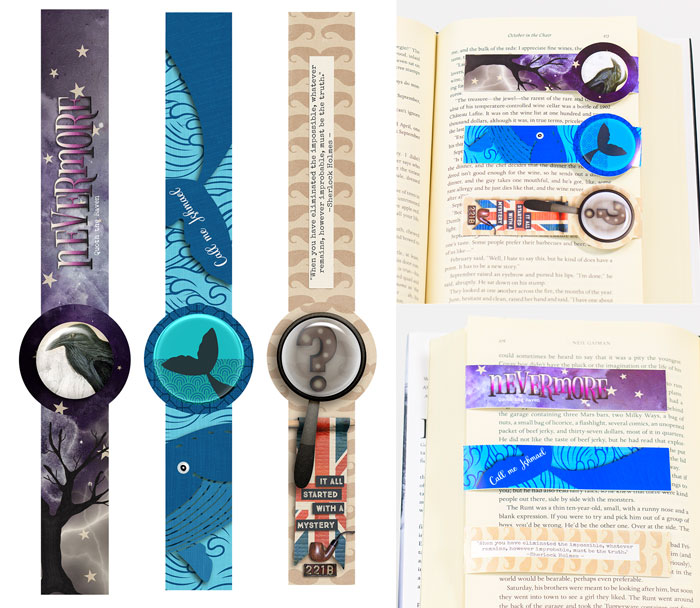
Sherlock Holmes bookmark made with Through the Spyglass by WendyP Designs and magnifying glass from Day at the Museum, Nevermore bookmark made with Scrap Your Stories: Halloween by Studio Flergs and Kristin Cronin-Barrow, and Moby Dick bookmark made with 50 States: Alaska by Kelly Bangs Creative
Isn’t that cool? I love the unique design and quotes on the reverse.
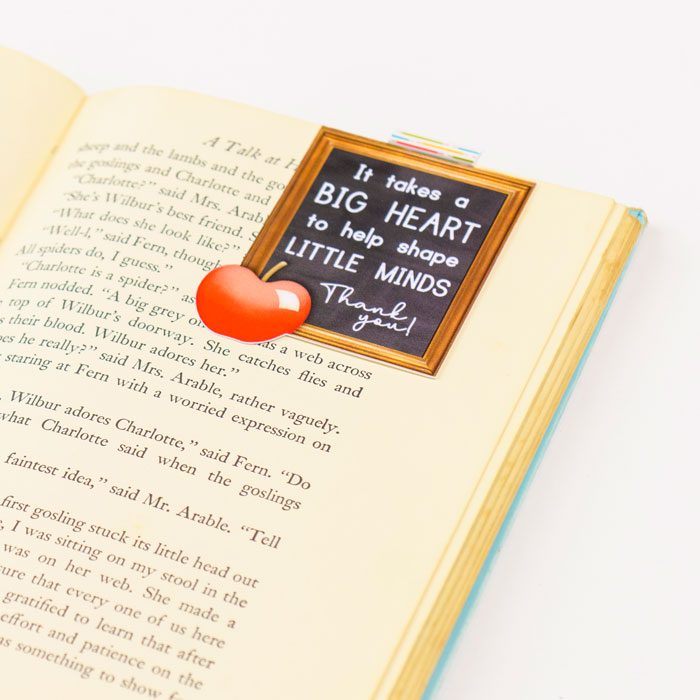
Made with School is Back by JoCee Designs
Have a teacher in your life that could use a little appreciation? A magnetic bookmark is a great way to say thank you! I used my Cricut machine and its Print & Cut feature to make this project even easier, and once I saw how fast it was, I used it for all the bookmarks in the remainder of this post.
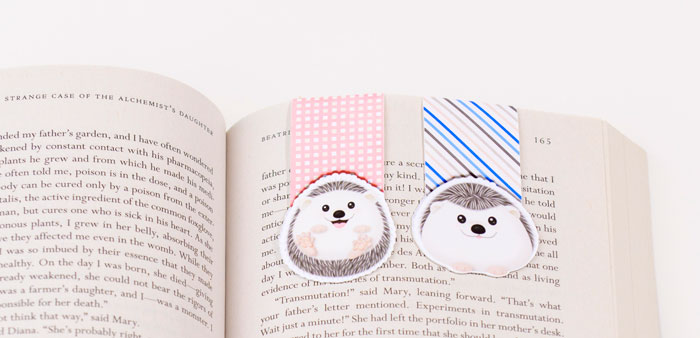
Made with Little Pets Hedgie by lliella designs
My stepdaughter is absolutely obsessed with hedgehogs, so I made these little guys as a “just because I’m thinking of you” gift. Aren’t they adorable?
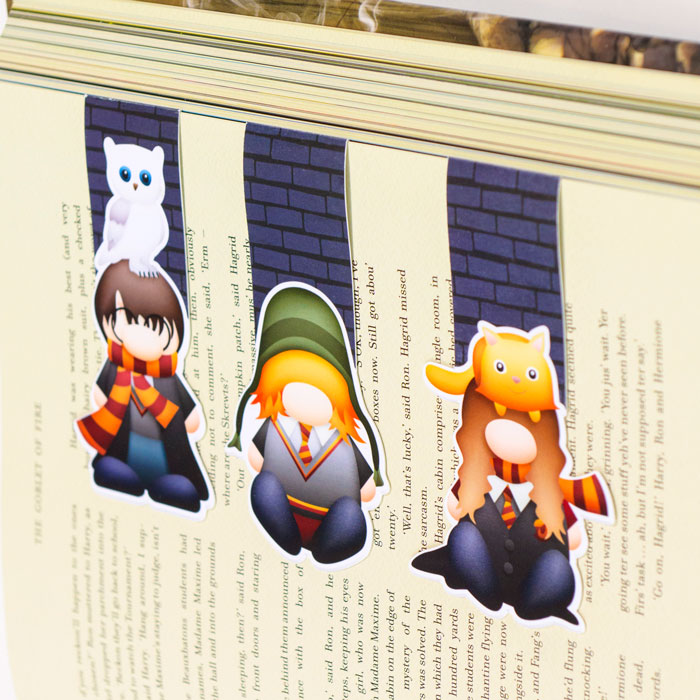
Made with Expecto Patrognome by WendyP Designs
And I decided my Illustrated Editions of Harry Potter weren’t complete without these precious gnome versions of Harry, Ron, and Hermione. Wait until you see what I did for the other side…
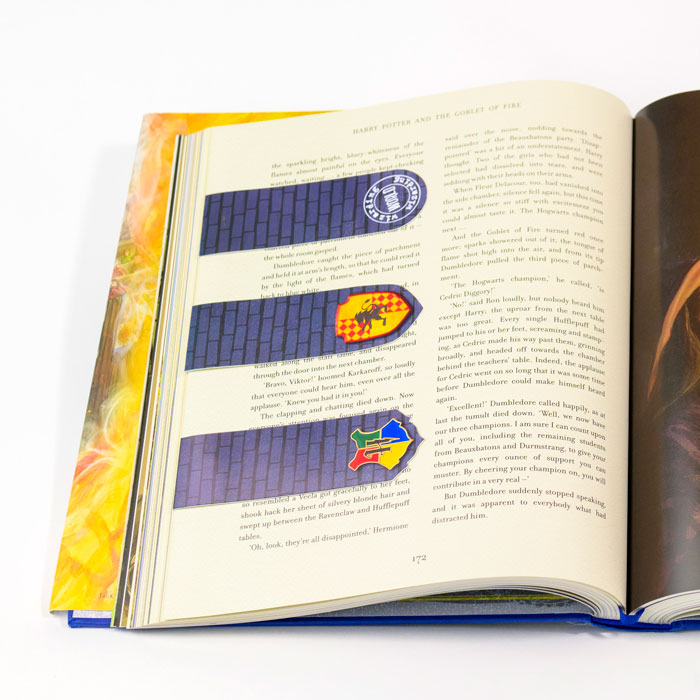
Made with Expecto Patrognome by WendyP Designs
Okay, one more shaped magnetic bookmark before we move on to our final project – the one with the WOW. For this one, I wanted a bookmark that wouldn’t slide all the way down to the edge of the book’s page, but instead would have part of the bookmark sitting above the book and be visible when the cover is shut. The solution was easy: crease and fold the bookmark partway down from the center, and then use adhesive to stick the inside center together. Check it out:
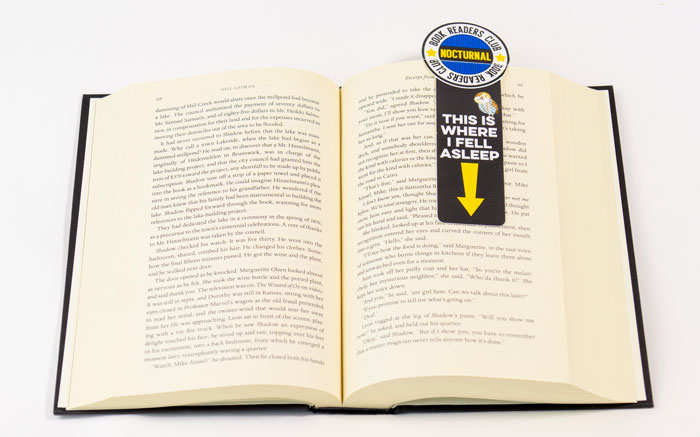
Made with All Booked Up by Erica Zane
I scored my bookmark just below the black bar with the word “NOCTURNAL” on each side and then glued the top half of the circle shut. Now the bookmark only opens as far as that line, so this is what it looks like when the book is shut:
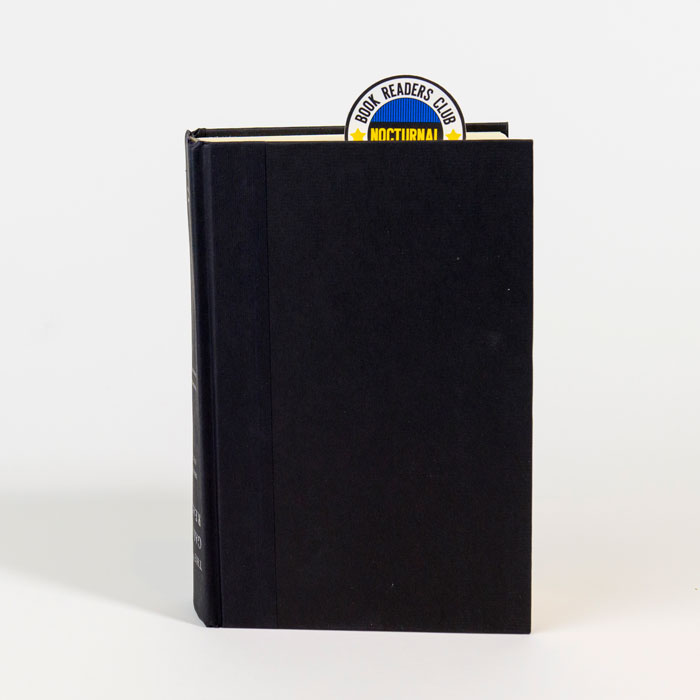
Made with All Booked Up by Erica Zane
Isn’t that slick? And it’s a little trick we’ll need for this final project.
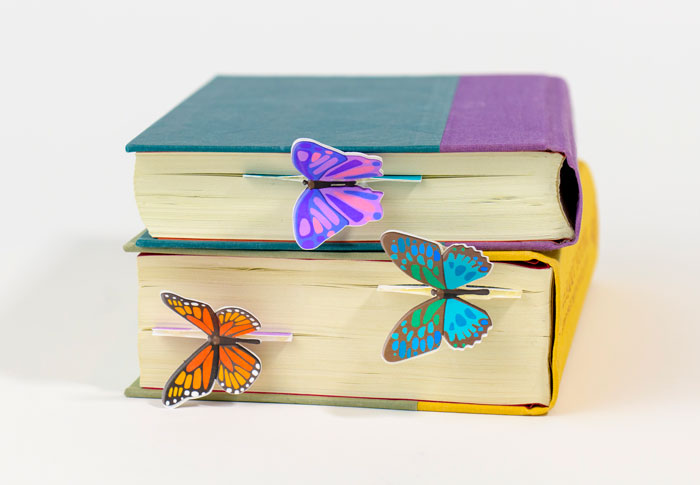
Project #3: Butterfly Bookmarks
I promised you a project with a little bit of WOW. Hopefully this doesn’t disappoint:
Made with Butterfly Season by Clever Monkey Graphics
Made with Butterfly Season by Clever Monkey Graphics
Made with Butterfly Season by Clever Monkey Graphics
I found inspiration for this project where all good ideas come from … Pinterest. The original project was a standard flat bookmark, but I knew it could be adapted for a bifold magnetic bookmark. So I pulled out the absolutely stunning kit Butterfly Season by Clever Monkey Graphics and got to work.
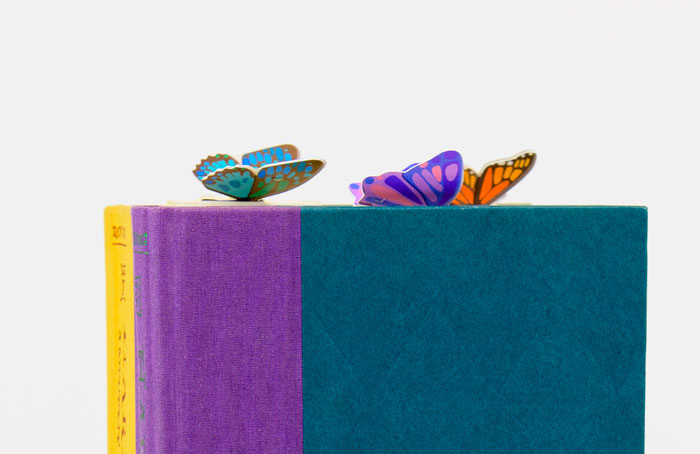
This is what the three pieces of the completed design looks like:
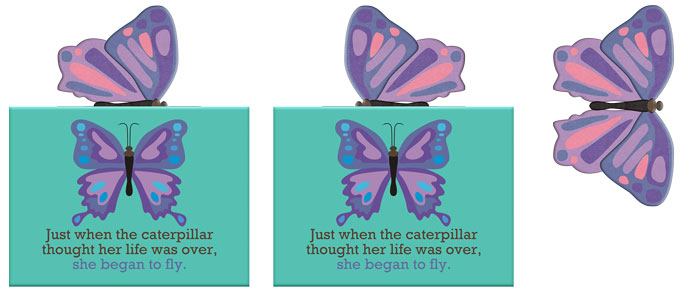
Made with Butterfly Season by Clever Monkey Graphics
After running this through the Print & Cut functions on my Cricut Maker 2, I had three perfectly cut pieces to work with. Here’s what I did next:
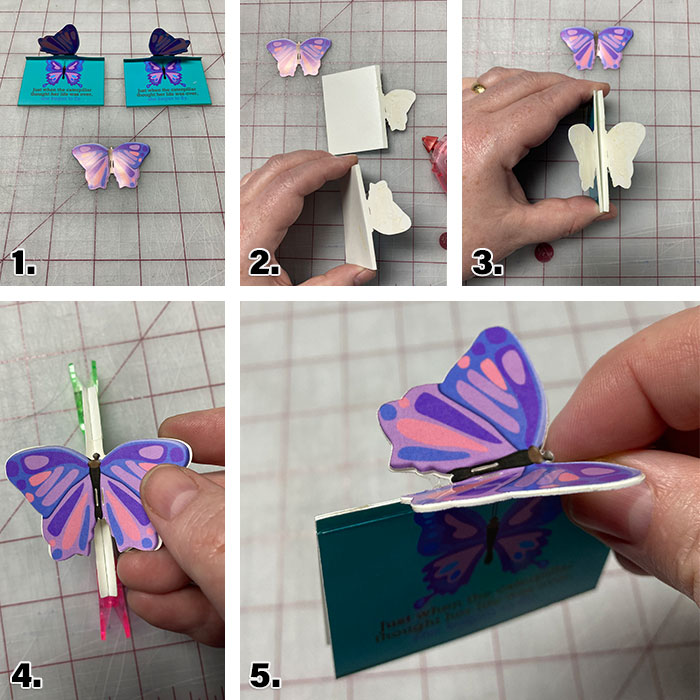
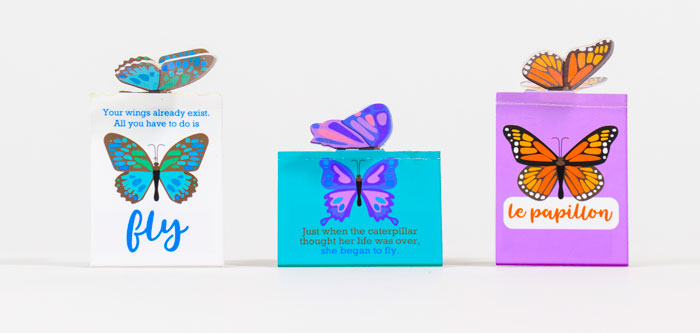
- I scored the two cards about 1/4″ below the top edge and folded them back, rubbing the crease with my bone folder.
- I applied adhesive to the top of both cards down to the fold line – so all over the butterfly wing and body as well as straight across that 1/4″ strip of card.
- I placed the cards together – adhesive not touching – so the back of the butterfly was facing up.
- I took the third piece, the butterfly, and carefully lined it up and pressed it to the adhesive on the cards’ wings.
- Once the butterfly was pressed together, I pressed the cards together along the 1/4″ strip at the top and made sure they were good and stuck.
And then I put my magnets on the inside of the two cards and my bookmark was complete.
I’m so tickled with how the butterflies turned out, I may just make myself an entire collection of them!
And that, my friends, is a wrap for this edition of Think Outside the Album! Hopefully I’ve got you thinking about all the possibilities for magnetic bookmarks. From useful tools around the house to back-to-school art projects for the kids, thank you gifts for teachers and love mail for college students and even themed party favors – magnetic bookmarks are versatile, inexpensive to make, and best of all, quick and easy. What ideas do you have for using magnetic bookmarks? Tell me in the comment section below and be sure to snap a few photographs of your next project to share in the Gallery. I can’t wait to see what you create when you Think Outside the Album!


wendyp said...
on July 26th, 2022 at 8:37 am
OMG these are amazing and so inspiring!! I always enjoy watching these blogs from you!
Charlene said...
on July 28th, 2022 at 5:46 am
These are fantastic! Thanks for the inspiration.
leablahblah said...
on August 2nd, 2022 at 8:13 am
This is so cool! Especially the butterflies one. What kind of paper/cardstock did you print/cut it on?